# OPNsense Baseline Guide with Mullvad VPN Multi-WAN, Guest, and VLAN Support
[](https://wikipedia.mutschlerhome.com/uploads/images/gallery/2025-02/1lMfvl3H7OjWGBCv-image.png)
This beginner-friendly, step-by-step guide walks you through the initial configuration of your OPNsense firewall. The title of this guide is an homage to the [pfSense baseline guide with VPN, Guest, and VLAN support](https://nguvu.org/pfsense/pfsense-baseline-setup) that some of you guys might know, and this is an [OPNsense](https://opnsense.org/) migration of it. I found that guide two years ago and immediately fell in love with the network setup. After researching for weeks, I decided to use OPNsense instead of pfSense. I bit the bullet and bought the [Deciso DEC630](https://www.deciso.com/product-catalog/dec630/) appliance. Albeit expensive and possibly overkill for my needs, I’m happy to support the open-source mission of Deciso, the maintainers of OPNsense. The only thing I regret about the purchase is that I now can’t afford the sexier-looking successor model, the [DEC690](https://shop.opnsense.com/dec600-series-opnsense-desktop-security-appliances/).
To configure OPNsense, I followed the instructions of the pfSense guide, taking notes on the differences. Some options moved to different menus or changed. As my notes grew, I decided to publish them as a guide on my website.
My goal was to create a comprehensive guide that’s easy to follow. But I tried to strike a different balance regarding the brevity of the instructions compared to the pfSense guide. It’s a matter of personal taste, but I find the instructions in that guide too verbose. I intentionally omit most of the repetitive “click save and apply” instructions and only list configuration changes deviating from defaults, making exceptions for important settings. I consider the OPNsense defaults stable enough for this approach in the hope of keeping the effort required to maintain this guide to a minimum.
I’m a homelab hobbyist, so be warned that this guide likely contains errors. Please, verify the steps yourself and do your research. I hope this guide is as helpful and inspiring to you as the pfSense guide was to me. Your feedback is always welcome and very much appreciated.
## Overview
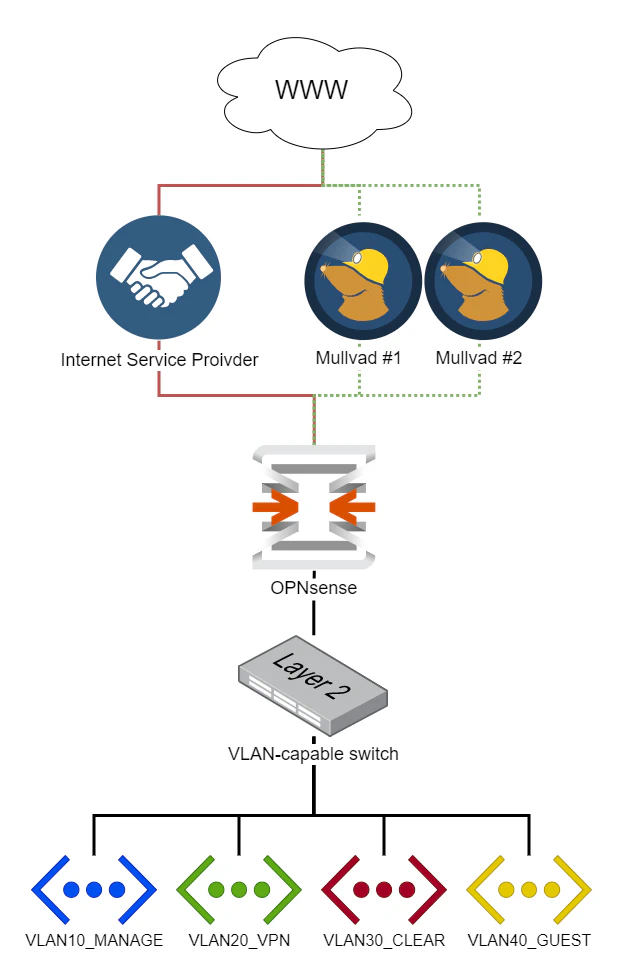
### WAN
- DHCP WAN from a single Internet Service Provider (ISP)
- [Mullvad VPN](https://mullvad.net/) multi-WAN with gateway groups
### LAN
We segregate the local network into several areas with different requirements.
#### Management Network (VLAN 10)
The Management network connects native management interfaces like WiFi access points and IPMI interfaces.
#### VPN Network (VLAN 20)
The primary LAN network uses the WireGuard VPN tunnels for outbound connections, maximizing privacy and security. If the VPN tunnels fail, outbound connections won’t be possible. Exceptions to selectively route traffic through the ISP WAN gateway are possible.
#### “Clear” Network (VLAN 30)
General-purpose web access network that doesn’t use VPN tunnels. All outgoing connections leave through the ISP WAN gateway. It serves as a backup network in case the VPN tunnels fail.
#### Guest Network (VLAN 40)
The network that visitors use. It allows unrestricted internet access. Local networks aren’t accessible.
#### LAN Network
“Native” VLAN, used to debug and test new configurations.
### DNS Services
We’ll configure a DNS resolver (Unbound), as well as a DNS forwarder (Dnsmasq) in OPNsense. Management and VPN networks will use the resolver, the Clear network will use the forwarder, and the Guest network will use Cloudflare as an external DNS resolver. [We’ll dig into the details later](https://schnerring.net/blog/opnsense-baseline-guide-with-vpn-guest-and-vlan-support/#dns).
## Hardware Selection and Installation
The original pfSense guide features a [large section of hardware recommendations](https://nguvu.org/pfsense/pfsense-baseline-setup/#Hardware%20selection) and [installation instructions](https://nguvu.org/pfsense/pfsense-baseline-setup/#Install%20pfSense).
As mentioned earlier, I bought the [Deciso DEC630](https://www.deciso.com/product-catalog/dec630/) appliance, which is why I’m not advising on hardware choices. Have a look at the [official hardware sizing & setup guidelines](https://docs.opnsense.org/manual/hardware.html) for more information. See also [Initial Installation & Configuration](https://docs.opnsense.org/manual/install.html).
I verified this guide with a clean install of OPNsense version `21.7.5`.
## Wizard
Navigate to `192.168.1.1` in your browser and login with default credentials:
- **Username**: `root`
- **Password**: `opnsense`
Click `Next` to leave the welcome screen and get started with the initial wizard configuration.
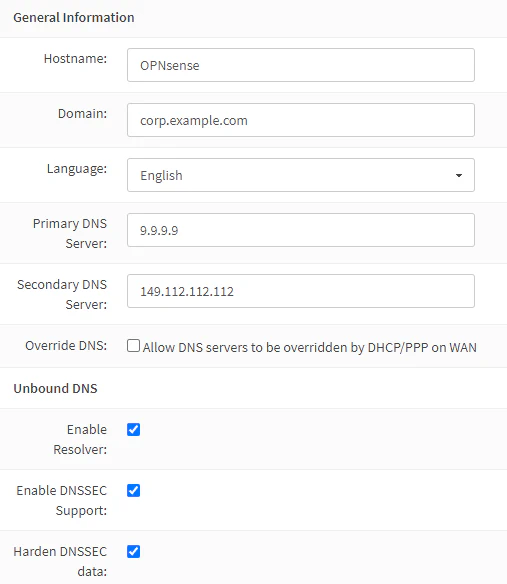
### General Information
[](https://wikipedia.mutschlerhome.com/uploads/images/gallery/2025-02/F1Vyg2uCeV2Whf7A-image.png)
I prefer using the DNS servers of [Quad9](https://quad9.org/) over the ones of my ISP. Only the Clear network will use these anyway, as secured networks use Unbound instead. The Guest network will use Cloudflare DNS servers.
For the domain, I prefer to use a subdomain of a domain name I own, like `corp.example.com`. I only use this subdomain internally. I consider the `local.lan` pattern a relic of the past. To prevent our local network structure from leaking to the outside world, we’ll later configure Unbound and Dnsmasq to treat the domain as private.
| | |
|---|
| Domain | `corp.example.com` |
| Primary DNS Server | `9.9.9.9` |
| Secondary DNS Server | `149.112.112.112` |
| Override DNS | `unchecked` |
| Enable DNSSEC Support | `checked` |
| Harden DNSSEC data | `checked` |
| | |
|---|
| Time server hostname | `0.ch.pool.ntp.org 1.ch.pool.ntp.org 2.ch.pool.ntp.org 3.ch.pool.ntp.org` |
| Timezone | `Europe/Zurich` |
| HTTP Redirect | |
|---|
| Disable web GUI redirect rule | `checked` |
| Secure Shell | | |
|---|
| Secure Shell Server | `checked` | |
| Authentication | | |
|---|
| Sudo | `Ask password` | Permit sudo usage for administrators with shell access. |
| | |
|---|
| Username | `` |
| Password | `` |
| Login shell | `/bin/csh` |
| Group Memberships | `admins` |
| Authorized keys | `` |
| Power Savings | |
|---|
| Use PowerD | `checked` |
| Power Mode | `Hiadaptive` |
| Gateway Monitoring | |
|---|
| Skip rules | `checked` |
| Miscellaneous | | |
|---|
| Firewall Optimization | `conservative` | Tries to avoid dropping any legitimate idle connections at the expense of increased memory usage and CPU utilization. |
| Firewall Maximum Table Entries | `2000000` | default is 1'000'000 |
| | |
|---|
| Disable anti-lockout | `checked` |
| | | |
|---|
| Hardware CRC | `unchecked` | Disable hardware checksum offload |
| | |
|---|
| Parent | `igb0` |
| VLAN tag | `10` |
| Description | `VLAN10_MANAGE` |
| | |
|---|
| Parent | `igb0` |
| VLAN tag | `20` |
| Description | `VLAN20_VPN` |
| | |
|---|
| Parent | `igb0` |
| VLAN tag | `30` |
| Description | `VLAN30_CLEAR` |
| | |
|---|
| Parent | `igb0` |
| VLAN tag | `40` |
| Description | `VLAN40_GUEST` |
- Select `vlan 10`, enter the description `VLAN10_MANAGE`, and click `+`
- Select `vlan 20`, enter the description `VLAN20_VPN`, and click `+`
- Select `vlan 30`, enter the description `VLAN30_CLEAR`, and click `+`
- Select `vlan 40`, enter the description `VLAN40_GUEST`, and click `+`
Click `Save`.
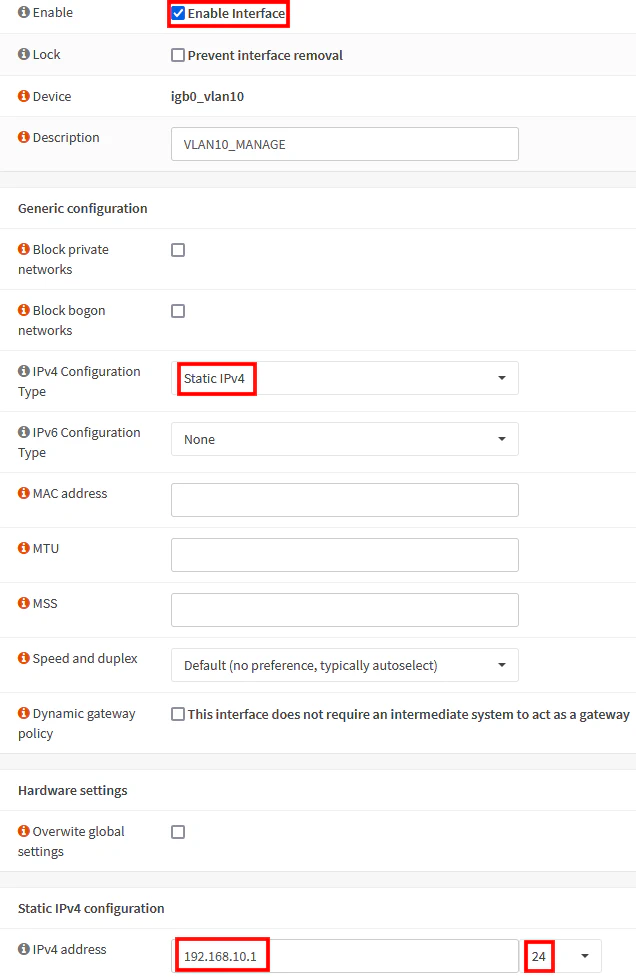
### VLAN Interface IPs
To easier remember which IP range belongs to which VLAN, I like the convention of matching the third octet of the IP with the VLAN ID. I.e., assigning the VLAN with the ID **10** the address 192.168.**10**.0/24.
[](https://wikipedia.mutschlerhome.com/uploads/images/gallery/2025-02/YzsFcaStfk9gJy40-image.png)
#### Interface: VLAN10\_MANAGE
Select the `VLAN10_MANAGE` interface.
| | |
|---|
| Enable Interface | `checked` |
| IPv4 Configuration Type | `Static IPv4` |
| IPv4 Address | `192.168.10.1/24` |
| | |
|---|
| Enable Interface | `checked` |
| IPv4 Configuration Type | `Static IPv4` |
| IPv4 Address | `192.168.20.1/24` |
| | |
|---|
| Enable Interface | `checked` |
| IPv4 Configuration Type | `Static IPv4` |
| IPv4 Address | `192.168.30.1/24` |
| | |
|---|
| Enable Interface | `checked` |
| IPv4 Configuration Type | `Static IPv4` |
| IPv4 Address | `192.168.40.1/24` |
| | |
|---|
| Enable | `checked` |
| Range | from `192.168.10.100` to `192.168.10.199` |
| | |
|---|
| Enable | `checked` |
| Range | from `192.168.20.100` to `192.168.20.199` |
| | |
|---|
| Enable | `checked` |
| Range | from `192.168.30.100` to `192.168.30.199` |
| | |
|---|
| Enable | `checked` |
| Range | from `192.168.40.100` to `192.168.40.199` |
| DNS servers | `1.1.1.1` `1.0.0.1` |
| | |
|---|
| Range | from `192.168.1.100` to `192.168.1.199` |
| | |
|---|
| Name | `mullvad-ch5-wireguard` |
| Public Key | `/iivwlyqWqxQ0BVWmJRhcXIFdJeo0WbHQ/hZwuXaN3g=` |
| Allowed IPs | `0.0.0.0/0` |
| Endpoint Address | `193.32.127.66` |
| Endpoint Port | `51820` |
| Keepalive | `25` |
| | |
|---|
| Name | `mullvad0` |
| Listen Port | `51820` |
| Tunnel Address | `` |
| Peers | `ch5-wireguard` |
| Disable Routes | `checked` |
| Gateway | `` |
- Select `wg0`, add the description `WAN_VPN0`, and click `+`
- Select `wg1`, add the description `WAN_VPN1`, and click `+`
Enable the newly created interfaces and restart the WireGuard service after. It ensures the interfaces get an IP address from WireGuard.
### VPN Gateways
[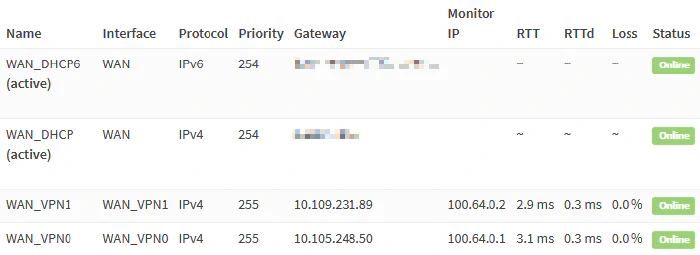](https://wikipedia.mutschlerhome.com/uploads/images/gallery/2025-02/YXjfIn6i4WAvrcWE-image.png)
Navigate to **System** → **Gateways** → **Single** and add the VPN gateways.
#### WAN\_VPN0
| | |
|---|
| Name | `WAN_VPN0` |
| Interface | `WAN_VPN0` |
| Address Family | `IPv4` |
| IP Address | `10.105.248.50` |
| Far Gateway | `checked` |
| Disable Gateway Monitoring | `unchecked` |
| Monitor IP | `100.64.0.1` |
| | |
|---|
| Name | `WAN_VPN1` |
| Interface | `WAN_VPN1` |
| Address Family | `IPv4` |
| IP Address | `10.109.231.89` |
| Far Gateway | `checked` |
| Disable Gateway Monitoring | `unchecked` |
| Monitor IP | `100.64.0.2` |
- `100.64.0.1` to `100.64.0.3` are [Mullvad’s ad-blocking and tracker-blocking DNS service servers](https://mullvad.net/it/blog/2021/5/27/how-set-ad-blocking-our-app/)
- `10.64.0.1` is the local Mullvad gateway
You can easily verify the above by running `traceroute 100.64.0.1` from a host connected to Mullvad.
#### Add Static IPv4 Configuration to the WireGuard Interfaces
OPNsense versions newer than `21.7.3` require adding static IPv4 configuration to the WireGuard interface. Otherwise, Unbound will use the default route despite setting the **Outgoing Network Interfaces** option. Other solutions exist, but I’m not sure which the “best” or most logical one is. As WireGuard integration matures, this section hopefully becomes obsolete. [You can find more information regarding this issue on GitHub](https://github.com/opnsense/core/issues/5329#issuecomment-958397043).
Navigate to **Interfaces** and edit the WireGuard interfaces.
##### IP Configuration: WAN\_VPN0
| | |
|---|
| IPv4 Configuration Type | `Static IPv4` |
| IPv4 address | `10.105.248.51/32` |
| IPv4 Upstream Gateway | `WAN_VPN0 - 10.105.248.50` |
| | |
|---|
| IPv4 Configuration Type | `Static IPv4` |
| IPv4 address | `10.109.231.90/32` |
| IPv4 Upstream Gateway | `WAN_VPN1 - 10.109.231.89` |
| | |
|---|
| Group Name | `WAN_VPN_GROUP` |
| WAN\_VPN0 | `Tier 1` |
| WAN\_VPN1 | `Tier 2` (failover) |
| Trigger Level | `Packet Loss or High Latency` |
| | |
|---|
| Network Address | `193.32.127.66/32` |
| Gateway | `WAN_DHCP` |
| Description | `Keep tunnels to mullvad-ch5-wireguard alive` |
| | |
|---|
| Network Address | `193.32.127.67/32` |
| Gateway | `WAN_DHCP` |
| Description | `Keep tunnels to mullvad-ch6-wireguard alive` |
- ISP selling user data
- ISP enforcing censorship
- ISP hijacking DNS traffic to redirect it to their DNS resolver; this makes self-hosting a DNS resolver impossible
Let’s summarize our goals:
- Use a DNS resolver for the management and VPN networks
- Resolve private domain hostnames for management and VPN networks
- Prevent DNS leaks from Unbound through the ISP WAN gateway
- Use DNS forwarding for the Clear network
- Use external DNS resolvers for the Guest network
### Resolver (Unbound)
Navigate to **Services** → **Unbound DNS** → **General**.
| | |
|---|
| Network Interfaces | `LAN` `VLAN10_MANAGE` `VLAN20_VPN` |
| DNSSEC | `checked` |
| DHCP registration | `checked` |
| DHCP static mappings | `checked` |
| Local Zone Type | `static` |
| Outgoing Network Interfaces | `WAN_VPN0` `WAN_VPN1` |
| | |
|---|
| Hide Identity | `checked` |
| Hide Version | `checked` |
| Prefetch Support | `checked` |
| Prefetch DNS Key Support | `checked` |
| Harden DNSSEC data | `checked` |
| | |
|---|
| Name | `corp.example.com` |
| Record Type | `SOA` |
| Primary Name Server | `opnsense.corp.example.com` |
| Administrator Email | `root@example.com` |
| Serial | `2021110201` (YYMMDDnn) |
| Refresh | `86400` (24 hours) |
| Retry | `7200` (2 hours) |
| Expire | `3600000` (1000 hours) |
| TTL | `3600` (1 hour) |
| | |
|---|
| Enable | `checked` |
| Listen Port | `5335` |
| Do not forward private reverse lookups | `checked` |
| Domain | IP | Description |
|---|
| `168.192.in-addr.arpa` | `192.168.20.1` | Forward reverse lookups of private IP addresses to Unbound |
| `corp.example.com` | `192.168.20.1` | Make Unbound the authoritative DNS server for private domain |
- Allow internet access for specific ports through WAN and VPN
- Allow intranet communications
- Redirect outbound DNS traffic to either Unbound or Dnsmasq
- Redirect NTP traffic to OPNsense
- Block intranet access for the Guest network
| | VLAN10 | VLAN20 | VLAN30 | VLAN40 | LAN |
|---|
| **Internet** | WAN | VPN + selective WAN | WAN | WAN | WAN |
| **Intranet** | pass | pass | pass | block | pass |
| **ICMP** | pass | pass | pass | pass | pass |
| **Anti-lockout** | yes | no | no | no | yes |
| **DNS** | Unbound | Unbound | Dnsmasq | external | Unbound |
| **NTP** | local | local | local | external | external |
| | |
|---|
| Name | `IG_LOCAL` |
| Description | `All local interfaces` |
| Members | `LAN` `VLAN10_MANAGE` `VLAN20_VPN` `VLAN30_CLEAR` `VLAN40_GUEST` |
| | |
|---|
| Name | `IG_OUT_WAN` |
| Description | `Interfaces allowing outbound WAN traffic` |
| Members | `LAN` `VLAN10_MANAGE` `VLAN30_CLEAR` `VLAN40_GUEST` |
| | |
|---|
| Name | `IG_OUT_VPN` |
| Description | `Interfaces allowing outbound VPN traffic and selective outbound WAN traffic` |
| Members | `VLAN20_VPN` |
| | |
|---|
| Name | `IG_DNS_RESOLVE` |
| Description | `Interfaces forced to use Unbound` |
| Members | `VLAN10_MANAGE` `VLAN20_VPN` |
| | |
|---|
| Name | `IG_DNS_FORWARD` |
| Description | `Interfaces forced to use Dnsmasq` |
| Members | `VLAN30_CLEAR` |
| | |
|---|
| Name | `IG_NTP` |
| Description | `Interfaces forced to use OPNsense as NTP server` |
| Members | `VLAN10_MANAGE` `VLAN20_VPN` `VLAN30_CLEAR` |
| | |
|---|
| Name | `SELECTIVE_ROUTING` |
| Type | `Host(s)` |
| Description | `External hosts reachable from IG_OUT_VPN networks through WAN` |
| | |
|---|
| Name | `PORTS_ANTI_LOCKOUT` |
| Type | `Port(s)` |
| Content | `443` (Web GUI) `22` (SSH) |
| Description | `OPNsense admin ports` |
| | |
|---|
| Name | `PORTS_OUT_LAN` |
| Type | `Port(s)` |
| Description | `Ports allowed for intranet` |
- `53` DNS
- `5353:5354` mDNS
- `123` NTP
- `21` FTP
- `22` SSH
- `161` SNMP
- `80` HTTP
- `8080`: HTTP alt / UniFi device and application communication
- `443` HTTPS
- `8443` HTTPS alt / UniFi application GUI/API as seen in a web browser
- `8880` UniFi HTTP portal redirection
- `10001` UniFi device discovery
- `5001` iPerf
- `623` IPMI
- `5900` VNC
- `3389` RDP
- `49152:65535` ephemeral ports
#### Ports Allowed to Communicate with the Internet
Allow ports for *egress* internet traffic. Amend the list depending on your needs.
| | |
|---|
| Name | `PORTS_OUT_WAN` |
| Type | `Port(s)` |
| Description | `Ports allowed for internet` |
- `21` FTP
- `22` SSH
- `80` HTTP
- `8080` HTTP alt
- `443` HTTPS
- `8443` HTTPS alt
- `465` SMTPS
- `587`: SMTPS
- `993`: IMAPS
- `49152:65535` ephemeral ports
##### A Fair Warning about Egress Filtering
As you add applications, you will be constantly amending the `PORTS_OUT_WAN` list. Depending on the application, the required ports may be poorly documented, so you’ll have to figure them out by inspecting the firewall logs. As other users have mentioned in the comments, blocking all egress traffic for all VLANs by default is probably not worth the hassle. Personally, I’ve given up on egress filtering altogether because of the administrative overhead that comes with it.
It is useful for high-security VLANs connecting devices such as cash registers in a retail store. Another example is VLANs with many untrusted IoT devices that have noisy telemetry. Putting them into a VLAN with egress filtering prevents them from “calling home”.
If you create the alias `ALL_PORTS` = `1:65535` and add it to the **Content** field of the `PORTS_OUT_WAN` alias, you can disable all egress filtering with the option of re-enabling it again later.
### NAT
Network Address Translation (NAT) is required to translate private to public IP addresses. We have the following requirements.
- Translate `IG_OUT_WAN` and `IG_OUT_VPN` network addresses to the `WAN` address range. Translating `IG_OUT_VPN` to `WAN` allows selective routing.
- Translate `IG_OUT_VPN` network addresses to the `WAN_VPN0` address range.
[](https://wikipedia.mutschlerhome.com/uploads/images/gallery/2025-02/jKFsLOMRgj0yVN7X-image.png)
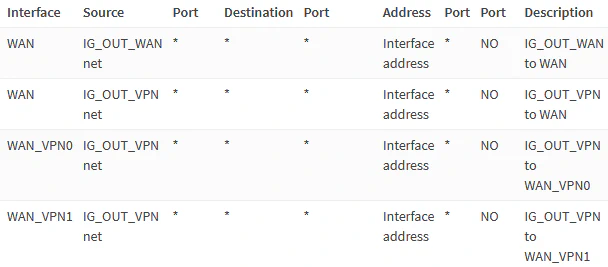
Navigate to **Firewall** → **NAT** → **Outbound**.
Select `Manual outbound NAT rule generation` and add the following rules.
#### IG\_OUT\_WAN to WAN
| | |
|---|
| Interface | `WAN` |
| Source address | `IG_OUT_WAN net` |
| Description | `IG_OUT_WAN to WAN` |
| | |
|---|
| Interface | `WAN` |
| Source address | `IG_OUT_VPN net` |
| Description | `IG_OUT_VPN to WAN` |
| | |
|---|
| Interface | `WAN_VPN0` |
| Source address | `IG_OUT_VPN net` |
| Description | `IG_OUT_VPN to WAN_VPN0` |
| | |
|---|
| Interface | `WAN_VPN1` |
| Source address | `IG_OUT_VPN net` |
| Description | `IG_OUT_VPN to WAN_VPN1` |
| | |
|---|
| Action | `Pass` |
| Interface | `LAN` `VLAN10_MANAGE` |
| Protocol | `TCP/UDP` |
| Source | `any` |
| Destination | `This Firewall` |
| Destination port range | `PORTS_ANTI_LOCKOUT` |
| Description | `Anti-lockout` |
| | |
|---|
| Action | `Pass` |
| Interface | `IG_LOCAL` |
| TCP/IP Version | `IPv4` |
| Protocol | `ICMP` |
| ICMP type | `Echo Request` |
| Source | `IG_LOCAL net` |
| Description | `Allow intranet pings` |
| | |
|---|
| Action | `Reject` |
| **Quick** | `unchecked` |
| Interface | `IG_LOCAL` |
| TCP/IP Version | `IPv4+IPv6` |
| Protocol | `any` |
| Source | `IG_LOCAL net` |
| Destination | `IG_LOCAL net` |
| Log | `checked` |
| Description | `Reject intranet traffic by default` |
| | |
|---|
| Action | `Pass` |
| **Quick** | `unchecked` |
| Interface | `IG_LOCAL` |
| Protocol | `TCP/UDP` |
| Source | `IG_LOCAL net` |
| Destination | `IG_LOCAL net` |
| Destination port range | `PORTS_OUT_LAN` |
| Description | `Allow intranet traffic` |
| | |
|---|
| Action | `Pass` |
| **Quick** | `unchecked` |
| Interface | `IG_OUT_WAN` |
| Protocol | `TCP/UDP` |
| Source | `IG_OUT_WAN net` |
| Destination / Invert | `checked` |
| Destination | `IG_LOCAL net` |
| Destination port range | `PORTS_OUT_WAN` |
| Description | `Allow internet traffic through WAN` |
| | |
|---|
| Action | `Pass` |
| Interface | `IG_OUT_VPN` |
| Protocol | `TCP/UDP` |
| Source | `IG_OUT_VPN net` |
| Destination | `SELECTIVE_ROUTING` |
| Destination port range | `PORTS_OUT_WAN` |
| Description | `Allow selected internet traffic through WAN` |
| | |
|---|
| Action | `Pass` |
| Protocol | `TCP/UDP` |
| Source | `IG_OUT_VPN net` |
| Destination / Invert | `checked` |
| Destination | `IG_LOCAL net` |
| Destination port range | `PORTS_OUT_WAN` |
| Description | `Allow internet traffic through WAN_VPN0` |
| Gateway | `WAN_VPN_GROUP` |
| | |
|---|
| Action | `Block` |
| Interface | `VLAN40_GUEST` |
| Protocol | `TCP/UDP` |
| Source | `VLAN40_GUEST net` |
| Destination | `This Firewall` |
| Destination port range | `PORTS_ANTI_LOCKOUT` |
| Log | `checked` |
| Description | `Block admin ports` |
| | |
|---|
| Action | `Block` |
| Interface | `VLAN40_GUEST` |
| Protocol | `TCP/UDP` |
| Source | `VLAN40_GUEST net` |
| Destination | `IG_LOCAL net` |
| Log | `checked` |
| Description | `Block traffic to local networks` |
| | |
|---|
| Action | `Pass` |
| Interface | `VLAN40_GUEST` |
| Protocol | `TCP/UDP` |
| Source | `VLAN40_GUEST net` |
| Destination / Invert | `checked` |
| Destination | `IG_LOCAL net` |
| Description | `Unrestricted internet access` |
| | |
|---|
| Interface | `IG_DNS_FORWARD` |
| Protocol | `TCP/UDP` |
| Source | `IG_DNS_FORWARD net` |
| Destination | `any` |
| Destination port range | `DNS` |
| Redirect target IP | `127.0.0.1` |
| Redirect target port | `5335` |
| Description | `Redirect any DNS traffic to Dnsmasq` |
| | |
|---|
| Interface | `IG_DNS_RESOLVE` |
| Protocol | `TCP/UDP` |
| Source | `IG_DNS_RESOLVE net` |
| Destination / Invert | `checked` |
| Destination | `IG_DNS_RESOLVE net` |
| Destination port range | `DNS` |
| Redirect target IP | `127.0.0.1` |
| Redirect target port | `DNS` |
| Description | `Redirect outbound DNS traffic to Unbound` |
| | |
|---|
| Interface | `IG_NTP` |
| Protocol | `UDP` |
| Source | `IG_NTP net` |
| Destination / Invert | `checked` |
| Destination | `IG_NTP net` |
| Destination port range | `NTP` |
| Redirect target IP | `127.0.0.1` |
| Redirect target port | `NTP` |
| Description | `Redirect outbound NTP traffic to OPNsense` |
- `VLAN20_VPN`
- Unbound *resolves* remote and local hostname lookups
- Redirect outbound DNS traffic to Unbound
- Reverse lookups of private IPs
- Don’t leak lookups for the private `corp.example.com` domain
- `VL30_CLEAR`
- Dnsmasq *forwards* remote hostname lookups to the system DNS servers like Quad9 *and* Unbound
- Forward local hostname lookups to Unbound
- Redirect outbound DNS traffic to Dnsmasq
- Forward local reverse lookups of private IPs to Unbound
- Don’t leak lookups for the private `corp.example.com` domain and forward them to Unbound
- `VL40_GUEST`
- Use external DNS resolvers
- Allow for clients to override DNS
- OPNsense lookups are blocked
We’ll use the `dig` tool and the firewall logs under **Firewall** → **Log Files** → **Live View** for testing.
I’ll also skip the Management network because it requires the same testing as the VPN network.
#### VLAN20\_VPN: Test DNS
Connect to `VLAN20_VPN`.
##### VLAN20\_VPN: Remote Hostname Lookups
Run `dig california.gov`:
```text
; <<>> DiG 9.16.1-Ubuntu <<>> california.gov
;; global options: +cmd
;; Got answer:
;; ->>HEADER<<- opcode: QUERY, status: NOERROR, id: 41004
;; flags: qr rd ra ad; QUERY: 1, ANSWER: 1, AUTHORITY: 0, ADDITIONAL: 1
;; OPT PSEUDOSECTION:
; EDNS: version: 0, flags:; udp: 1232
;; QUESTION SECTION:
;california.gov. IN A
;; ANSWER SECTION:
california.gov. 300 IN A 63.196.102.29
;; Query time: 36 msec
;; SERVER: 192.168.20.1#53(192.168.20.1)
;; WHEN: Tue Nov 16 22:37:34 CET 2021
;; MSG SIZE rcvd: 59
```
Here are the firewall logs showing the iterative DNS requests Unbound sends.
[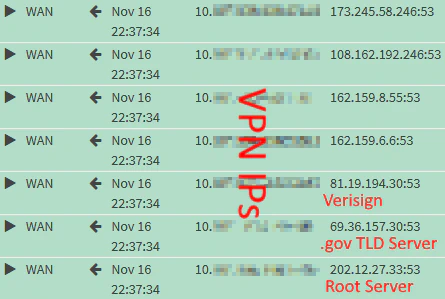](https://wikipedia.mutschlerhome.com/uploads/images/gallery/2025-02/MptYCMcLoMsmaSge-image.png)
##### VLAN20\_VPN: Local Hostname Lookups
Run `dig opnsense.corp.example.com`:
```text
; <<>> DiG 9.16.1-Ubuntu <<>> opnsense.corp.example.com
;; global options: +cmd
;; Got answer:
;; ->>HEADER<<- opcode: QUERY, status: NOERROR, id: 22291
;; flags: qr aa rd ra; QUERY: 1, ANSWER: 3, AUTHORITY: 0, ADDITIONAL: 1
;; OPT PSEUDOSECTION:
; EDNS: version: 0, flags:; udp: 1232
;; QUESTION SECTION:
;opnsense.corp.example.com. IN A
;; ANSWER SECTION:
opnsense.corp.example.com. 3600 IN A 192.168.1.1
opnsense.corp.example.com. 3600 IN A 192.168.10.1
opnsense.corp.example.com. 3600 IN A 192.168.20.1
;; Query time: 0 msec
;; SERVER: 192.168.20.1#53(192.168.20.1)
;; WHEN: Tue Nov 16 21:48:19 CET 2021
;; MSG SIZE rcvd: 105
```
##### VLAN20\_VPN: Redirect Outbound DNS Traffic
Run `dig opnsense.org @8.8.8.8`:
```text
; <<>> DiG 9.16.1-Ubuntu <<>> opnsense.org @8.8.8.8
;; global options: +cmd
;; Got answer:
;; ->>HEADER<<- opcode: QUERY, status: NOERROR, id: 17970
;; flags: qr rd ra ad; QUERY: 1, ANSWER: 1, AUTHORITY: 0, ADDITIONAL: 1
;; OPT PSEUDOSECTION:
; EDNS: version: 0, flags:; udp: 1232
;; QUESTION SECTION:
;opnsense.org. IN A
;; ANSWER SECTION:
opnsense.org. 184 IN A 178.162.131.118
;; Query time: 0 msec
;; SERVER: 8.8.8.8#53(8.8.8.8)
;; WHEN: Tue Nov 16 21:51:15 CET 2021
;; MSG SIZE rcvd: 57
```
`dig` can’t tell that OPNsense hijacked the request and thus displays an incorrect `SERVER` value. If you check the firewall logs, you shouldn’t see any requests to `8.8.8.8`. Instead, you should see iterative root server requests.
##### VLAN20\_VPN: Reverse Lookups of Private IPs
Run `dig -x 192.168.20.1`:
```text
; <<>> DiG 9.16.1-Ubuntu <<>> -x 192.168.20.1
;; global options: +cmd
;; Got answer:
;; ->>HEADER<<- opcode: QUERY, status: NOERROR, id: 9264
;; flags: qr aa rd ra; QUERY: 1, ANSWER: 1, AUTHORITY: 0, ADDITIONAL: 1
;; OPT PSEUDOSECTION:
; EDNS: version: 0, flags:; udp: 1232
;; QUESTION SECTION:
;1.20.168.192.in-addr.arpa. IN PTR
;; ANSWER SECTION:
1.20.168.192.in-addr.arpa. 3600 IN PTR OPNsense.corp.example.com.
;; Query time: 0 msec
;; SERVER: 192.168.20.1#53(192.168.20.1)
;; WHEN: Tue Nov 16 21:56:14 CET 2021
;; MSG SIZE rcvd: 96
```
If you want, additionally reverse-lookup an IP that doesn’t exist. The firewall logs mustn’t contain requests to external DNS servers.
##### VLAN20\_VPN: Verify `corp.example.com` Is Private
To test whether OPNsense is the authoritative server for `corp.example.com`, we lookup a non-existent hostname in that domain. `dig` should return an authoritative `NXDOMAIN` response with the SOA record we earlier defined earlier in the `AUTHORITY SECTION`.
Run `dig nowhere.corp.example.com`:
```text
; <<>> DiG 9.16.1-Ubuntu <<>> nowhere.corp.example.com
;; global options: +cmd
;; Got answer:
;; ->>HEADER<<- opcode: QUERY, status: NXDOMAIN, id: 44590
;; flags: qr aa rd ra; QUERY: 1, ANSWER: 0, AUTHORITY: 1, ADDITIONAL: 1
;; OPT PSEUDOSECTION:
; EDNS: version: 0, flags:; udp: 1232
;; QUESTION SECTION:
;nowhere.corp.example.com. IN A
;; AUTHORITY SECTION:
corp.example.com. 3600 IN SOA opnsense.corp.example.com. root.example.com. 2021110201 86400 7200 3600000 3600
;; Query time: 0 msec
;; SERVER: 192.168.20.1#53(192.168.20.1)
;; WHEN: Tue Nov 16 21:59:58 CET 2021
;; MSG SIZE rcvd: 110
```
##### VLAN20\_VPN: DNS Leak Test
In your browser, navigate to [dnsleaktest.com](https://dnsleaktest.com/) or [mullvad.net/check](https://mullvad.net/en/check). We expect the “leaked” DNS server to match our Mullvad public Mullvad IP. The second leak is from the **Outgoing Interface** we configured for Unbound:
[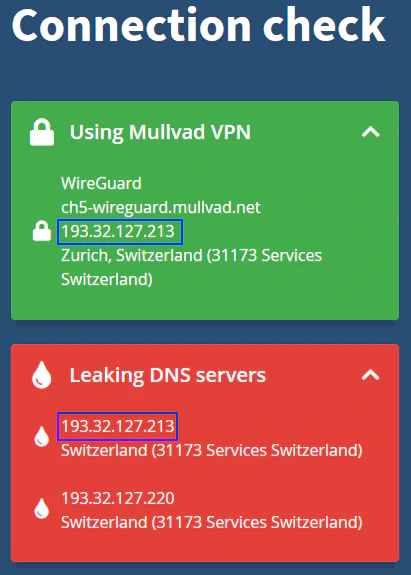](https://wikipedia.mutschlerhome.com/uploads/images/gallery/2025-02/n4d7qqjA6PmTHfhj-image.png)
#### VLAN30\_CLEAR: Test DNS
Connect to `VLAN30_CLEAR`.
##### VLAN30\_CLEAR: Remote Hostname Lookups
Run `dig opnsense.org`:
```text
; <<>> DiG 9.16.1-Ubuntu <<>> opnsense.org
;; global options: +cmd
;; Got answer:
;; ->>HEADER<<- opcode: QUERY, status: NOERROR, id: 65053
;; flags: qr rd ra; QUERY: 1, ANSWER: 1, AUTHORITY: 0, ADDITIONAL: 1
;; OPT PSEUDOSECTION:
; EDNS: version: 0, flags:; udp: 1232
;; QUESTION SECTION:
;opnsense.org. IN A
;; ANSWER SECTION:
opnsense.org. 596 IN A 178.162.131.118
;; Query time: 5 msec
;; SERVER: 192.168.30.1#53(192.168.30.1)
;; WHEN: Tue Nov 16 16:45:08 CET 2021
;; MSG SIZE rcvd: 57
```
Check the firewall logs. Enable logging for the port forward rule if you want it to show up.
[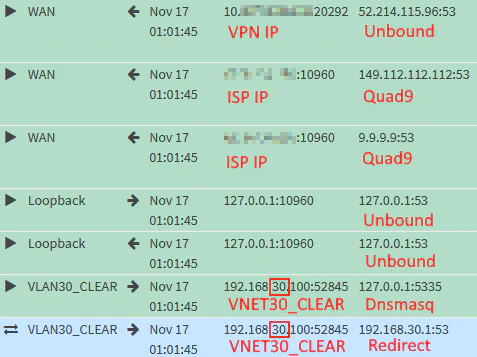](https://wikipedia.mutschlerhome.com/uploads/images/gallery/2025-02/f4VVnlL9Q3ixMSG4-image.png)
You can see that Dnsmasq forwards to the DNS servers defined under **System** → **Settings** → **General** *and* Unbound.
##### VLAN30\_CLEAR: Local Hostname Lookups
Run `dig opnsense.corp.example.com`:
```text
; <<>> DiG 9.16.1-Ubuntu <<>> opnsense.corp.example.com
;; global options: +cmd
;; Got answer:
;; ->>HEADER<<- opcode: QUERY, status: NOERROR, id: 61385
;; flags: qr aa rd ra; QUERY: 1, ANSWER: 1, AUTHORITY: 0, ADDITIONAL: 1
;; OPT PSEUDOSECTION:
; EDNS: version: 0, flags:; udp: 4096
;; QUESTION SECTION:
;opnsense.corp.example.com. IN A
;; ANSWER SECTION:
opnsense.corp.example.com. 1 IN A 192.168.1.1
;; Query time: 0 msec
;; SERVER: 192.168.30.1#53(192.168.30.1)
;; WHEN: Wed Nov 17 00:45:49 CET 2021
;; MSG SIZE rcvd: 73
```
##### VLAN30\_CLEAR: Redirect Outbound DNS Traffic
Run `dig opnsense.org @8.8.8.8`:
```text
; <<>> DiG 9.16.1-Ubuntu <<>> opnsense.org @8.8.8.8
;; global options: +cmd
;; Got answer:
;; ->>HEADER<<- opcode: QUERY, status: NOERROR, id: 34638
;; flags: qr rd ra; QUERY: 1, ANSWER: 1, AUTHORITY: 0, ADDITIONAL: 1
;; OPT PSEUDOSECTION:
; EDNS: version: 0, flags:; udp: 1232
;; QUESTION SECTION:
;opnsense.org. IN A
;; ANSWER SECTION:
opnsense.org. 430 IN A 178.162.131.118
;; Query time: 3 msec
;; SERVER: 8.8.8.8#53(8.8.8.8)
;; WHEN: Tue Nov 16 00:12:15 CET 2021
;; MSG SIZE rcvd: 57
```
We confirm it works by looking at the firewall logs again:
[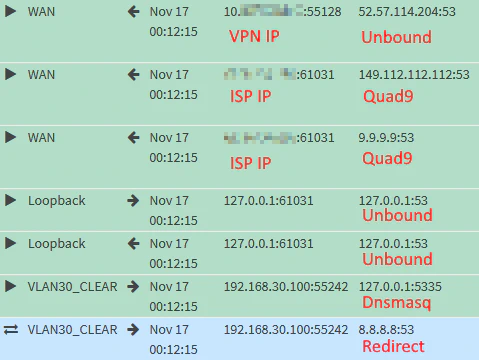](https://wikipedia.mutschlerhome.com/uploads/images/gallery/2025-02/Bw7kapI3oiWSTUDJ-image.png)
##### VLAN30\_CLEAR: Forward Reverse Lookups of Private IPs to Unbound
Run `dig -x 192.168.20.1`:
```text
; <<>> DiG 9.16.1-Ubuntu <<>> -x 192.168.20.1
;; global options: +cmd
;; Got answer:
;; ->>HEADER<<- opcode: QUERY, status: NOERROR, id: 20607
;; flags: qr aa rd ra; QUERY: 1, ANSWER: 1, AUTHORITY: 0, ADDITIONAL: 1
;; OPT PSEUDOSECTION:
; EDNS: version: 0, flags:; udp: 1232
;; QUESTION SECTION:
;1.20.168.192.in-addr.arpa. IN PTR
;; ANSWER SECTION:
1.20.168.192.in-addr.arpa. 3600 IN PTR OPNsense.home.schnerring.net.
;; Query time: 1 msec
;; SERVER: 192.168.30.1#53(192.168.30.1)
;; WHEN: Wed Nov 17 00:09:05 CET 2021
;; MSG SIZE rcvd: 96
```
The firewall logs confirm it works.
[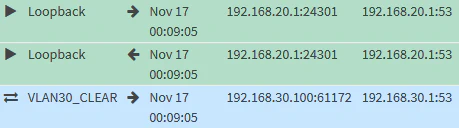](https://wikipedia.mutschlerhome.com/uploads/images/gallery/2025-02/FbjujbORRIL351qF-image.png)
##### VLAN30\_CLEAR: Verify `corp.example.com` Is Private
Run `dig nowhere.corp.example.com`:
```text
; <<>> DiG 9.16.1-Ubuntu <<>> nowhere.corp.example.com
;; global options: +cmd
;; Got answer:
;; ->>HEADER<<- opcode: QUERY, status: NXDOMAIN, id: 7481
;; flags: qr aa rd ra; QUERY: 1, ANSWER: 0, AUTHORITY: 1, ADDITIONAL: 1
;; OPT PSEUDOSECTION:
; EDNS: version: 0, flags:; udp: 1232
;; QUESTION SECTION:
;nowhere.corp.example.com. IN A
;; AUTHORITY SECTION:
corp.example.com. 3600 IN SOA opnsense.corp.example.com. root.example.com. 2021110201 86400 7200 3600000 3600
;; Query time: 0 msec
;; SERVER: 192.168.30.1#53(192.168.30.1)
;; WHEN: Tue Nov 16 20:44:35 CET 2021
;; MSG SIZE rcvd: 112
```
This time, requests will only be forwarded to Unbound, but not external DNS resolvers.
[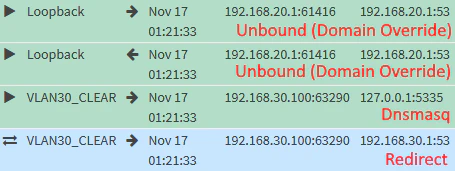](https://wikipedia.mutschlerhome.com/uploads/images/gallery/2025-02/XmlSAhoy44iSSrHt-image.png)
##### VLAN30\_CLEAR: DNS Leak Test
As we saw earlier, we expect the Quad9 *and* the Mullvad public IPs to leak. Here is the result of an extended test from [dnsleaktest.com](https://dnsleaktest.com/):
[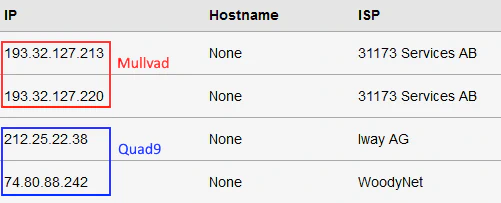](https://wikipedia.mutschlerhome.com/uploads/images/gallery/2025-02/SqzMxp5aoV3FkjXp-image.png)
#### VLAN40\_GUEST: Test DNS
Connect to `VLAN40_GUEST`.
Verify that `dig opnsense.org @192.168.40.1` times out.
The Cloudflare DNS servers you configured in the DHCP settings of the Guest VLAN should show up when running the leak test:
[](https://wikipedia.mutschlerhome.com/uploads/images/gallery/2025-02/vzUbD1XTKJYBLyDT-image.png)