Manage Who Can Create Microsoft 365 Groups
By default, all users can create Microsoft 365 groups. This is the recommended approach because it allows users to start collaborating without requiring assistance from IT.
If your business requires that you restrict who can create groups, you can restrict Microsoft 365 Groups creation to the members of a particular Microsoft 365 group or security group.
If you're concerned about users creating teams or groups that don't comply with your business standards, consider requiring users to complete a training course and then adding them to the group of allowed users.
When you limit who can create a group, it affects all services that rely on groups for access, including: Outlook, SharePoint, Viva Engage, Microsoft Teams, Planner, Power BI (classic), Project for the web / Roadmap
The steps in this article won't prevent members of certain roles from creating Groups. Microsoft 365 global admins can create groups via the Microsoft 365 admin center, Planner, Exchange, and SharePoint, but not other locations such as Teams. Other roles can create Microsoft 365 Groups via limited means, listed below.
- Exchange Administrator: Exchange admin center, Microsoft Entra ID
- Partner Tier 1 Support: Microsoft 365 admin center, Exchange admin center, Microsoft Entra ID
- Partner Tier 2 Support: Microsoft 365 admin center, Exchange admin center, Microsoft Entra ID
- Directory Writers: Microsoft Entra ID
- Groups Administrator: Microsoft Entra ID
- SharePoint Administrator: SharePoint admin center, Microsoft Entra ID
- Teams Service Administrator: Teams admin center, Microsoft Entra ID
- User Administrator: Microsoft 365 admin center, Microsoft Entra ID
If you're a member of one of these roles, you can create Microsoft 365 Groups for restricted users, and then assign the user as the owner of the group.
Licensing requirements
To manage who creates groups, the following people need Microsoft Entra ID P1 or P2 licenses or Microsoft Entra Basic EDU licenses assigned to them:
- The admin who configures these group creation settings
- The members of the group who are allowed to create groups
Note: See Assign or remove licenses in the Microsoft Entra admin center for more details about how to assign Azure licenses.
The following people don't need Microsoft Entra ID P1 or P2 or Microsoft Entra Basic EDU licenses assigned to them:
- People who are members of Microsoft 365 groups and who don't have the ability to create other groups.
Step 1: Create a group for users who need to create Microsoft 365 groups
Only one group in your organization can be used to control who is able to create Microsoft 365 Groups. But, you can nest other groups as members of this group.
Admins in the roles listed above do not need to be members of this group: they retain their ability to create groups.
-
In the admin center, go to the Groups page.
-
Click on Add a Group.
-
Choose the group type you want. Remember the name of the group! You'll need it later.
-
Finish setting up the group, adding people or other groups who you want to be able to create groups as members (not owners).
For detailed instructions, see Create, edit, or delete a security group in the Microsoft 365 admin center.
Step 2: Run PowerShell commands
You must use the preview version of Azure Active Directory PowerShell for Graph (AzureAD) (module name AzureADPreview) to change the group-level guest access setting:
-
If you haven't installed any version of the Azure AD PowerShell module before, see Installing the Azure AD module and follow the instructions to install the public preview release.
-
If you have the 2.0 general availability version of the Azure AD PowerShell module (AzureAD) installed, you must uninstall it by running
Uninstall-Module AzureADin your PowerShell session, and then install the preview version by runningInstall-Module AzureADPreview. -
If you have already installed the preview version, run
Update-Module AzureADPreviewto make sure it's the latest version of this module.
Copy the script below into a text editor, such as Notepad, or the Windows PowerShell ISE.
Replace <GroupName> with the name of the group that you created. For example:
$GroupName = "Group Creators"
Save the file as GroupCreators.ps1.
In the PowerShell window, navigate to the location where you saved the file (type "CD <FileLocation>").
Run the script by typing:
.\GroupCreators.ps1
and sign in with your administrator account when prompted.
$GroupName = "<GroupName>"
$AllowGroupCreation = $False

Connect-AzureAD

$settingsObjectID = (Get-AzureADDirectorySetting | Where-object -Property Displayname -Value "Group.Unified" -EQ).id
if(!$settingsObjectID)
{
    $template = Get-AzureADDirectorySettingTemplate | Where-object {$_.displayname -eq "group.unified"}
    $settingsCopy = $template.CreateDirectorySetting()
    New-AzureADDirectorySetting -DirectorySetting $settingsCopy
    $settingsObjectID = (Get-AzureADDirectorySetting | Where-object -Property Displayname -Value "Group.Unified" -EQ).id
}

$settingsCopy = Get-AzureADDirectorySetting -Id $settingsObjectID
$settingsCopy["EnableGroupCreation"] = $AllowGroupCreation

if($GroupName)
{
  $settingsCopy["GroupCreationAllowedGroupId"] = (Get-AzureADGroup -SearchString $GroupName).objectid
} else {
$settingsCopy["GroupCreationAllowedGroupId"] = $GroupName
}
Set-AzureADDirectorySetting -Id $settingsObjectID -DirectorySetting $settingsCopy

(Get-AzureADDirectorySetting -Id $settingsObjectID).Values
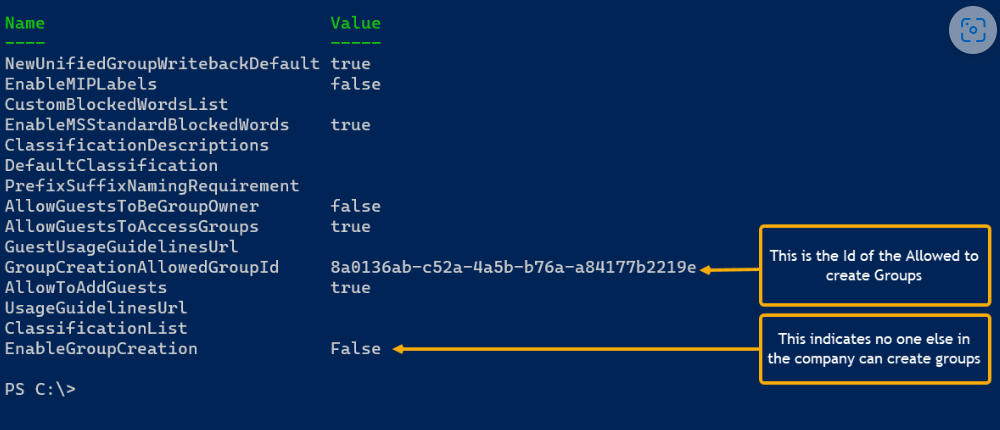
The last line of the script will display the updated settings:
If in the future you want to change which group is used, you can rerun the script with the name of the new group.
If you want to turn off the group creation restriction and again allow all users to create groups, set $GroupName to "" and $AllowGroupCreation to "$true" and rerun the script.
Step 3: Verify that it works
Changes can take thirty minutes or more to take effect. You can verify the new settings by doing the following:
-
Sign in to Microsoft 365 with a user account of someone who should NOT have the ability to create groups. That is, they are not a member of the group you created or an administrator.
-
Select the Planner tile.
-
In Planner, select New Plan in the left navigation to create a plan.
-
You should get a message that plan and group creation is disabled.
Try the same procedure again with a member of the group.
Note: If members of the group aren't able to create groups, check that they aren't being blocked through their OWA mailbox policy.
Related topics
Collaboration governance planning recommendations
Create your collaboration governance plan
Getting started with Office 365 PowerShell