| **Comparing Windows LAPS and Legacy LAPS** | ||
| **Windows LAPS** | **Legacy LAPS** | |
| Password-management bits | Included with the April 2023 Cumulative Update for Windows | The client-side extension must be installed on each computer. |
| Frequency of processing the LAPS policy cycle | This is hard-coded in Windows to 1 hour The Invoke-LapsPolicyProcessing PowerShell cmdlet can be used to trigger processing in addition to gpupdate /force. | Since this was a Group Policy Client-side extension, this was done at the same time as a group policy refresh. gpupdate /force will force the processing of Group Policy |
| Configuration options | Group Policy Configuration Service Provider (such as Intune) | Group Policy |
| Group Policy settings location | Computer Configuration – Policies – Administrative Templates – System – LAPS | Computer Configuration – Policies – Administrative Templates – LAPS |
| Where is the password stored in AD | All Windows LAPS attributes are confidential attributes: msLAPS-PasswordExpirationTime: This is a regular attribute that stores the date and time that the LAPS password will expire / when it will be reset, calculated by adding the value of the *Password Age (Days)* setting to the time the password was last set msLAPS-Password: A clear-text string that contains the name of the managed account, the timestamp of the password update, and the current password msLAPS-EncryptedPassword: The encrypted current password msLAPS-EncryptedPasswordHistory: Contains the encrypted previous passwords (it will store as many of the previous passwords as it is configured to, which allows for a maximum of 12) msLAPS-EncryptedDSRMPassword: This setting only pertains to Domain Controllers. msLAPS-EncryptedDSRMPasswordHistory: This setting only pertains to Domain Controllers. | ms-mcs-AdmPwd: This is a confidential attribute where the password is stored ms-mcs-AdmPwdExpirationTime: This is a regular attribute that stores the date and time that the LAPS password will expire / when it will be reset, calculated by adding the value of the *Password Age (Days)* setting to the time the password was last set |
| Where can the password be backed up to? | Active Directory or Entra ID. | Active Directory only. |
| Is the password encrypted when backed up to AD/Entra ID? | Active Directory: It depends on the LAPS policy in use when the password is saved in AD. Entra ID: Yes, the password is always encrypted. | No. |
| Who can access the password in AD | - When backed up to AD: If the password is not encrypted (msLAPS-Password) you must have access to the confidential attribute in AD.If the password is encrypted (msLAPS-EncryptedPassword, msLAPS-EncryptedPasswordHistory) you must have access to the confidential attribute in AD AND be an authorized password decryptor (refer to the *Windows LAPS Policy Settings* section below).Note that each encrypted password in the password history can/may have a different decryptor. - When backed up to Entra ID: By default only members of the following roles: Global Administrator, Cloud Device Administrator, Intune Administrator | You must have access to the confidential attribute in AD. |
| **Setting** | **Description** |
| Password Settings | If enabled, you can configure the following aspects of the password that is generated: **Password Complexity**: Determines what type of characters are used to generate the password. The available options are: - Large letters - Large letters + small letters - Large letters + small letters + numbers - Large letters + small letters + numbers + specials - Large letters + small letters + numbers + specials (improved readability) *This option is only available starting with 24H2 operating systems (Windows 11 24H2 and Server 2025). With this option, the following letters are not used: I O Q l o With this option, the following numbers are not used: 0 1 With this option, only the following symbols are used: ! # % + @ : = ? \* - Passphrase (long words) *This option is only applicable starting with 24H2 operating systems (Windows 11 24H2 and Server 2025).* - Passphrase (short words with unique prefixes) *This option is only applicable starting with 24H2 operating systems (Windows 11 24H2 and Server 2025).* - Passphrase (short words) *This option is only applicable starting with 24H2 operating systems (Windows 11 24H2 and Server 2025).* **Password Length**: Determines how many characters the password will be in length. This must be a number from 8 – 64. The default value is 14. **Password Age (Days)**: This is the number of days that will be used to set the password expiration time. This must be a number from 1 – 365. The default value is 30. **Passphrase Length (words)**: This is the number of words that will be used in the passphrase (when Password Complexity is set to a passphrase option). This must be a number from 3 – 10. The default value is 6. *This option is only applicable starting with 24H2 operating systems (Windows 11 24H2 and Server 2025).* |
| Name of administrator account to manage | The name of the local administrator account whose password is managed. Only set this if you want Windows LAPS to manage an account other than the built-in Administrator. The default, when not specified, is the built-in Administrator (by its well-known RID). Notes: If you specify a disabled account, the password will be managed by the account will not be enabled by LAPS. If you specify an account that does not exist, . If you specify an account that is not a member of the local Administrators group it will not be added to the local Administrators by LAPS. |
| Configure automatic account management | *This option is only applicable starting with 24H2 operating systems (Windows 11 24H2 and Server 2025).* *When enabled, this takes precedence over the Name of administrator account to manage setting.* If enabled, you can configure the following aspects of the managed account: **Specify the target account to manage**: Two options are available: - Manage a custom admin account A custom account will be managed by Windows LAPS. - Manage the built-in admin account The Built-in Administrator account will be managed by Windows LAPS (by its well-known RID). **Automatic account name (or name prefix)**: The name of the account that Windows LAPS will manage the password for (or the prefix on the name of the account if *Randomize the name of the managed account* is checked.) **Enable the managed account** (checkbox): If checked, the account will be enabled by LAPS. If unchecked, the account will be disabled by LAPS. **Randomize the name of the managed account** (checkbox): If checked, the Automatic account name (or name prefix) will be treated as a prefix; a suffix of eight random numbers will be added to it. The name will also be randomized every time the password is changed. If unchecked, the Automatic account name (or name prefix) will be treated as the account name. |
| Enable password encryption | If enabled, the password is encrypted before it is backed up to AD. If disabled, the password is not encrypted before it is backed up to AD. If not configured, the default value is Enabled. *This setting is only applicable when backing up the password to Active Directory.* |
| Enable password backup for DSRM accounts | If enabled, the Domain Controller’s DSRM account password will be managed and backed up to AD. If not configured, the default value is Disabled. *This setting is only applicable to Domain Controllers.* |
| Do not allow password expiration time longer than required by policy | If enabled, LAPS will adhere to the computer’s password settings policy and the password will be reset when the password has expired based on the computer’s password settings policy. The new expiration is then set so it adheres to the computer’s password settings policy. If disabled, the expiration of the password set by LAPS could exceed the requirement of the computer’s password settings policy. If not configured, the default value is Enabled. |
| Configure size of encrypted password history | If enabled, you can specify how many older encrypted passwords to store in AD. This must be a number from 0 – 12. This setting only applies when encrypted passwords are being backed up to AD. This setting may help out when reverting to a VM snapshot where an older password was in use at the time the snapshot was taken. The default value, if not configured, is 0. |
| Configure password backup directory | Determines where the password is backed up to. Options: - 0: Disabled - 1: Entra ID only - 2: Windows Server (on-prem) AD only The default value when not specified is 0 (the password will not be backed up). |
| Configure authorized password decryptors | When enabled, you will specify the user or group that is authorized to decrypt the encrypted password in AD. You must provide one of the following as the decryptor - The SID of the group or user - The name of the group or user in the following format: AUSTIN\\<name> Warning: If the device cannot resolve the SID or name provided, the password will not be backed up. This setting only applies when encrypted passwords are being backed up to AD. The default value when not specified is the Domain Admins group. *This setting is only applicable when backing up the password to Active Directory.* |
| Post-authentication actions | Specify an action that will be triggered after the successful authentication of the account whose password is being managed. The available actions are: - Take no actions - Reset the password - Reset the password and logoff the managed account - Reset the password and reboot the device - Reset the password, logoff the managed account, and terminate any remaining processes *This fifth option is only applicable starting with 24H2 operating systems (Windows 11 24H2 and Server 2025).* Set the grace period to the time you want it to wait after the authentication before the action is triggered. The grace period must be set greater than 0; if set to 0 the action will not be triggered. The default behaviour, when this setting is disabled or not configured, is to reset the password and logoff the managed account after 24 hours. If you want it to take no action, enable this setting and select Take no actions. |
| **Cmdlet** | **Description** |
| Get-LapsAdPassword | Gets the escrowed password(s) from Active Directory. Review the Retrieving a LAPS Password section above for details and examples. |
| Invoke-LapsPolicyProcessing | Initiates the processing of the current LAPS policy, independent of the hourly processing cycle). |
| Reset-LapsPassword | Attempts to immediately change the managed account’s password (whether or not it has expired). |
The [FSMO role owners](https://woshub.com/transfer-seize-fsmo-roles-in-active-directory/) can be displayed as follows: netdom query fsmo 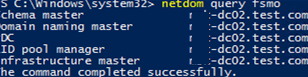
After that, you won’t be able to make changes to the AD forest configuration because it will be locked. The `rendom /prepare` command will check the availability of all DCs in the forest and if they are ready to be renamed. Make sure that the command has not returned any errors. 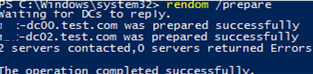 ``` Waiting for DCs to reply. mun-dc02.test.com was prepared successfully mun-dc00.test.com was prepared successfully The operation completed successfully. ``` The command below will rename the domain (domain controllers will be unavailable for some time and restarted automatically to apply new settings): ``` rendom /execute ``` 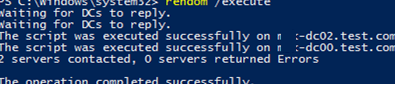 ``` Waiting for DCs to reply. The script was executed successfully on mun-dc02.test.com The script was executed successfully on mun-dc00.test.com 2 servers contacted, 0 servers returned Errors The operation completed successfully. ``` Make sure that the new domain name is displayed in the domain properties. Note that the full computer name did not change. 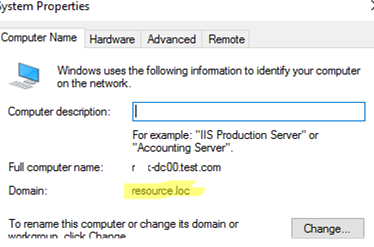You must provide an account name in the format `newdomain\username` to login to the DC. To get to the DC, specify the account from the domain. On [Windows Core domain controllers](https://woshub.com/windows-server-core-install-active-directory-domain-controller/) you can specify a different username by pressing ESC several times. 
Run the following command to update GPO bindings: ``` gpfixup /olddns:test.com /newdns:resource.loc ``` 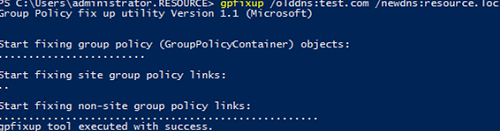 ``` Group Policy fix up utility Version 1.1 (Microsoft) Start fixing group policy (GroupPolicyContainer) objects: Start fixing site group policy links: Start fixing non-site group policy links: gpfixup tool executed with success. ``` Then update the NetBIOS domain name: ``` gpfixup /oldnb:TEST /newnb:RESOURCE ``` Then add new names on each domain controller manually and make them primary ones: ``` netdom computername %COMPUTERNAME%.test.com /add:%COMPUTERNAME%.resource.loc netdom computername %COMPUTERNAME%.test.com /makeprimary:%COMPUTERNAME%.resource.loc ``` Restart the DCs: ```bash Shutdown –f –r –t 0 ```Only domain controllers need to be manually renamed. The rest of the computers and servers can be rebooted twice and they will automatically switch to the new domain. This must be done after /execute and BEFORE executing the rendom /clean command. Or you can use the commands above to rejoin computers to the new domain.
The command below will remove links to your old domain from AD: ``` rendom /clean ``` Unlock the domain configuration: ``` rendom /end ``` Open the [ADUC](https://woshub.com/install-active-directory-users-computers-aduc-console/) (`dsa.msc`) console and make sure that it has connected to the new domain name and all OU structure, users and computers remain in place. 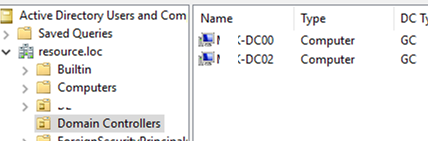Note that you will have to do some extra steps to re-configure some services (CA, Failover Clusters) to a new domain.
After renaming your domain, check the AD replication state and errors on the DCs (see the link above). [Original Article](https://woshub.com/rename-active-directory-domain/) # Step by Step How to Rename Domain Name in Windows Server 2016 You can use the domain rename process to change the names of your domains, and you can also use it to change the structure of the domain trees in your forest. This process involves updating the Domain Name System (DNS) and trust infrastructures as well as Group Policy and service principal names (SPNs). The ability to rename domains provides you with the flexibility to make important name changes and forest structural changes as the needs of your organization change. Using domain rename, you cannot only change the name of a domain, but you can change the structure of the domain hierarchy and change the parent of a domain or move a domain residing in one domain tree to another domain tree. The domain rename process can accommodate scenarios involving acquisitions, mergers, or name changes in your organization, but it is not designed to accommodate forest mergers or the movement of domains between forests.Note: Domain rename is intended to be a supported method for renaming domains when domain renames are necessary; it is not intended to make domain rename a routine operation.The domain rename process is complex, and it requires a great deal of care in planning and execution. In addition, the time that is required for a complete domain rename operation is directly proportional to the size of an Active Directory forest in terms of its number of domains, domain controllers, and member computers. Therefore, although domain rename is possible, it should not be undertaken lightly.The domain rename operation is not supported in `Microsoft Exchange Server 2007` or `Exchange Server 2010`. DNS domain rename is supported in `Exchange Server 2003`. However, renaming of the NetBIOS domain name is not supported in any version of Exchange Server. Other non-Microsoft applications might also not support domain rename.
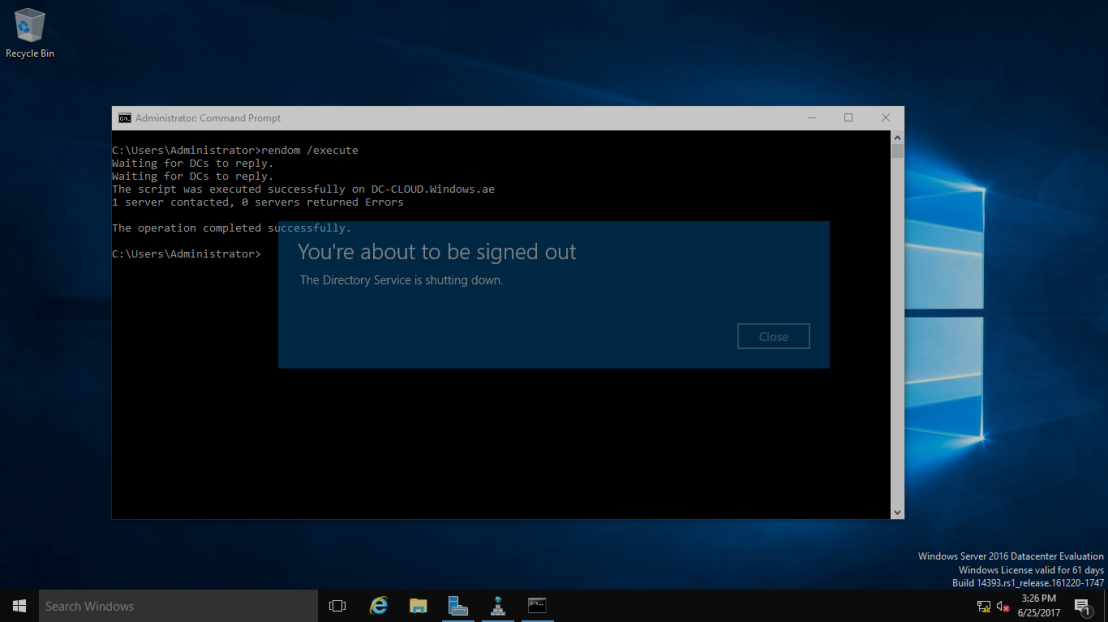
For this time easy Guide, I will show you all how to rename domain name in Windows Server 2016, the process is straightforward. but as usual. backup any necessary information and Server before you proceed & I always advice, please do this exercises in LAB Environment (Hyper-V). Don’t simply take any risk by doing this is production environment unless you have to. 😦 The existing domain is `Windows.ae` and I will rename it to `Sifad.local` #### **So, let get started.** 1 – Open your `System Properties` and check your `existing domain name`, if you see from my Windows Server 2016 `system properties`, my existing domain name is `Windows.ae`. This will be change to `Sifad.local` in the short while.  2 – Next, open your `Server Dashboard`, go to Tools & click `DNS` to open `DNS Manager`. 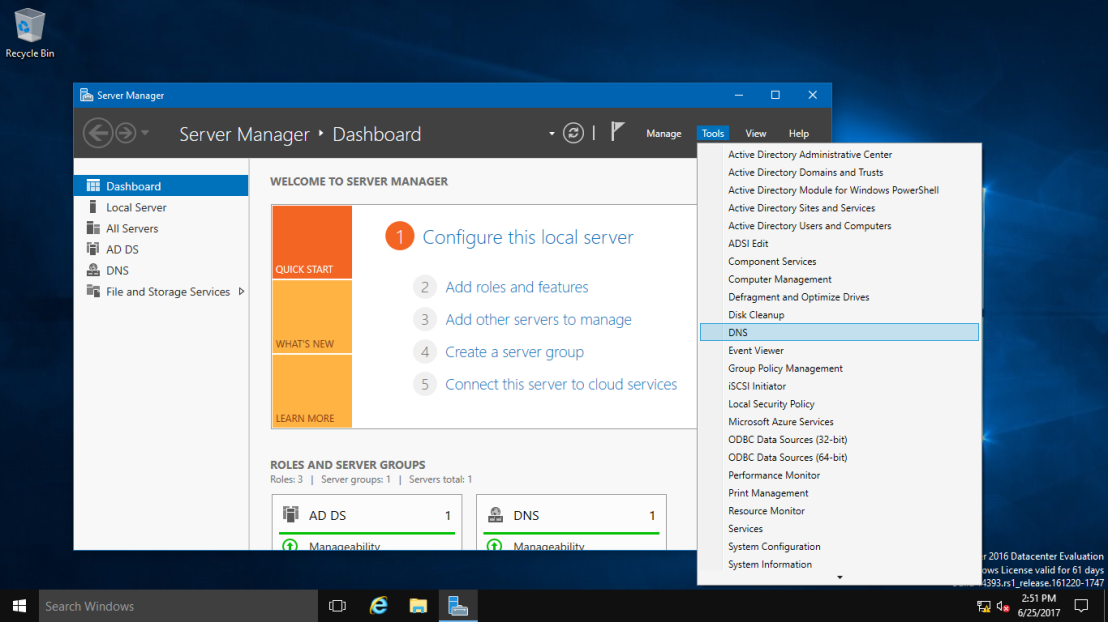 3 – on the `DNS Manager`, you must create the `New DNS Zone (Sifad.local)`, this is to make sure that after whole process successfully, your `member server and Windows clients can join to new Domain name`. To `create new DNS Zone`, Right Click `Forward Lookup Zone`, and click `New Zone` 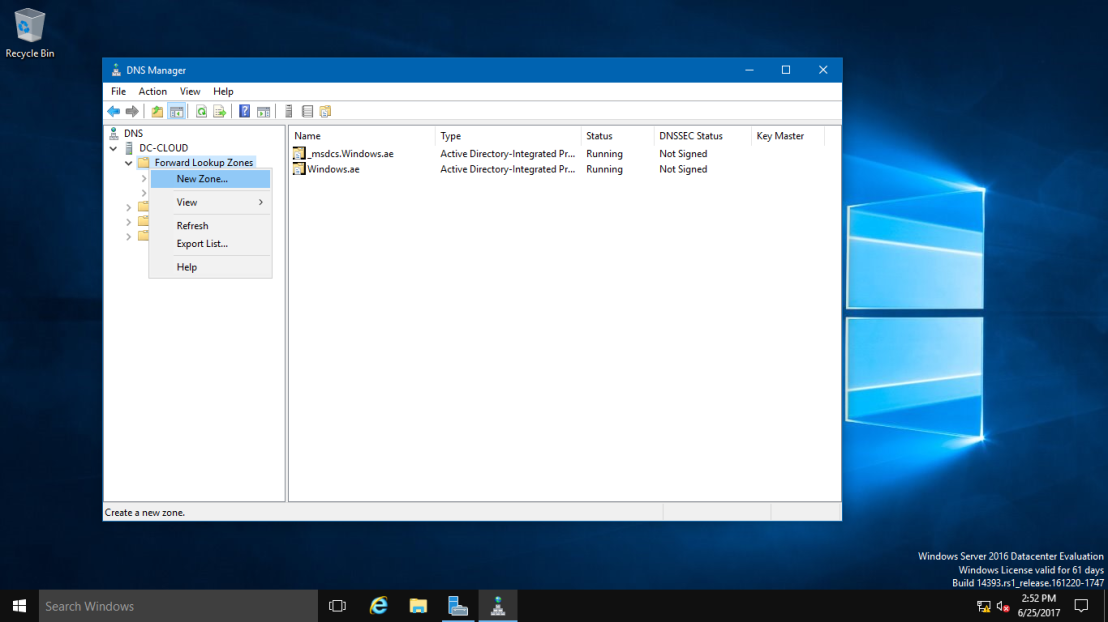 4 – On the `Welcome to the New Zone Wizard`, just click Next button. 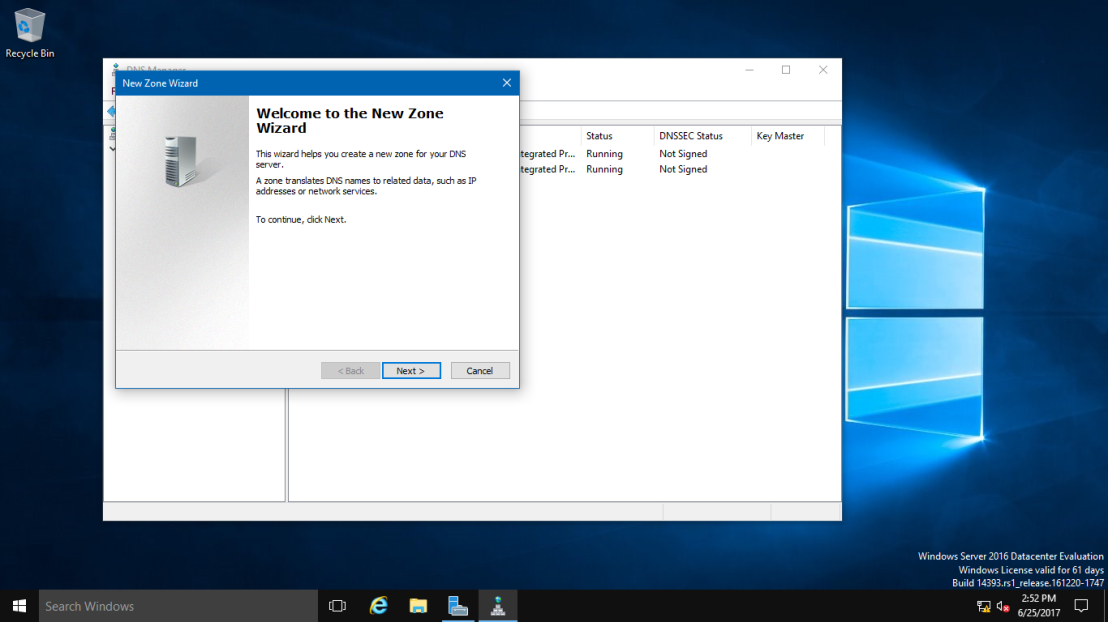 5 – On the Zone Type, Click `Primary Zone` and click Next.  6 – On the `Active Directory Zone Replication Scope`, click button `To all DNS servers running on domain controllers in this domain: Windows.ae` and click Next. 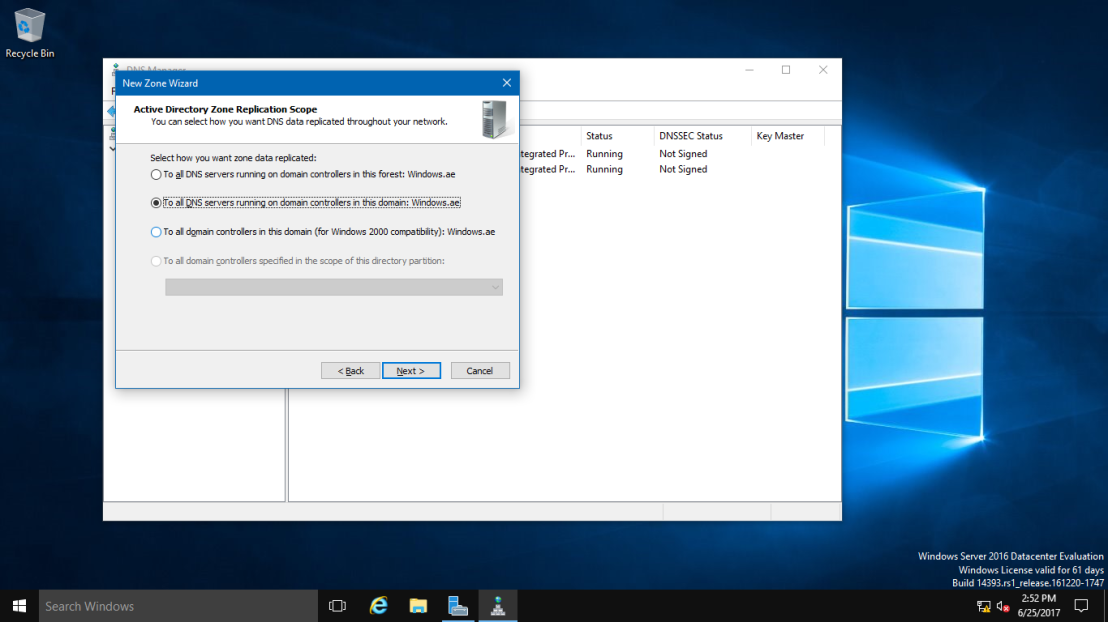 7 – In the `Zone Name`, key in your `New Domain Name`, my new Domain Name is `Sifad.local`. 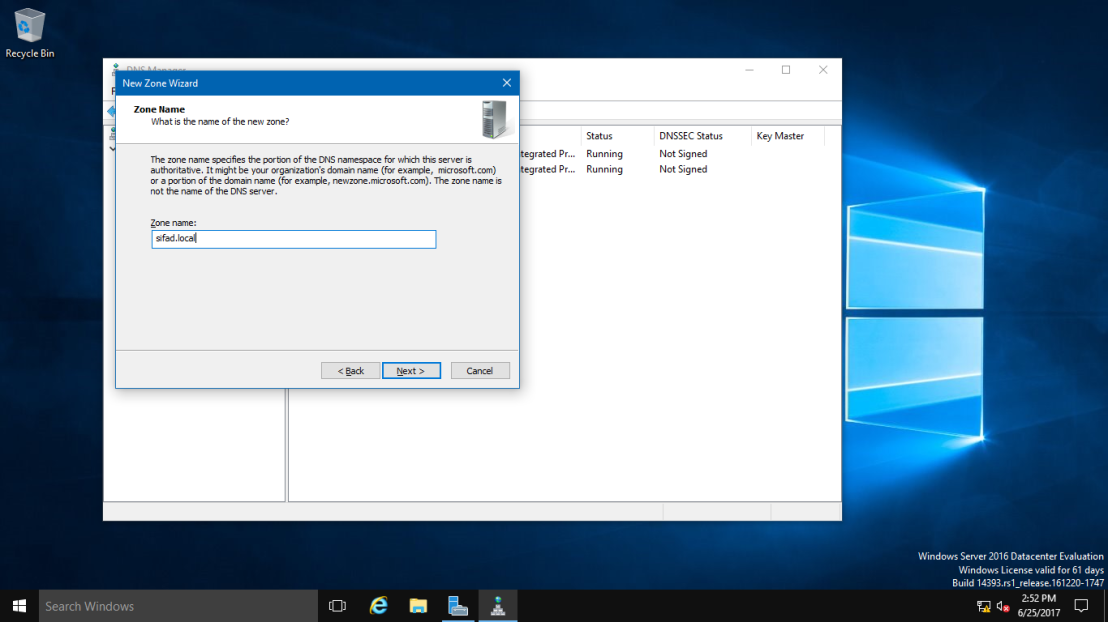 8 – On the `Dynamic Update, Click Allow only secure dynamic updates (recommended for Active Directory)`, and click Next.  9 – On the `completing the New Zone Wizard`, click `Finish` to complete the process.  10 – On DNS Manager, you can see my new `Domain Name is listed (sifad.local)`. 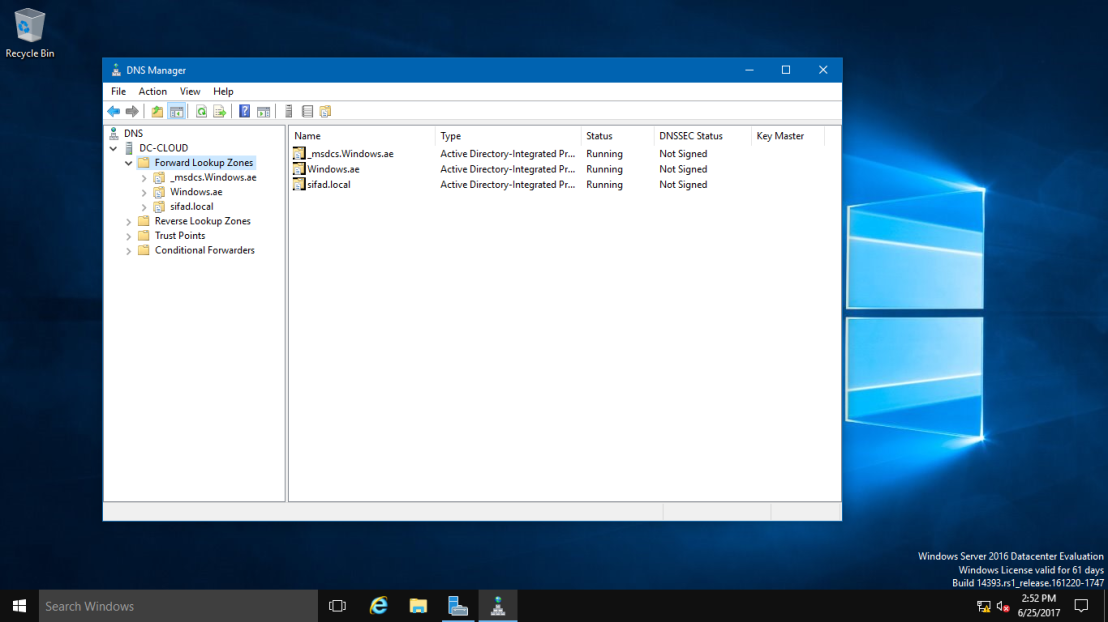 11 – Next, open `Command Prompt, run as administrator`.  12 – In CMD, type `rendom /list` and press enter – this command use to generate a state file named `Domainlist.xml`. This file contains the current forest configuration. 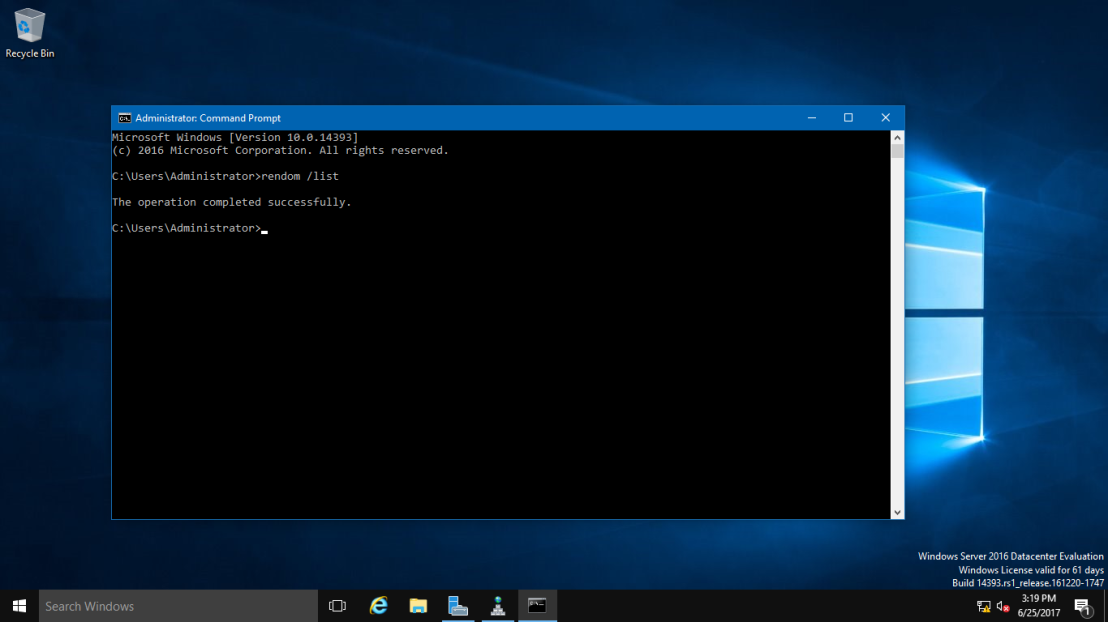 13 – Next, open computer and browse to `C:\Users\Administrator` folder to get your `Domainlist.xml`. 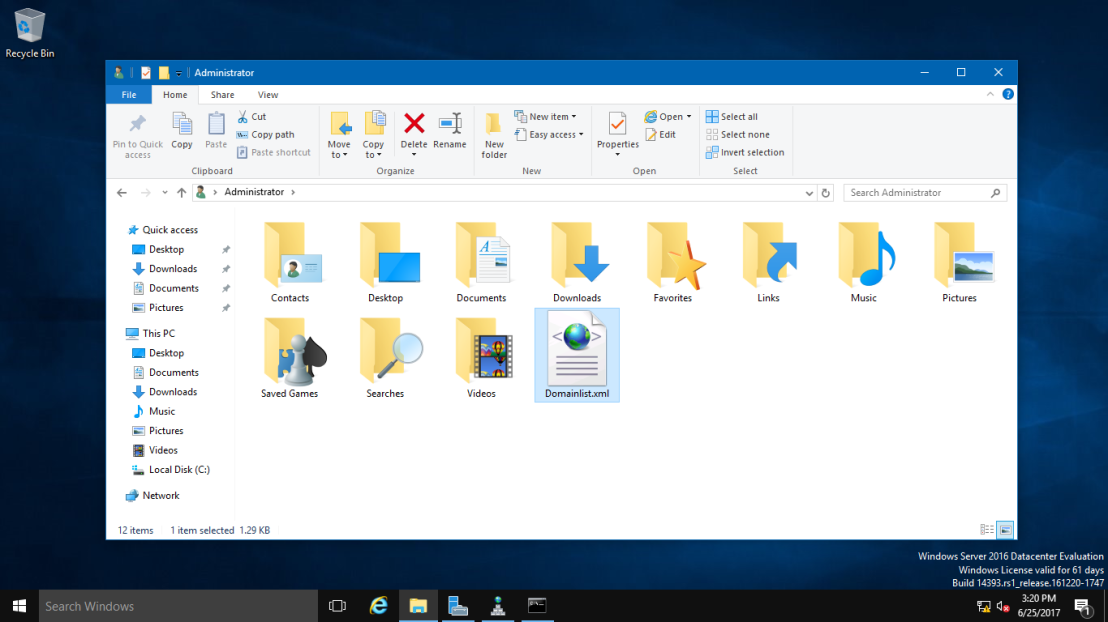 14 – Once you see the `Domainlist.xml`, right click the file name & choose `Edit`. I going to change the DNSname and NetBiosName in this `Domainlist.xml file`. 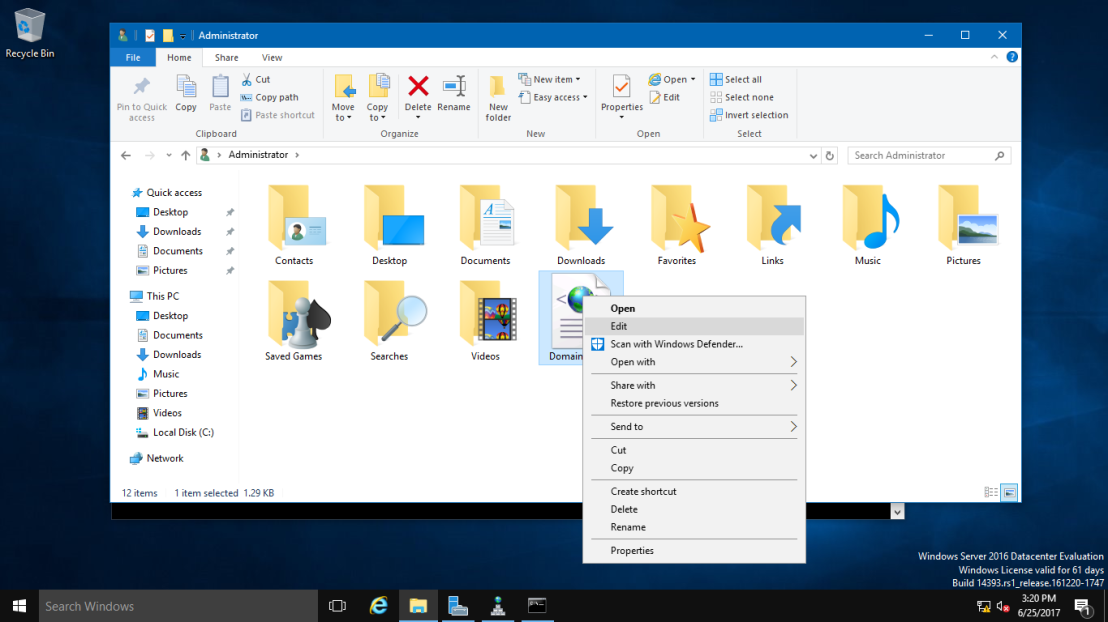 15 – Once the `Domainlist.xml` open, you can see there are few existing Domain name, `change this existing domain name to new domain name`. (**Refer to picture**) 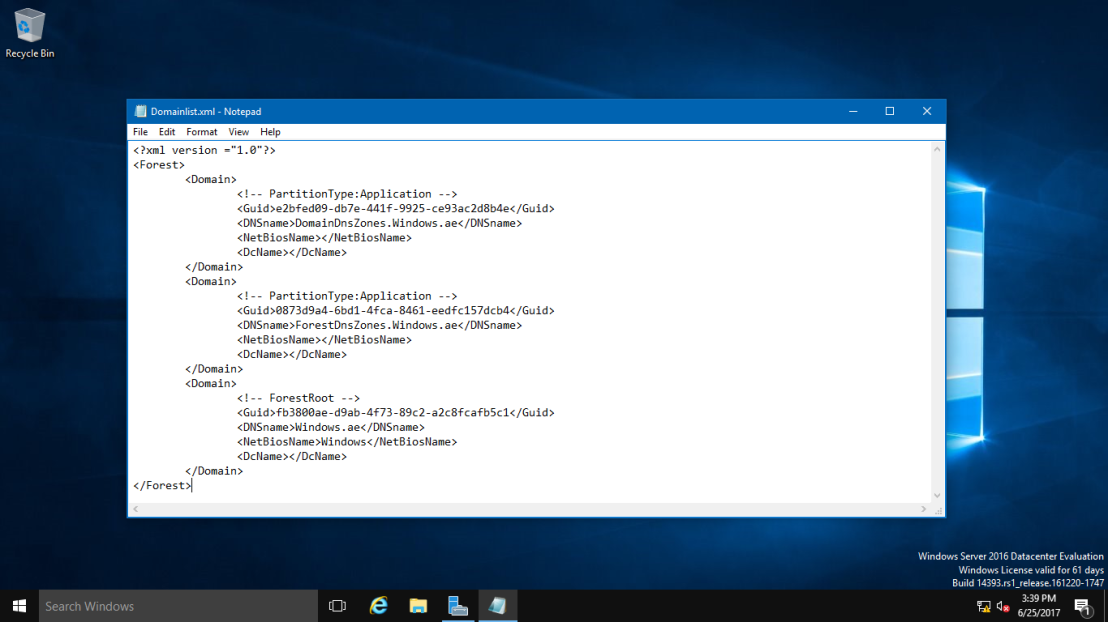 16 – once you change to new Domain name, make sure you save the `Domainlist.xml` file. 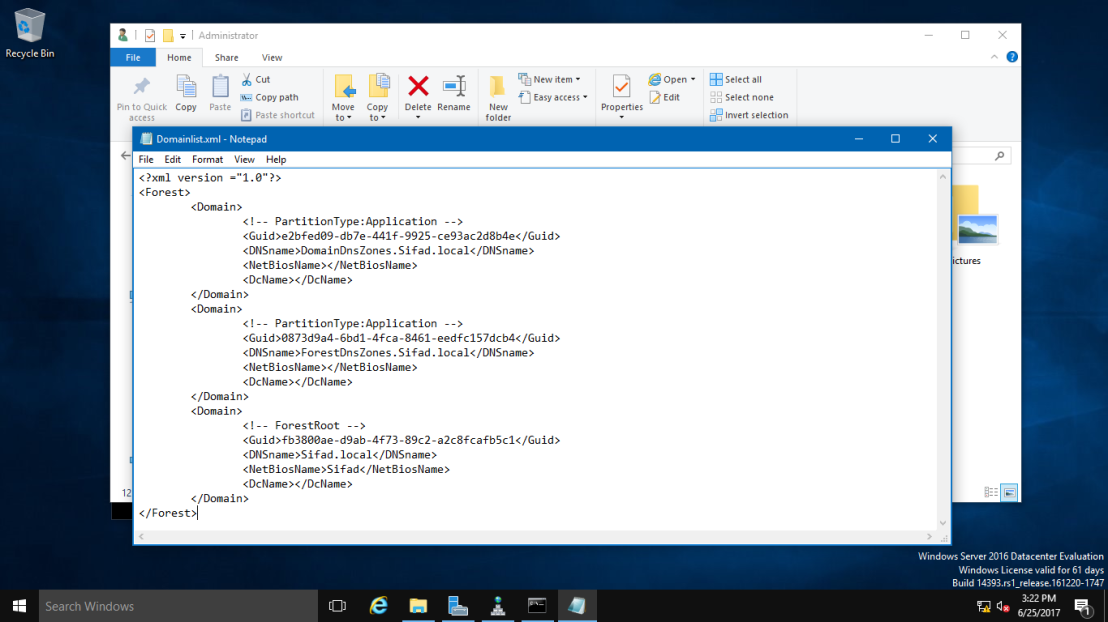 17 – After you save the `Domainlist.xml` file, On the CMD, type `rendom /showforest`. This is to show the potential changes; this step does not make any changes. 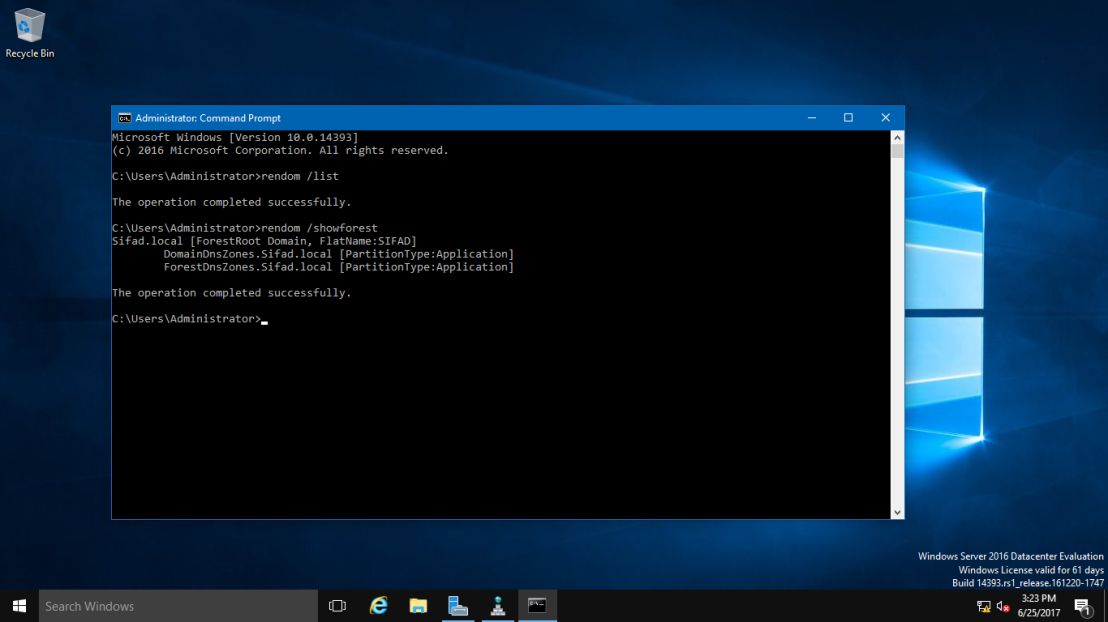 18 – Next, type `rendom /upload`. This is to upload the rename instructions (`Domainlist.xml`) to the configuration directory partition on the domain controller holding the domain naming operations master role.  19 – Next, type `rendom /prepare`. This use to verify the readiness of each DC in the forest to carry out the rename instructions. This should contact all DC’s successfully and return no errors before proceed to next process. 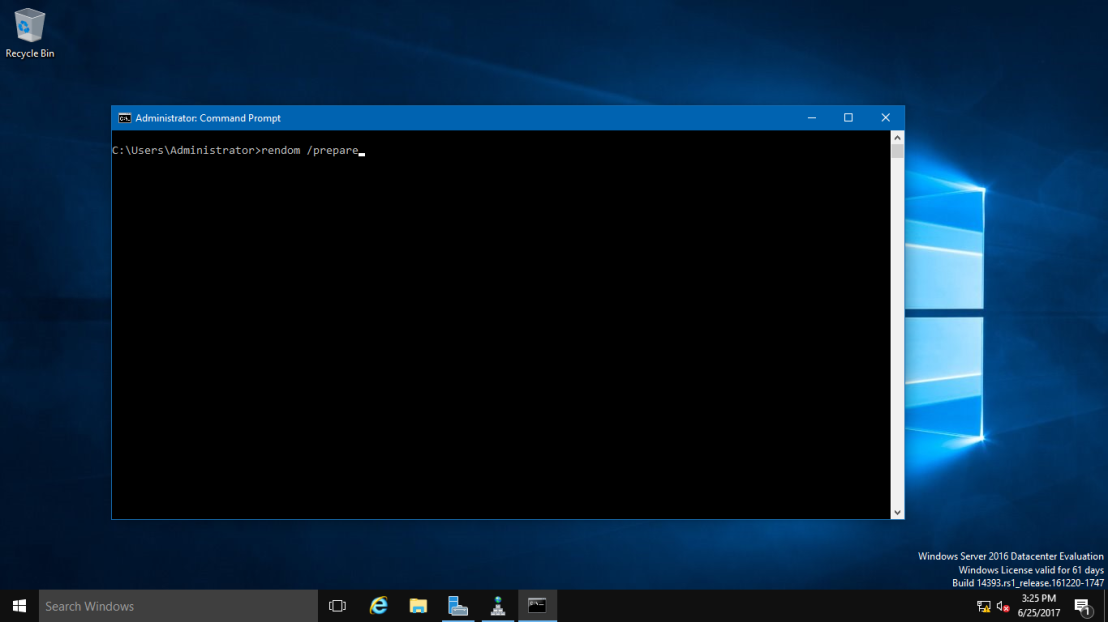 20 – Next, type `rendom /execute`. This is to `verifies readiness` of all DC’s and then preforms the rename action on each one.“**Remember also there will be a service interruption during this process. Once the process successful, your DC Server will be restarted.**”
 21 – Once your DC Server restarted, `log in using the new Domain name as Administrator`. 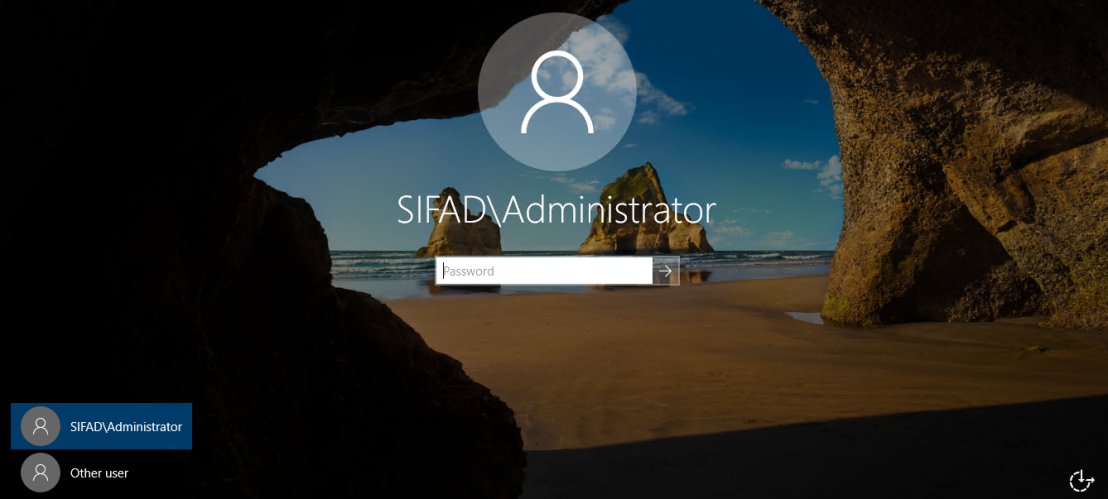 22 – Next, after you successfully log in, open `System Properties` and `check your old Domain Name is now gone`. Replace by new Domain name.  23 – Next, open `CMD` again, and type `gpfixup /olddns:windows.ae /newdns:sifad.local` This is to refresh all `intra Domain` references and links to group policy objects. 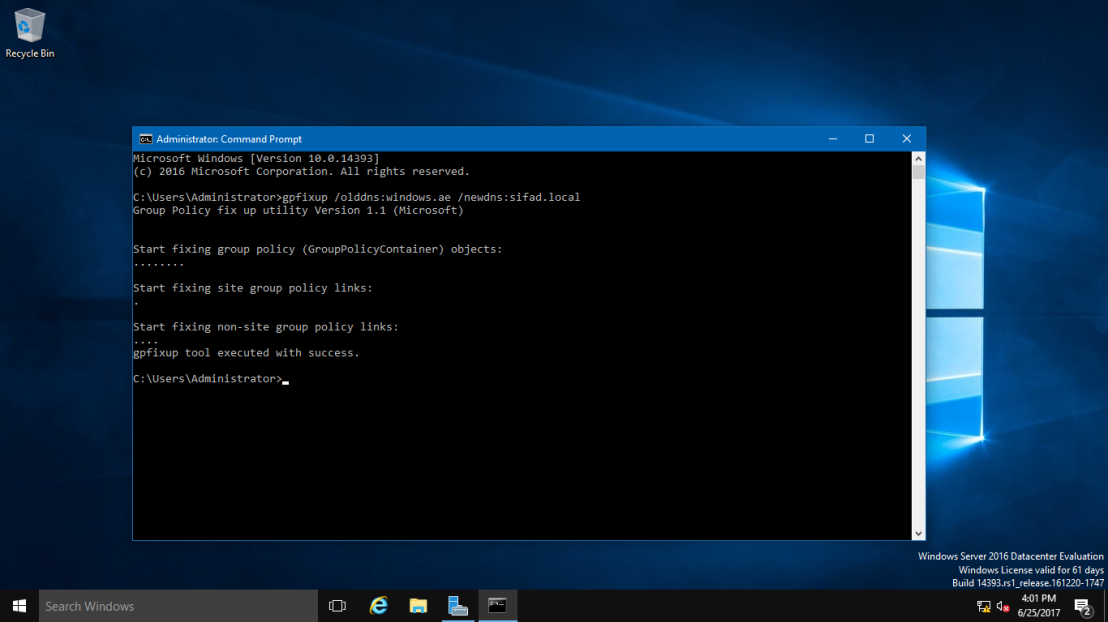 24 – Next, type `gpfixup /oldnb:DC-CLOUD /newnb:sifad`. 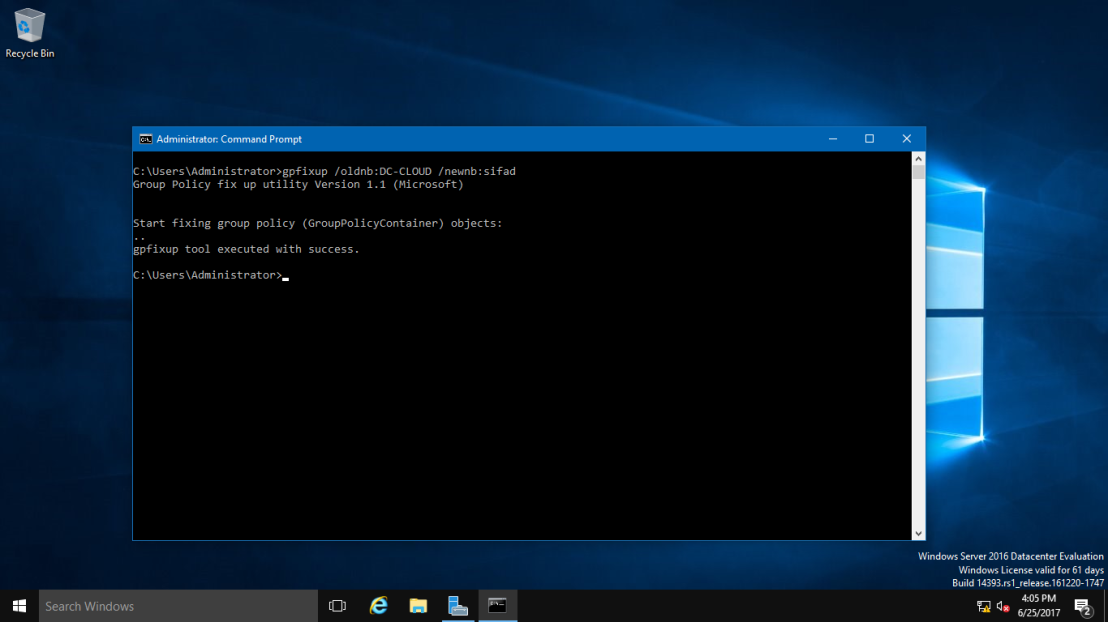 25 – Next, type `rendom /clean`. This is to remove references of the old domain name from AD.  26 – Next, type `rendom /end`. This is to unfreeze the forest configuration and allow further changes. This was frozen during the rendom /upload step. 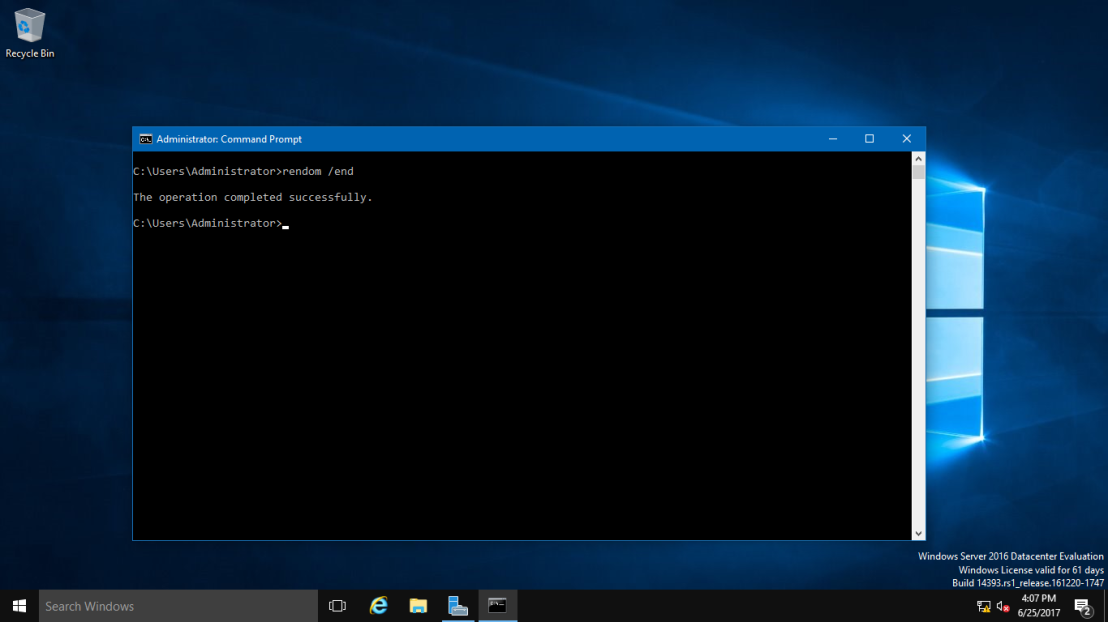 27 – Next, Open `DNS Manager`, click your new created domain (`Sifad.local`), here you can see your own IP listed but we still have long way to go to make sure this DNS Zone is working. 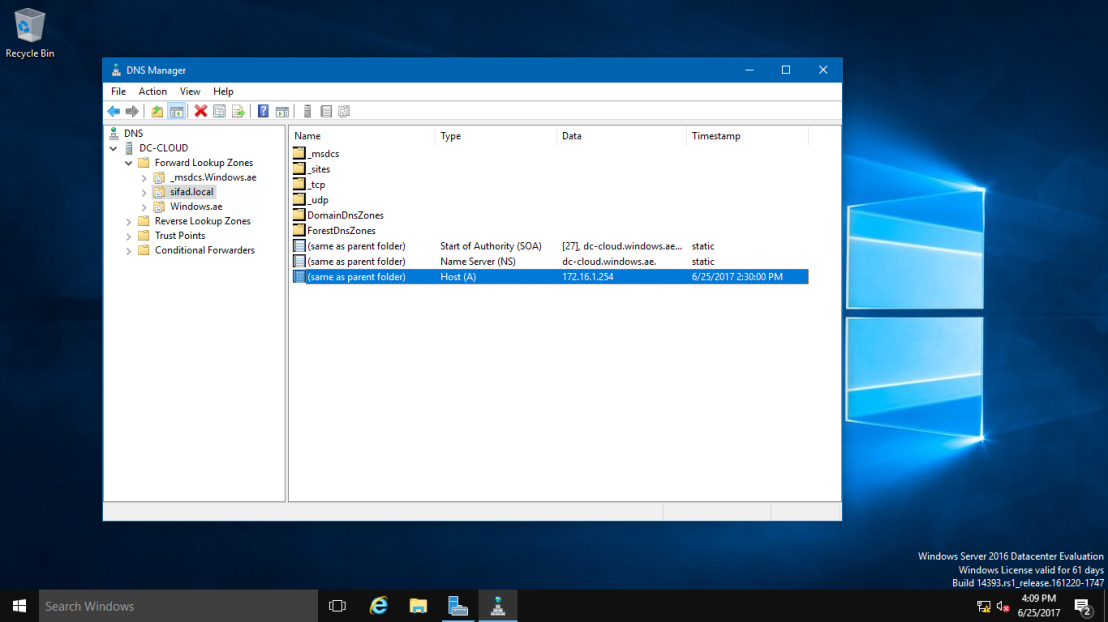 28 – Next, turn on your `client PC`, for this exercise I’m using `Windows 10` as a client. Open `System Properties` and `join to new Domain` (`sifad.local`). Windows Security box will show up and now `key in administrator and domain password` and click OK (`Welcome to the sifad.local domain`). (Refer pictures)  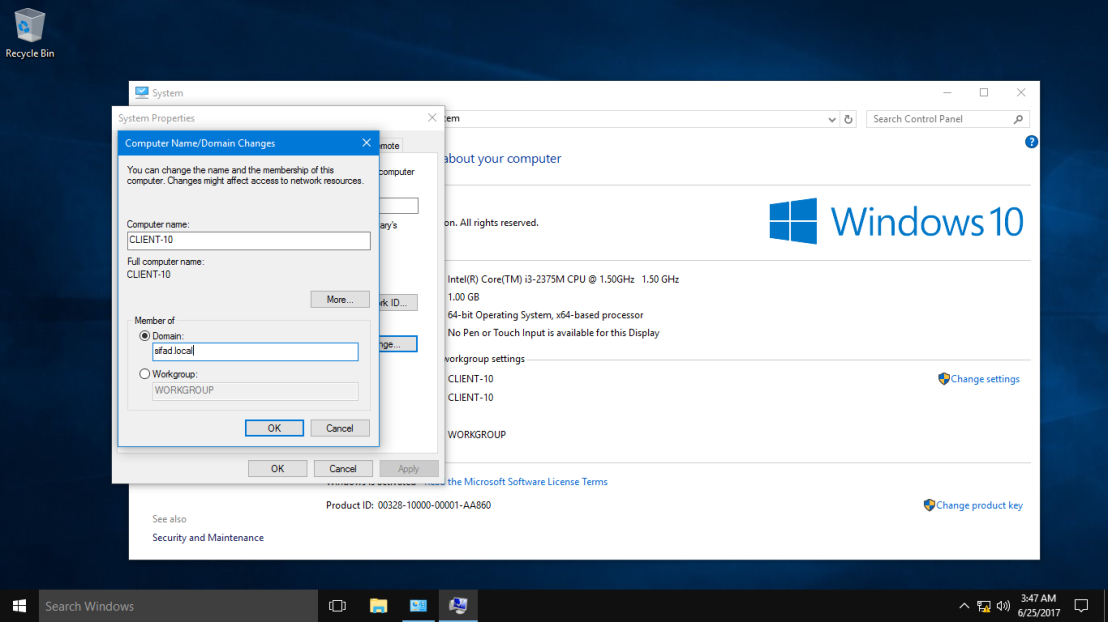 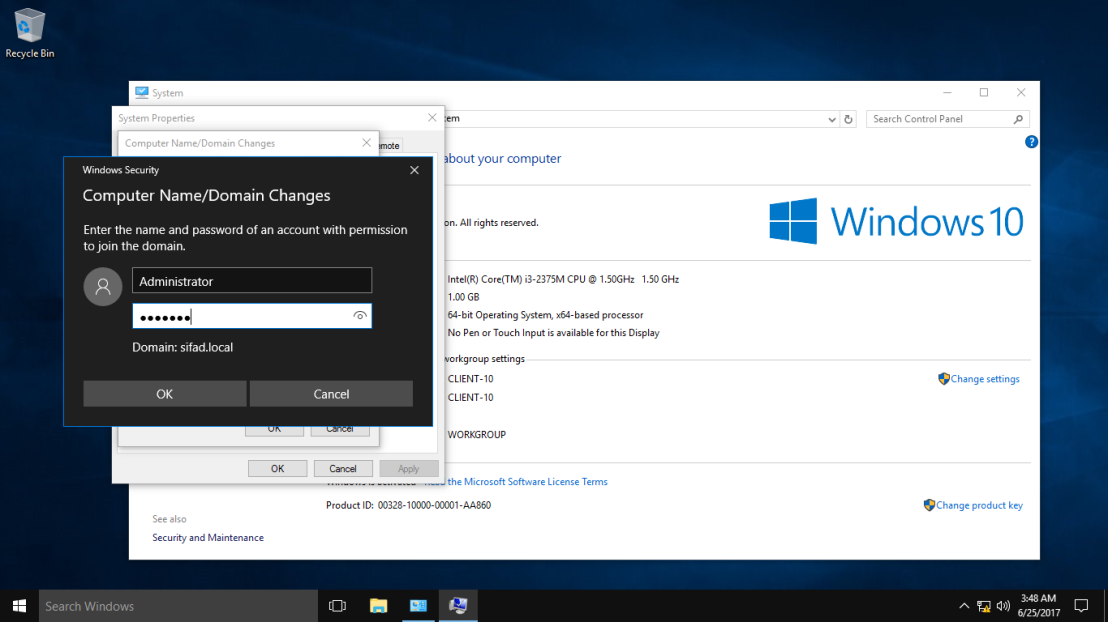 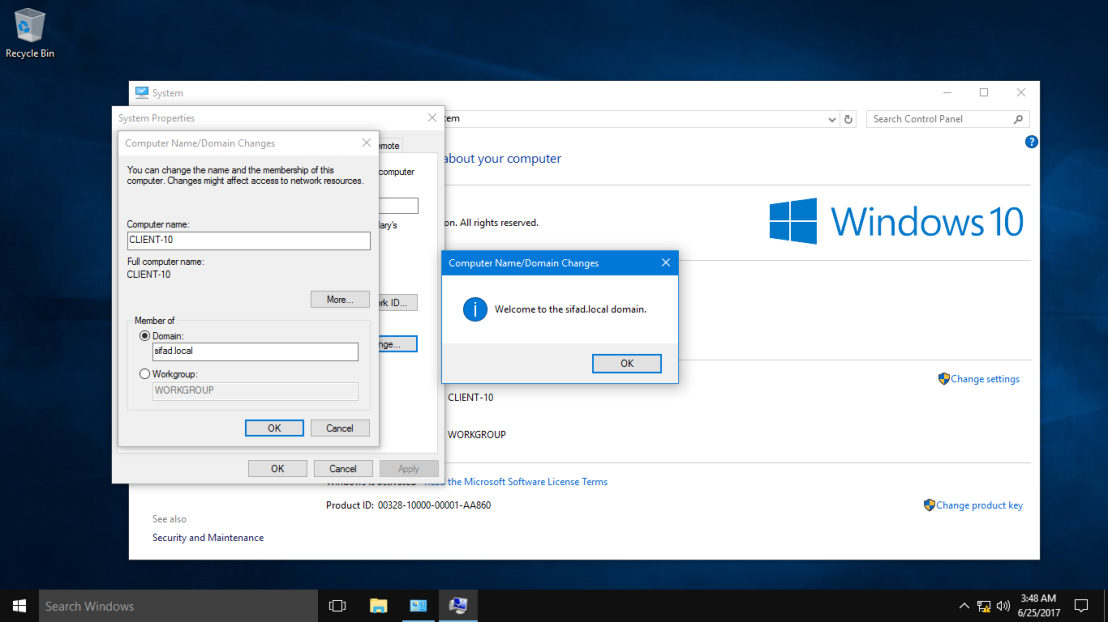 29 – After your Windows 10 restart, `log in as a domain administrator`. 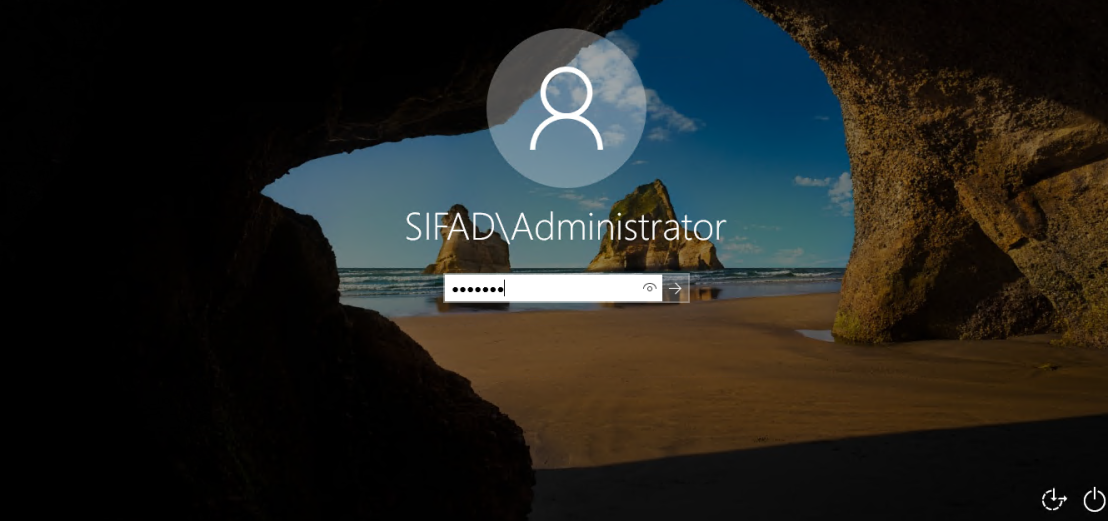 30 – Once you log in, `double check Windows 10 System Properties`. Now your `Windows 10 successfully join in to new Domain` (`Sifad.local`). 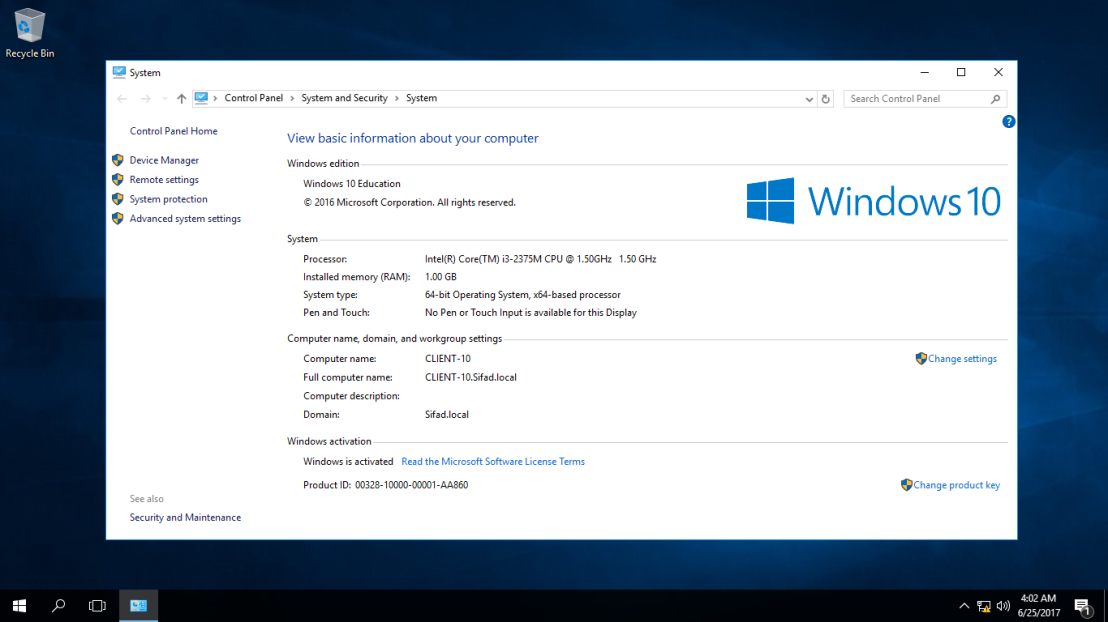 31 – Now, go to the Server 2016 and `open DNS Manager`, you can see now your `Windows 10 Client is listed in DNS`. 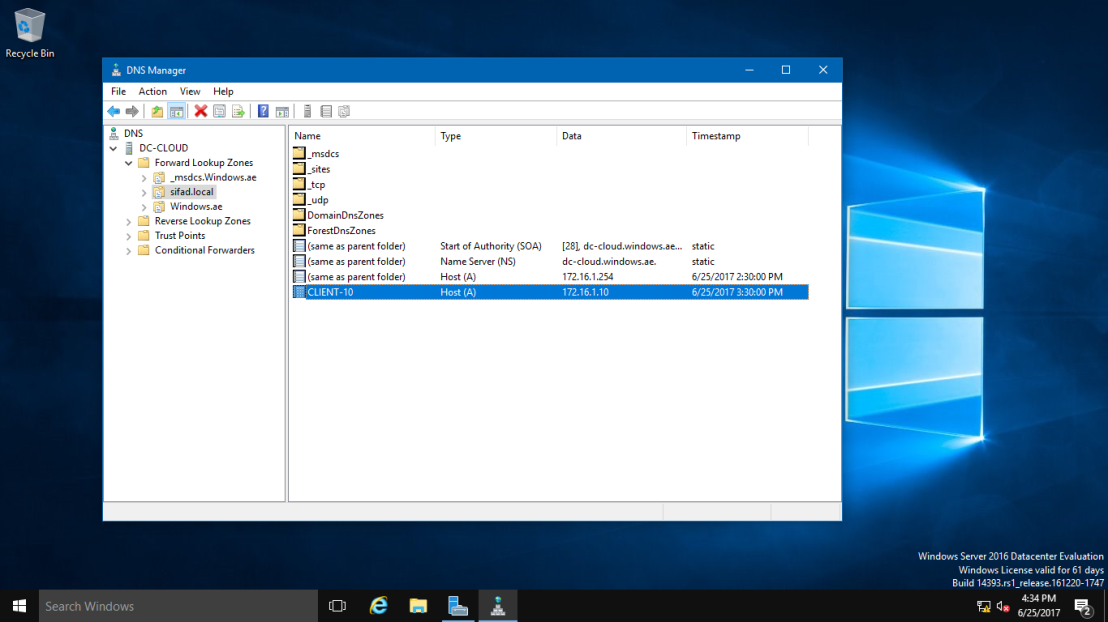 32 – You can also check in `Active Directory Users & Computers` that your Windows 10 Client now also listed. 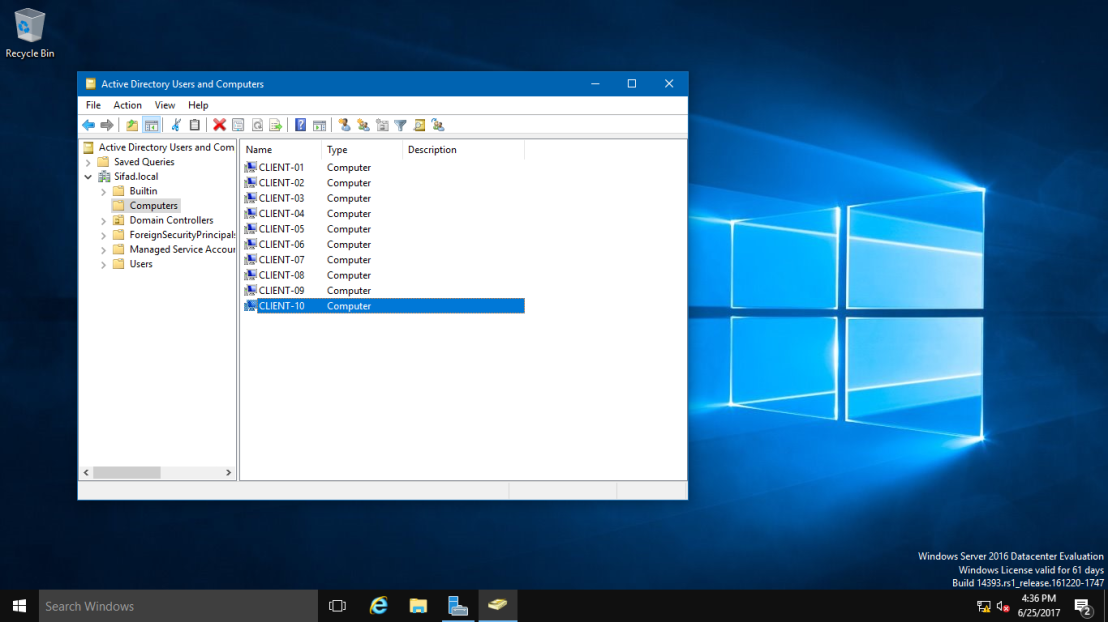 This ends the rename process and we have a dc now with a new domain name. [Original Article](https://newhelptech.wordpress.com/2017/06/25/step-by-step-how-to-rename-domain-name-in-windows-server-2016/) # Troubleshooting # Domain Controller Could Not Be Contacted #### Error Description When I try to join a new Windows workstation or server to an Active Directory (AD) domain, I sometimes encounter the following error: “An Active Directory Domain Controller (AD DC) for the domain ‘domainname’ could not be contacted.” This error can occur due to any of several reasons, from a simple incorrect DNS server IP address to a much more complex issue. In this blog, I will walk you through the steps you need to troubleshoot this problem, from the simplest to the most complex. #### When the Error Arises The error can be displayed when you attempt to join a workstation or server to a domain. Here are the steps that lead up to the error: 1. Right-click on the `Start` button and select `System`: 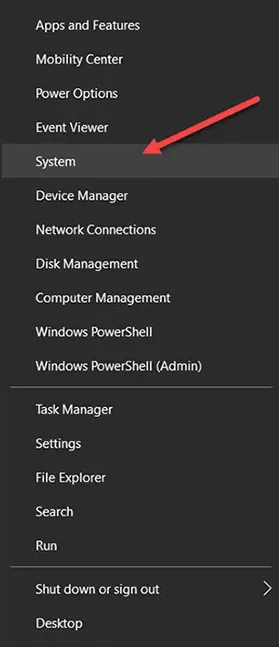 2. On the next screen, click `Change settings`: 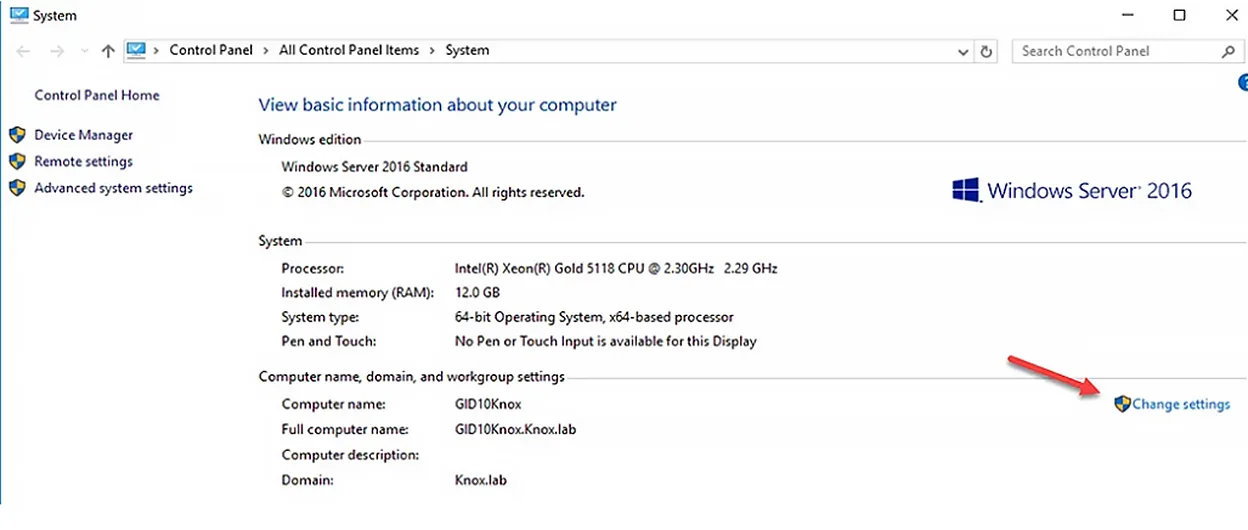 3. In the System Properties window, click the `Change` button. Then enter the name of the new computer and specify which domain you want to join it to, being sure to enter the FQDN (fully qualified domain name) of the domain. Click `OK`. This is when the error might be displayed: 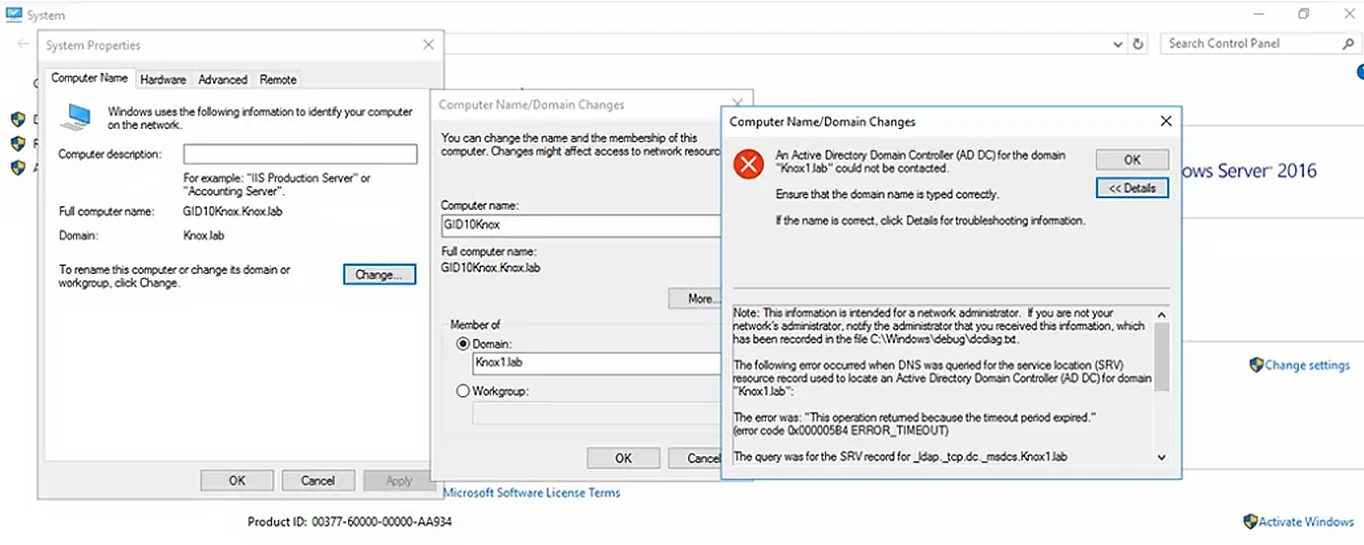 #### Initial Troubleshooting Steps First, ensure that you typed the domain name correctly. If that’s not the problem, click `Details` to get information about the error. The following sections detail the steps to take to get to the root of the problem. In most cases, the issue is related to one of the following: incorrect DNS settings or a wrong IP address on your system, DNS misconfiguration on the domain controller (DC) side, or ports that are blocked on the firewall. If you do not know the root of the problem, I suggest proceeding through these troubleshooting options in order. However, if you have additional information, feel free to proceed directly to the step that you think is likely to solve the problem. #### Verify that the IP Settings are Correct Make sure that the network interface of your computer has the right IP address. The IP address can be explicitly defined in the network adapter settings or can be obtained from a DHCP server. To get the computer’s current network settings, use this command: ``` ipconfig /all ``` 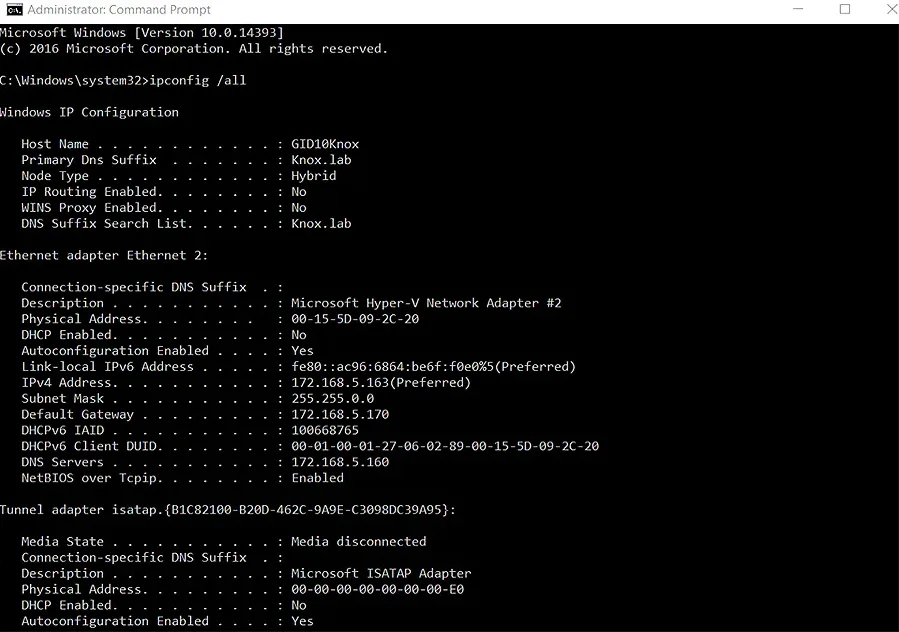 #### Make sure the DNS Client Service is Running Next, check whether the DNS client service is up and running using this command: ``` Get-Service dnscache ``` 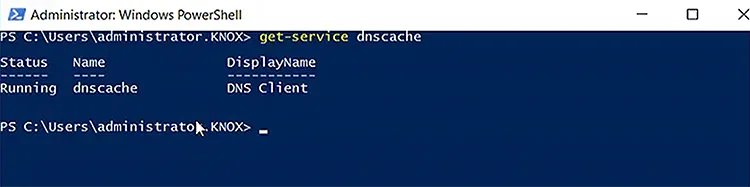 #### Check the Host File for Domain Entries Make sure there are no entries for your domain or domain controller names in the hosts file located at `C:\Windows\System32\Drivers\etc\hosts` on the PC. Open the file with Notepad or any other text editor. If there are any entries for your domain or DC names, delete them. To view the contents of the hosts file on the PC, use this command: ``` get-content C:\Windows\System32\Drivers\etc\hosts ``` 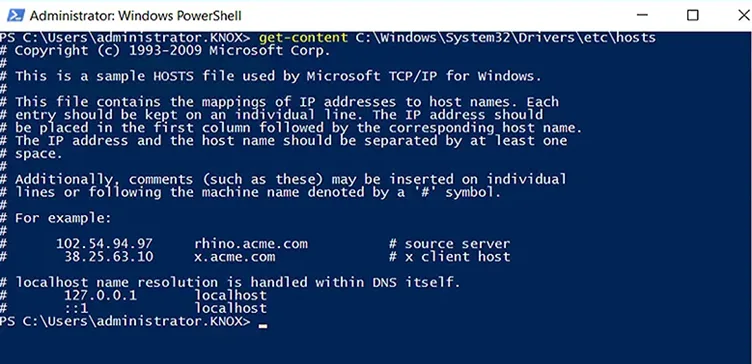 #### Restart the DNS Cache Service Open an elevated command prompt and clear the DNS cache using this command: ``` ipconfig /flushdns ``` Then stop and restart the dnscache service using this command: ``` net stop dnscache && net start dnscache ``` 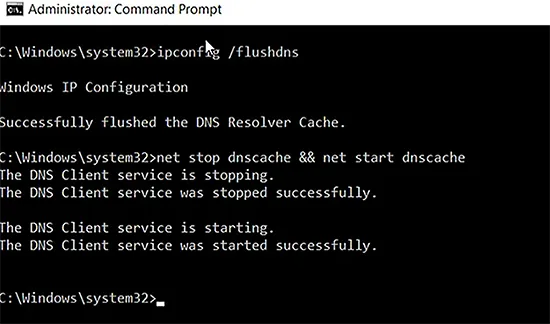 Alternatively, you can use the Service.msc console. Right-click on `DNS Client` to open its properties dialog:  Click use the `Stop` and `Start` buttons to stop and restart the service:  #### Check whether the DC is Reachable from the Client To determine whether the domain controller is reachable from the client, first run the following commands from a command prompt: ``` ping your_domain_name.com ``` 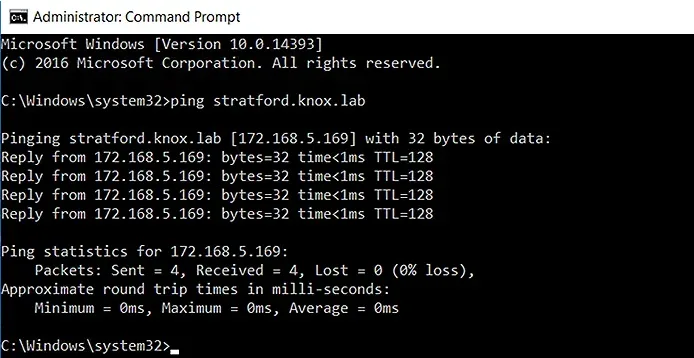 Then run this command: ``` tracert your_domain_name.com ```  You should also check the availability of the DC from another workstation on the same network. If your client cannot access the DC but other clients can, there could be a problem with your client’s cable or hardware, or with a device in the middle. To narrow down the problem, try a different network jack or go wireless. #### Check the DC’s Accessibility using PowerShell Alternatively, you can use the following PowerShell cmdlets to check the connectivity to the DC. To display the IP address: ``` Get-NetIPConfiguration –All ``` 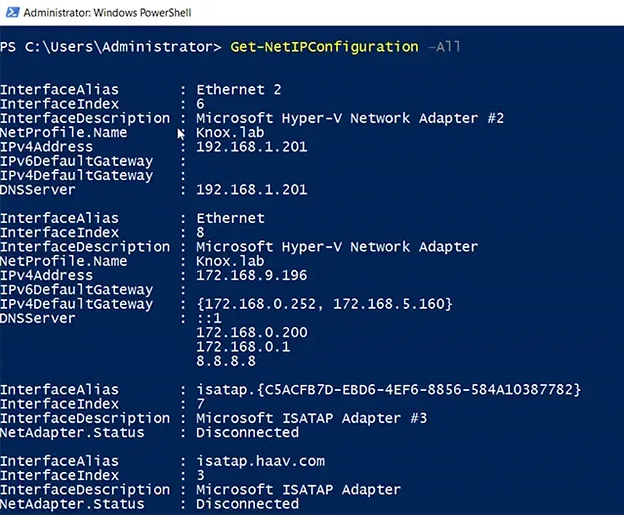 To ping the DC: ``` Test-NetConnection domainname ``` 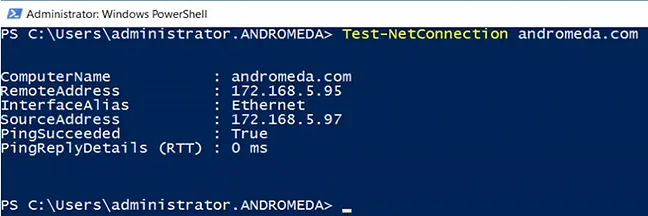 To trace the routes to the DC: ``` Test-NetConnection –TraceRoute domainname ``` 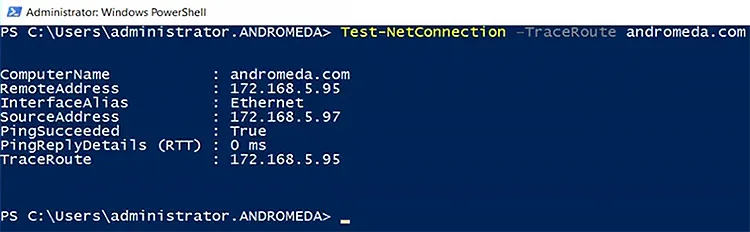 #### Add the DNS server to the TCP/IP settings of your Network Adapter If the domain controller can be reached, try adding the IP address of your DNS server to your network adapter’s Advanced TCP/IP settings. 1. Open `Control Panel`, click `Network and Sharing Center`, and then click `Change adapter settings`: 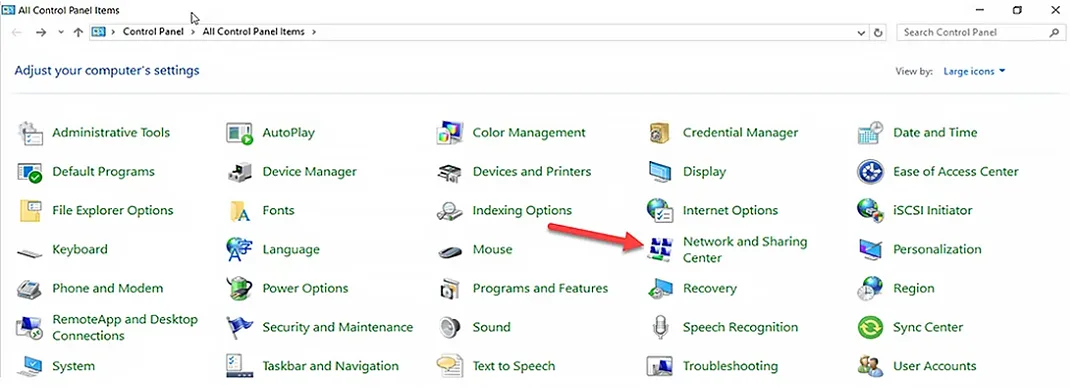 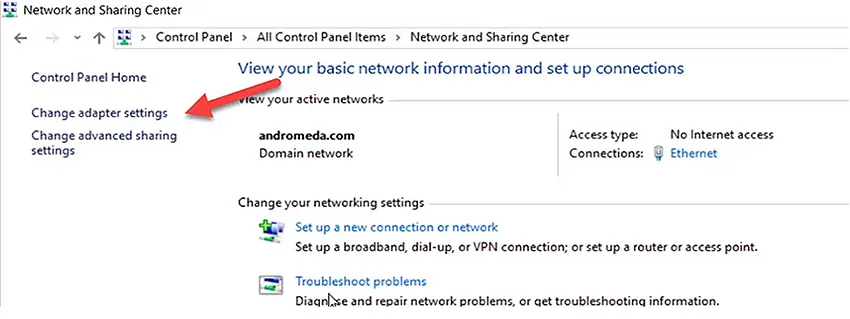 2. Right-click on the network adapter and select `Properties`. 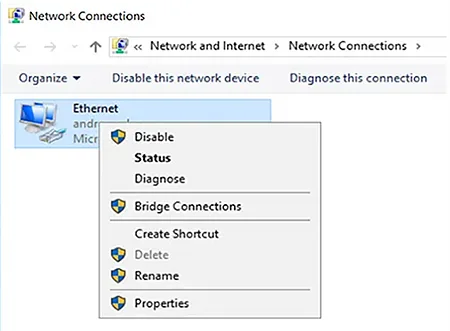 3. Right-click on `Internet Protocol Version 4 (TCP/IPv4)` and choose `Properties`. 4. Click the `Advanced` button and go to the DNS tab. 5. On the `DNS` tab, click the `Add` button, provide the IP address of your DNS server and click `OK`. (Note that the DNS server might be a DC, especially if it’s a small organization.) 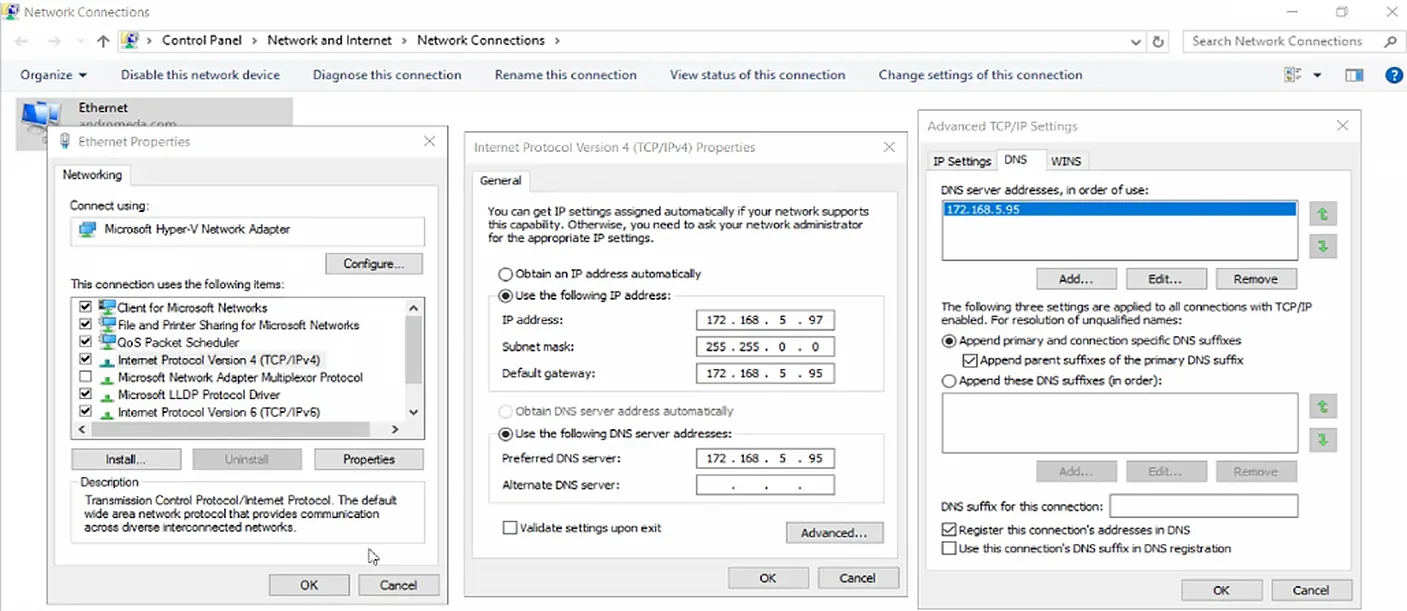 6. If multiple IP addresses are listed, use the arrow buttons to move your preferred one to the top of the list. Then click `OK`. 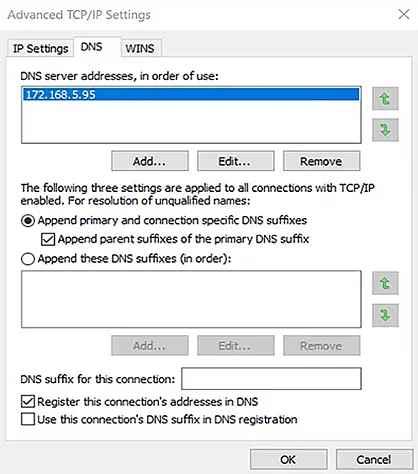 7. Click `OK` again to save your changes. 8. Restart the workstation or server so the changes will take effect, and try again to join the workstation or server to the Active Directory domain. #### Check whether you’re using the Right DNS servers Before you go too deep down the rabbit hole, double-check that you are using the correct DNS servers. Specifically, the DNS servers that DCs are aware of are used to register records that help AD-connected devices locate resources like DCs; DNS servers that are not AD-integrated do not have these records. According, make sure you are using one of the following: - A DNS server with Active Directory integration - A DNS server that replicates records from another DNS server that is aware of Active Directory - A DNS server configured to query either an AD-integrated DNS server or a DNS server with duplicated records via forwarding To check that your DNS server is one of these, use the PowerShell cmdlet shown below in a PowerShell session on a domain-joined PC. (If you don’t have another domain client to use, you will need to contact your network staff.) ``` Get-DnsClientServerAddress ``` 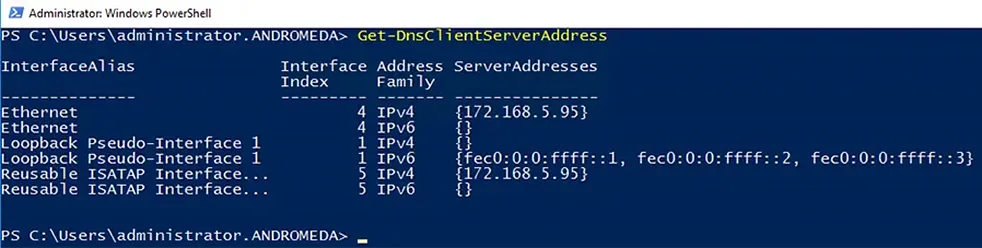 The DNS servers used by the computer running the cmdlet are listed in the ServerAddesses column. #### Option 1: Update the Computer’s DNS Client Settings If you need to update the computer’s DNS client settings, you can use the following cmdlet: ``` Set-DnsClientServerAddress ``` Alternatively, you can use the IPv4 Properties dialog box for the computer’s network card: Go to Control Panel –> Network –> Internet –> Network Connections. Then right-click on the network card, select `Properties` and then `Internet Protocol Version 4 (TCP/IPv4)`, and then `Properties`. Review the settings: 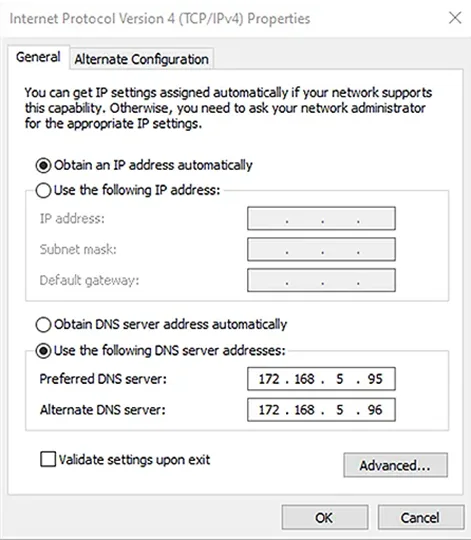 If the network supports Dynamic Host Configuration Protocol (DHCP), ensure that both the `Obtain an IP address automatically` and `Obtain DNS server address automatically` boxes are checked. If your network does not use DHCP, change the values for `Preferred DNS server` and `Alternative DNS server` to the ones you found previously (when you ran the `Set-DnsClientServerAddress` cmdlet). #### Option 2: Connect to the Domain through Windows Settings Another option is to connect to the domain through Windows Settings: 1. Press the `Windows` and `I` keys on your keyboard to open the Window Settings window. 2. Click `Accounts`. 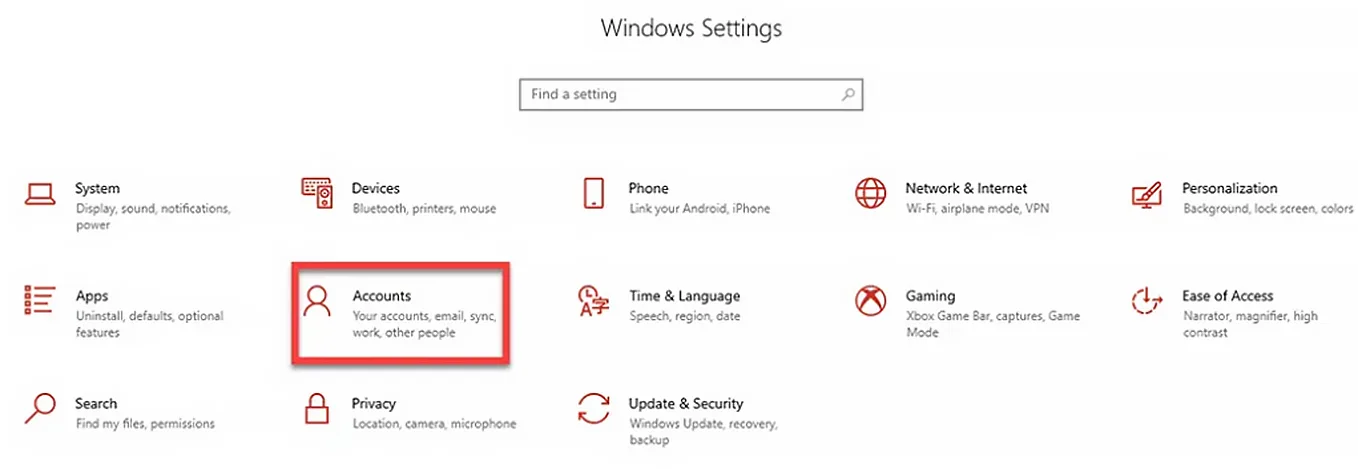 3. In the left menu, click `Access work or school`. Then click `Connect`. 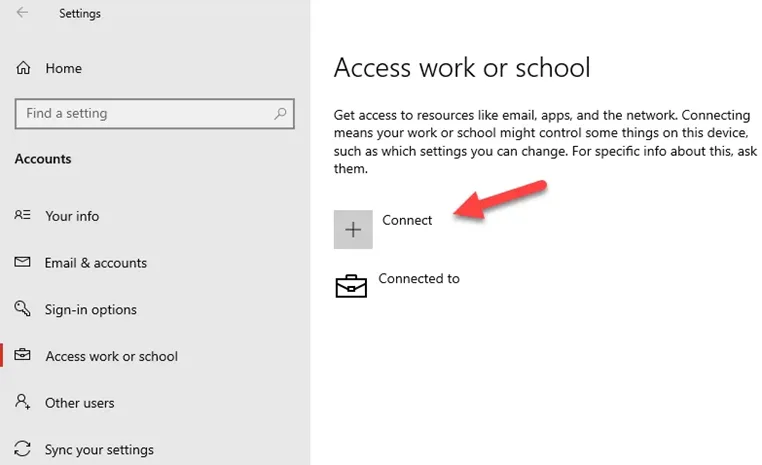 4. At the bottom of the Microsoft account window, click `Join this device to a local Active Directory domain`. 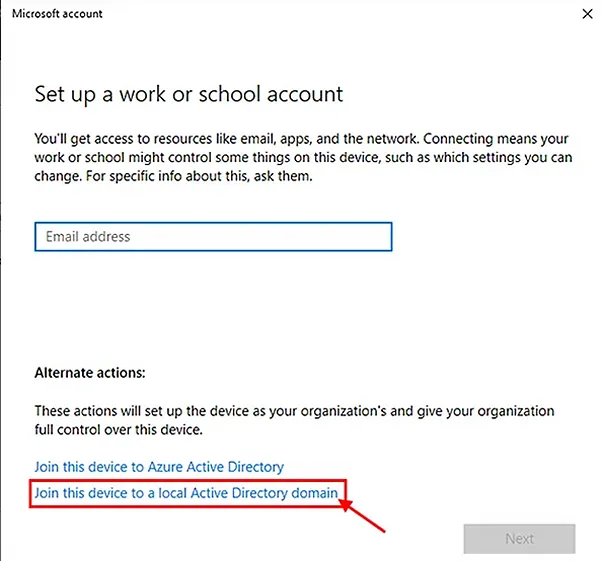 5. Provide a valid, contactable domain name and click `Next`. 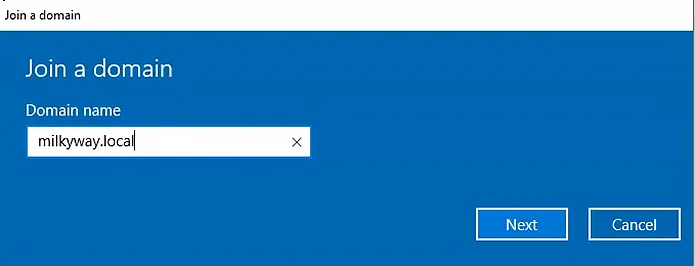 6. Next, provide a domain account to use for joining this workstation to a domain. This account must have the permissions to join a workstation to a domain. Click `OK`. 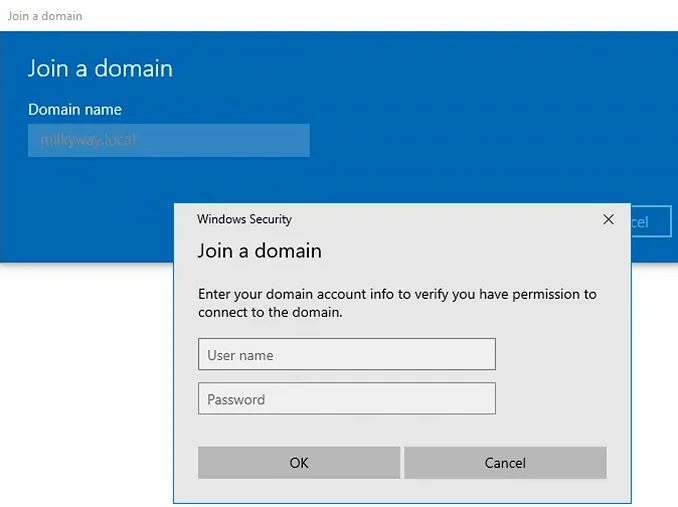 7. If you do not get an error, your workstation is now joined with the domain. On the next screen, provide a user account for this PC and then click `Next`. 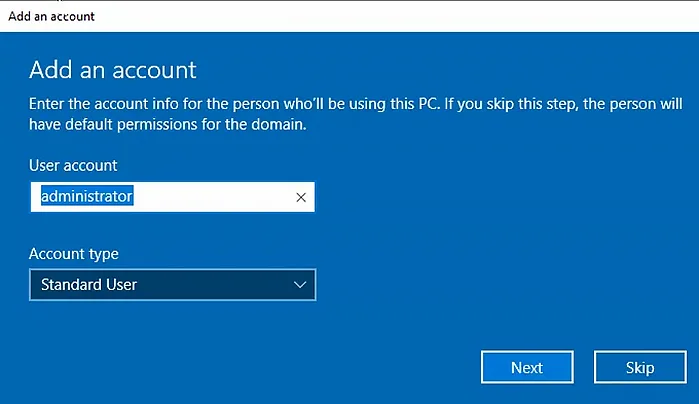 8. Click `Restart` so your changes will take effect. #### Check whether a Firewall is blocking port 53 on the DC Check whether the DNS service on the DC is being blocked by a firewall. To see whether port 53 is available on the DC, use this cmdlet: ``` test-netconnection 172.168.5.160 -port 53 ``` Check the value of “TcpTestSucceeded”. A value of “True” as shown below indicates that the DNS service on the DC is operational. 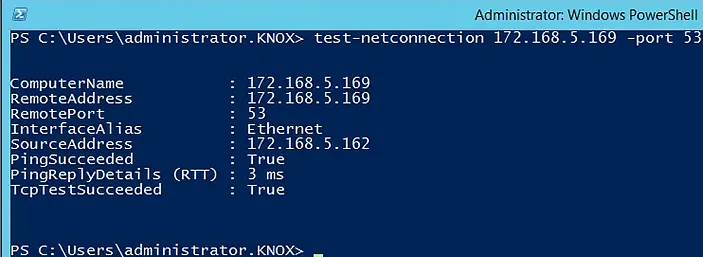 #### Check whether your Computer can resolve the Domain Name of the DC Next, check whether the workstation can accurately resolve the domain name to the DC’s IP address. Use the fully qualified domain name of the domain to which you are trying to join your workstation with the Resolve-DNSName cmdlet, as shown here: ``` Resolve-DNSName fabrikam.local ``` 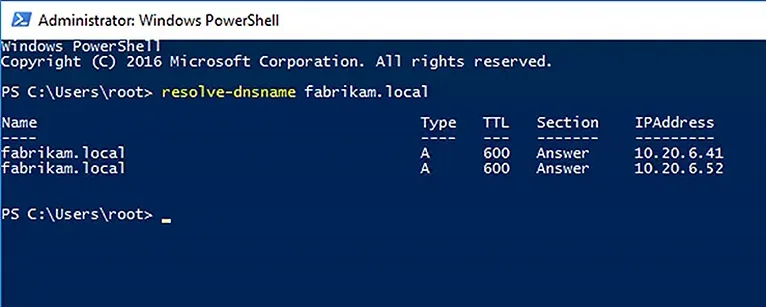 This command should return one or more DNS server records. #### Check whether the Workstation can Contact the DNS server that hosts the DNS zone Next, check whether: - The computer can communicate with the DNS server that hosts the DNS zone or resolves DNS names for the domain. - The DNS server for the client is configured correctly and that it is connected to it. - You can find a domain and connect to the DC from your computer. To get the domain and DC information, along with the IP address, use the following cmdlet: ``` nltest /dsgetdc:fabrikam.local ``` 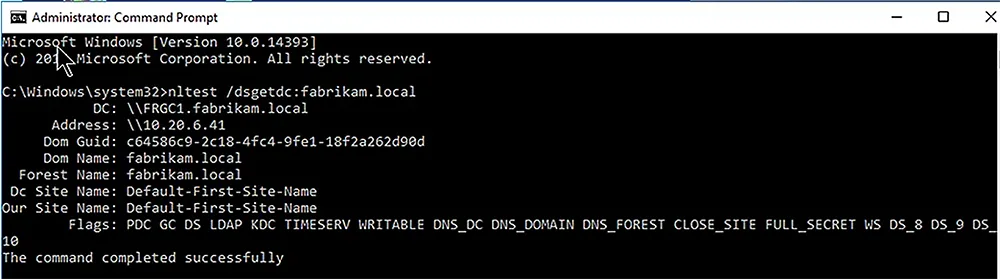 If the command completes successfully, it will return information like the following: ``` DC: \\FRGC1.fabrikam.local Address: \\10.20.6.41 Dom Guid: c64586c9-2c18-4fc4-9fe1-18f2a262d90d Dom Name: fabrikam.local Forest Name: fabrikam.local Dc Site Name: Default-First-Site-Name Our Site Name: Default-First-Site-Name Flags: PDC GC DS LDAP KDC TIMESERV WRITABLE DNS_DC DNS_DOMAIN DNS_FOREST CLOSE_SITE FULL_SECRET WS DS_8 DS_9 DS_10 The command completed successfully ``` #### Restart the Netlogon Service on the Domain Controller Restart the Netlogon service on the DC using this command: ``` net stop netlogon && net start netlogon ``` 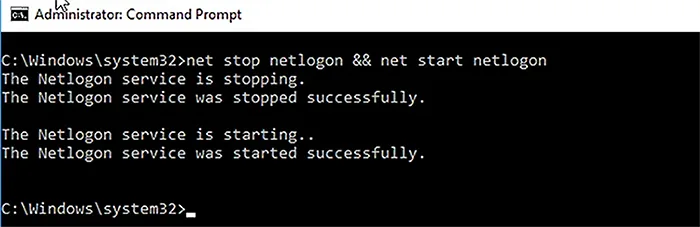 Alternatively, simply reboot the DC. When the server restarts, it will try to register the necessary SRV records on the DNS server. #### Re-register the DC’s DNS records Re-register the DC’s DNS records by running this command: ``` ipconfig /registerdns ```  Wait for the records to arrive in DNS and for them to propagate across the domain. [Original Article](https://blog.netwrix.com/2023/05/15/active-directory-domain-controller-for-the-domains-couldnot-be-contacted/) # Change IP Address on Domain Controller [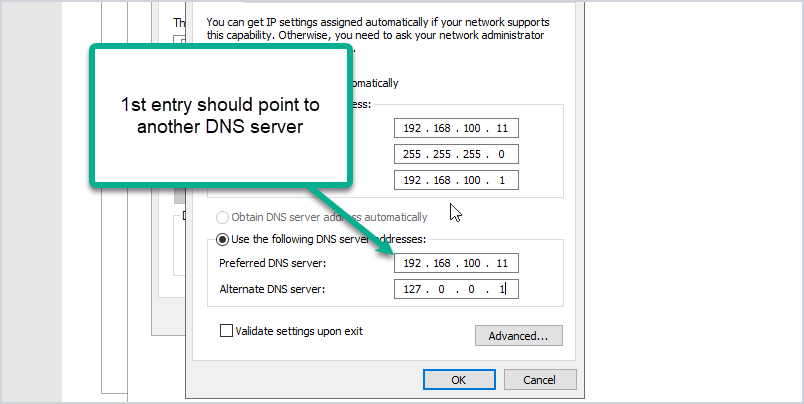](https://wikipedia.mutschlerhome.com/uploads/images/gallery/2023-11/dGjmWjYVQZSMv5fX-kNGimage.png) In this post, I will demonstrate how to change the IP address on a domain controller.Before you change the IP address it is very important to run through a checklist. Any changes to a domain controller can disrupt services and impact business operations. See my checklist below.
For this demonstration, I have the following settings. - DC1, IP Address 192.168.100.10 - DC2, IP Address 192.168.100.11 - DC3, IP Address 192.168.100.12 I’m going to change the IP on DC2 to 192.168.100.15. If you are changing to a different subnet there are additional things to consider that I go over in the checklist. ## Pre-Change Checklist I recommend reviewing each item on this checklist before making changes. I’ve migrated many domain controllers from small to large networks and these steps have been a lifesaver. If you do this often you will probably come up with your own checklist. #### Do You Have Multiple Domain Controllers? It is best practice to have multiple domain controllers and [backup Active Directory](https://activedirectorypro.com/backup-active-directory/) for disaster recovery reasons. I do not recommend making major changes to domain controllers if you have a single domain controller. If you have multiple DCs and the change breaks the server you can still operate from a secondary DC. You can [get a list of all domain controllers in your domain](https://activedirectorypro.com/list-all-domain-controllers-with-powershell/) with this command: ``` Get-ADDomainController -filter * | select hostname, domain, forest ``` #### Check FSMO Roles Does the DC hold any FSMO roles? Easily check with this command: ``` netdom query fsmo ``` Below you can see all my FSMO roles are on DC1. 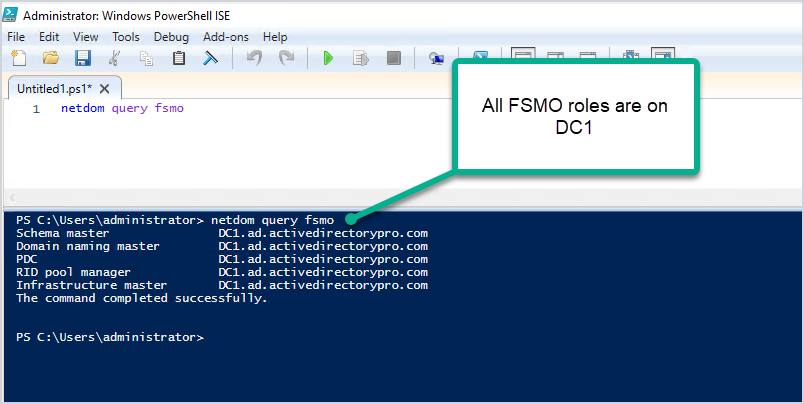 To help avoid disruption to authentication services you could move the FSMO roles to another domain controller that is on the same site. Keep in mind you would need to move any services that are manually configured to the server. I’m making changes to DC2 which has no FSMO roles running on it. #### Check Installed Roles and Features I recommend checking what services are running on the server, you don’t want to change the IP and then have something break because you didn’t know it was a DHCP server or a web server. - Check the control panel for installed software - Check the installed roles and features You can quickly check the installed roles and features with this command: ``` Get-WindowsFeature | Where-Object {$_. installstate -eq "installed"} ``` Below you can see my DC2 server has some critical services running on it including DHCP and DNS. I’ll need to consider this when changing IP addresses. 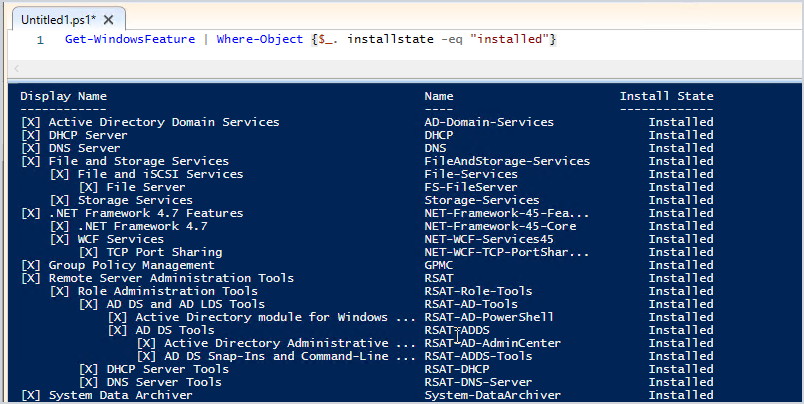 #### Find Devices Pointing to the Domain Controller with Wireshark [Wireshark](https://wireshark.org/) can help you identify what systems are pointing to your domain controller for various services like DNS, DHCP, and so on. This might be the most important pre-change step. Useful Wireshark filters: - dns - dhcp - ldap - DCERPC Here is an example: 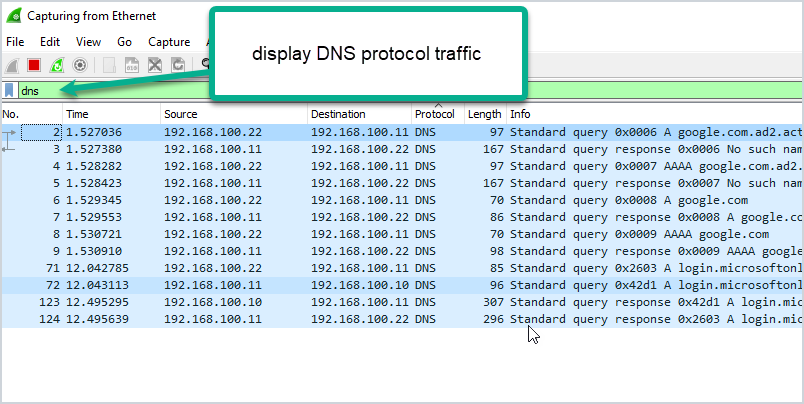 The packet capture shows that system 192.168.100.22 is using DC2 for DNS. I’ve done a large migration of domain controllers before and used Wireshark to help identify systems that are still pointing to old domain controllers. From experience, you will probably be surprised at how many systems are hardcoded to your DCS. #### Check Domain Controller Health You need to check that your domain controller is healthy before making the change. Any issues could result in replication issues, DNS issues, and so on. I’ve got a complete guide on how to use [dcdiag](https://activedirectorypro.com/dcdiag-check-domain-controller-health/) its actually very easy to use. Just open the command prompt on your server and run the command. ``` dcdiag ``` #### Check The Health of DNS By default, dcdiag does not test DNS. Use this command to run a complete test on DNS. ``` dcdiag /test:dns /v ``` Make sure the server passes all tests and the name resolution SRV record is registered. #### Run Best Practice Analyzer The best practice analyzer can find configuration issues according to Microsoft best practices. The BPA tool is not always accurate so you need to double check its findings. Also, any errors or warnings do not mean your migration will fail. It can just help you find any major misconfigurations according to Microsoft best practices. Here is a scan from my DC2. 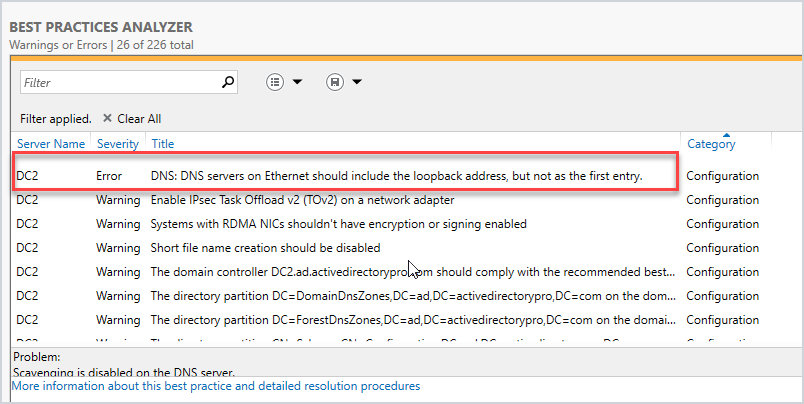 I’ve got a warning that the loopback address is not included on the ethernet adapter settings. The best practice is to point the preferred DNS server to another DNS server (not itself). Here is an example of how it should be configured: 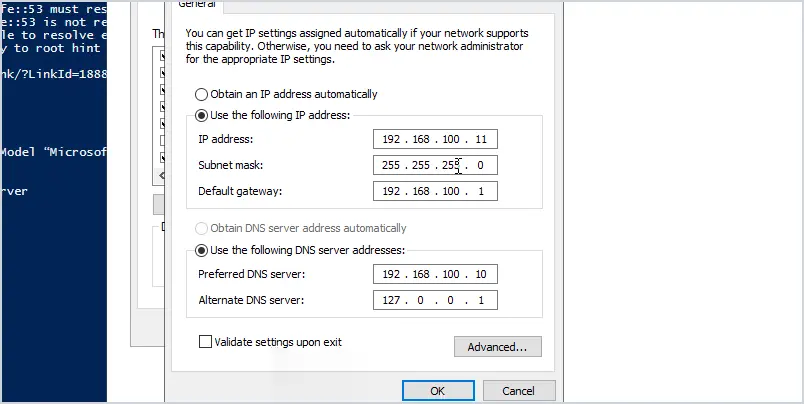 My DC2 IP address is 192.168.100.11. You can see I set the preferred DNS to another domain controller (DC1) and the alternate is set to the loopback address. This is Microsoft’s best practice. Again any warnings or errors the best practice analyzer finds doesn’t mean your migration will fail. But to help avoid any potential migration issues I recommend running this tool and reviewing the scan results. It might even fix some issues you weren’t aware of. #### Are You Changing Subnets? If you will be changing to a new subnet then consider the following: - If the server also runs DHCP you will need to update the helper address on your switch or firewall. - Add the new subnet to Active Directory sites and services. #### Check Firewall Rules Are there any firewall rules that will need to be updated? This could be your network firewall and windows based firewalls. I typically have rules on the network firewall that limit network access for critical servers like domain controllers. I would need to update the firewall rules to permit traffic to the new DC IP. #### Plan & Schedule the IP Change I recommend making this type of change during your maintenance window. No matter how much you prepare for changes there is always a potential for something going wrong. You need to have a maintenance window to allow time to resolve any issues. Don’t forget to communicate these changes with your team ahead of time. ## How to Change the IP Address of a Domain Controller: Here are the steps to changing the IP Address on a domain controller. 1. Log on locally to the server (console access, don’t RDP or use remote access). 2. Change NIC TCP/IP settings 1. Change IP Address 2. Change subnet mask (if required) 3. Change Default gateway (if required) 4. Preferred DNS server (should point to another DC in the same site) 5. Alternate DNS server (should be the loopback address 127.0.0.1) 3. After changing the IP run `ipconfig /flushdns` to remove local cache 4. Run `ipconfig /registerdns` to ensure the new IP is registered by the DNS server 5. Run `dcdiag /fix` to ensure service records are registered. #### Video Tutorial [](https://youtu.be/4R942B54cEE) Done. Nice work! ## Post Change Checklist: - Update DHCP settings if DC server is also DNS server - If subnet address changed then make sure AD Sites and services is updated - Update clients that use static ip address - Update other DCs nic settings (if needed) - Run commands `dcdiag` and `dcdiag /test:dns /v` to check for issues. - Verify DNS is working, you can do this with [nslookup](https://activedirectorypro.com/use-nslookup-check-dns-records/). - Test authenticating to the DC. You can do this by manually settings a client IP DNS settings to the IP of the DC or using PowerShell and specify the authentication server. - Continue to monitor old IP with wireshark – This can be done by a span port or assign the DCs old IP to a computer with wireshark installed. This is useful to help find systems that are still using the old IP of the DC. - Update firewall rules if needed. - If a client system is having issues try to flush the local dns cache with `ipconfig /flushdns` command - Changing the IP address on the DC should not effect any shares on the server as long as DNS is updated. ## Summary In this post, I showed you how to change the IP address on a domain controller. I also showed you a checklist I go through before changing the IP address. Authentication, DNS, and DHCP services are critical so it’s very important to plan and review as much as you can before making changes to these critical services. Also, all organizations and networks are different so over time you may have a different checklist than mine. [Original Article](https://activedirectorypro.com/change-ip-address-on-domain-controller/) # Changing default OU for new USERS and COMPUTERS By default, users are created in “Users”, and Computers in “Computers” OU, but these are the default folders, and one may want to defferentiate between them, in ex. when using Azure AD Hybrid and Autopilot or Intune, when new computers are domain joined, you want them to go to specific sync’ed OU’s instead: 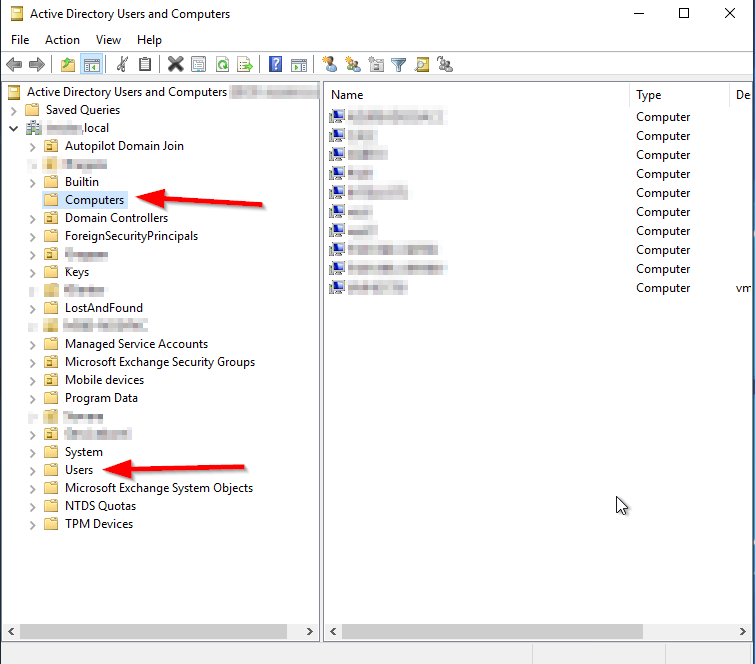 To see the default OU’s, that are in use today, type this into Powershell: Computers: ``` Get-ADDomain | select computerscont* ```  Users: ``` Get-ADDomain | select userscont* ```  How to change: Computers: ``` redircmp “OU=Autopilot Domain Join,DC=domain,DC=local” ``` Users: ``` redirusr “OU=Users,OU=Microsoft365,DC=domain,DC=local” ``` That’s it! – Effective immediately 🙂 [Original Article](https://martinsblog.dk/active-directory-changing-default-ou-for-new-users-and-computers/) # How to Perform Authoritative Sync of SYSVOL Data Using Distributed File System Replication (DFS) #### Instructions**Important:** This article is only applicable if SYSVOL data is being replicated using Distributed File System Replication (DFSR). This has been the preferred method of replicating SYSVOL data since Windows Server 2008. It is possible, however, that the older method, File Replication Service (FRS), is still in use if the domain has existed for a long time. To determine whether DFSR is in use, run `dfsrmig /getmigrationstate` from an elevated command prompt on a domain controller (DC). If the migration state is "Eliminated," DFSR is in use.
| FSMO Role | Loss implications |
| Schema | The schema cannot be extended. However, in the short term no one will notice a missing Schema Master unless you plan a schema upgrade during that time. |
| Domain Naming | Unless you are going to run DCPROMO, then you will not miss this FSMO role. |
| RID | Chances are good that the existing DCs will have enough unused RIDs to last some time, unless youre building hundreds of users or computer object per week. |
| PDC Emulator | Will be missed soon. NT 4.0 BDCs will not be able to replicate, there will be no time synchronization in the domain, you will probably not be able to change or troubleshoot group policies and password changes will become a problem. |
| Infrastructure | Group memberships may be incomplete. If you only have one domain, then there will be no impact. |
| FSMO Role | Restrictions |
| Schema | Original must be reinstalled |
| Domain Naming | |
| RID | |
| PDC Emulator | Can transfer back to original |
| Infrastructure |
| FSMO Role | Administrator must be a member of |
| Schema | Schema Admins |
| Domain Naming | Enterprise Admins |
| RID | Domain Admins |
| PDC Emulator | |
| Infrastructure |
By default, ADMT excludes these attributes from the migration, meaning you're going to be left with users that don't have this information. This will cause lots of issues if you're needing to use O365.
1. Create a new VBS script by coping the following info a Notepad document, then saving as `DisplayExclusionList.vbs`. Ensure this is saved in `C:\Temp` ``` Set o = CreateObject("ADMT.Migration") WScript.Echo o.SystemPropertiesToExclude ``` 2. Open an Administrative Command Prompt, navigate to `C:\Windows\SysWow64`, then run the the following command and the results should look similar to below the command. ``` cscript.exe C:\Temp\DisplayExclusionList.vbs ```  3. Once you have done this, you will see the list of all the items that are in the exclusions list. From here you can create a similar script which will amend that list and remove mail and proxyAddress ``` Set o = CreateObject("ADMT.Migration") o.SystemPropertiesToExclude = "msDS-PSOApplied,msDS-HostServiceAccount,attributeCertificateAttribute,audio,carLicense,departmentNumber,employeeNumber,employeeType,gecos,gidNumber,homePostalAddress,houseIdentifier,ipHostNumber,jpegPhoto,labeledURI,loginShell,memberUid,msDFSR-ComputerReferenceBL,msDFSR-MemberReferenceBL,msDS-ObjectReferenceBL,msDS-SourceObjectDN,msExchAssistantName,msExchHouseIdentifier,msExchLabeledURI,msRADIUS-FramedIpv6Route,msRADIUS-SavedFramedIpv6Route,msSFU30Aliases,msSFU30Name,msSFU30NisDomain,msSFU30PosixMember,msSFU30PosixMemberOf,networkAddress,nisMapName,otherMailbox,photo,preferredLanguage,registeredAddress,roomNumber,secretary,shadowExpire,shadowFlag,shadowInactive,shadowLastChange,shadowMax,shadowMin,shadowWarning,textEncodedORAddress,uid,uidNumber,unixHomeDirectory,unixUserPassword,userPKCS12,userSMIMECertificate,x500uniqueIdentifier" ```Whilst this might look like a really long command, all I did was copy the output from the DisplayExclusionsList.vbs file, then input it at the end of the script, and removed the `proxyAddress` and `mail` entries. After running the migration again, the attributes moved through very nicely and saved me a lot of time!!
[Original Article](https://wikipedia.mutschlerhome.com/attachments/30) # Using The Active Directory Migration Tool: A Comprehensive Guide By [Lavanya Rathnam](https://techgenix.com/author/lavanya/) / April 27, 2018 Migration has become an integral part of IT operations today. As an admin, you may have to move resources from one project to another, migrate objects as a part of a corporate strategy, and more. All this means you’re constantly doing migrations in one form or another. The good news though is migration is easy when you use Microsoft’s [Active Directory](https://techgenix.com/active-directory-synchronization/) because of a tool called Active Directory Migration Tool, or ADMT in short. This tool comes with a ton of options and wizards to help you migrate across domains and forests within just a few minutes. ### What is the Active Directory Migration Tool? The Active Directory Migration Tool helps to migrate objects and restructure tasks in an Active Directory environment. It is used for migrating between domains in the same forest (intraforest) or across different forests (interforest). ### Prerequisites for installing Active Directory Migration Tool To install the Active Directory Migration Tool, you need the following system requirements: - Windows Server 2008, Windows Server 2008 R2, Windows Server 2012, Windows Server 2012 R2, and Windows 2016 - Active Directory Migration Tool doesn’t work when computers are a read-only [domain controller](https://techgenix.com/networking-basics-part5/) or when they are a part of a server core configuration. - The source and the target domain should run only on one of the supported operating systems. - You need a SQL server database instance for ADMT to store data. You can either install it on your own machine or create an instance from an existing database in your network. ### How to install Active Directory Migration Tool 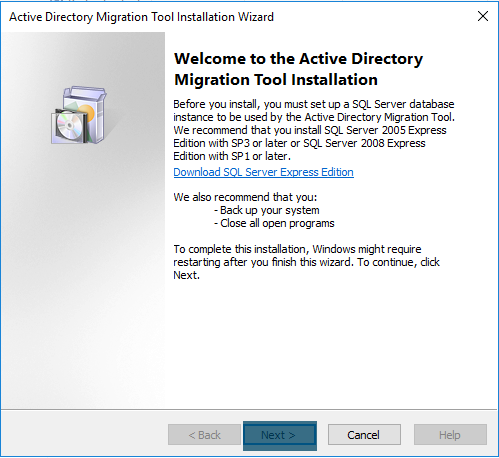 Installing ADMT is a fairly easy process. Here is a step-by-step guide to installing it. - Remove all previous versions of ADMT. - Download the Active Directory migration tool from [Microsoft’s site](https://www.microsoft.com/en-us/download/confirmation.aspx?id=56570). Navigate to the downloaded folder and double-click on admtsetup32.exe. - Read through the instructions and click “next” when you’re done. - Accept the license terms and conditions. - In the next step, you have the option to be a part of Microsoft’s “customer experience improvement program.” Select the “join” radio button if you want to send your hardware configuration information to improve ADMT. Else, select the “I do not want to join” radio button and click “next.” - In the following screen, provide the database instance. If you’re using a local server, specify it in the format “..”. For example, you can input “..SQLSERVER”. On the other hand, if you’re using an instance of your network database, use the format “.” - When you click “next,” the wizard will take a few minutes to configure your components and install them. - Once the installation is done, note the log path and installation directories. Finally, click “finish.” With this, your ADMT installation is complete and you’re all set to use it. ### How to use Active Directory Migration Tool You can migrate users, groups, computers, managed server accounts, and all other objects on AD FS using the ADMT console, command line, or VBScript. Let’s see some of the basic migration examples using the ADMT console. ### Intraforest migration using Active Directory Migration Tool #### Create a checklist Before starting the migration process, here’s a list of things to do. - As a first step, understand the structure of your forest. Check out your root domain, child domain, and tree domain, and see how they’re structured. Since they’re all part of the same forest, they’ll most likely have a two-way trust by default. - Determine which objects you want to move, the source of these objects, and the destination where you want to move them. - Consider creating a table to document the domain objects you plan to move. Include the source, destination, and even a status column for your reference. - ADMT doesn’t come with any built-in test options. So develop a test plan and make sure you test each object during and after the migration process. - Check the membership and credentials of each object before you migrate - ADMT migration is not reversible. The only way to move objects from the destination back to the source is to do another migration process. This can be cumbersome and long, so have a rollback plan in place. - Inform all users who will be affected by this migration. Follow your organization’s protocol and send clear communication ahead of time. Once you’ve taken care of these premigration tasks, start the migration process. #### Migration for limited objects If you want to migrate only a small number of objects, use the ADMT console to manually select the objects, and migrate them. To do that… - Log in with your ADMT credentials on the target or parent domain, where ADMT is already installed. - Navigate to the “Active Directory Migration Tool” folder, right-click on it, and select “user account migration wizard.” - When the wizard opens, click the “next” button. - In the next screen, give the NetBIOS or DNS name of the source and target domains, and click “next.” - Then, choose the “select users from domain” radio button 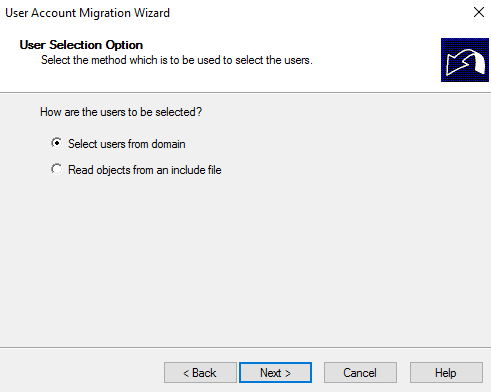 - In the next screen, click the “add” button. This will open a dialog box where you can browse through user accounts and select the users you want to migrate. - Once you’re done, click the “OK” button and the dialog box will close. Check if the main window has all the user accounts you selected. Click “next.” - Select the target [organizational unit](https://techgenix.com/crash-course-active-directory-organizational-unit-design/) for the selected users and click “next.” - In this screen, check “translate roaming profiles” and “update user rights” checkboxes. You may get warnings here. Simply ignore them and click “next.” - The next screen is conflict management settings. It’s best to select “do not migrate source object if a conflict is detected in the domain” as it makes conflict resolution easy for you. Click “next.” - This is the last screen, so check the details and click “finish.” Wait for the wizard to complete the migration. You’ll get a prompt in case of errors; otherwise you’ll see a summary of the migration process. Open the target domain and verify if the users are migrated. #### Migration for a large number of objects While it was easy to migrate a few objects manually, it can get cumbersome to select hundreds of objects. So, to migrate more than a handful of objects, it’s best to include them in a file and upload the same to the wizard. The first few steps are similar to the above-mentioned migration process. However, instead of choosing the “select users from domain” radio button, choose “read objects from an include file.” Browse, add the include file, and continue with the wizard. The process is similar to migrating individual user accounts. Once you’re done with the wizard, click “finish.” #### Migration of groups To migrate entire groups from source to destination, start with the “Active Directory Migration Tool” directory. Right-click and select “group account migration wizard.” - In this wizard, give the NetBIOS or DNS name of the source and target domains. - Next, choose “select groups from domain” option if you want to migrate only a few groups. In case of large groups, select “read objects from an include file.” - For the first option, manually choose from the list of groups. In the case of the second option, upload the include file with the names of all the groups you want to migrate. - Select the target organizational unit for the migrating groups. - Do not make any selection in the “group options” screen. Simply click “next.” - In the “conflict management” screen, choose “do not migrate source object if a conflict is detected in the target domain.” - Finally, check your information, click “finish” and wait for the wizard to complete the migration. You’ll get a summary of the migration process. 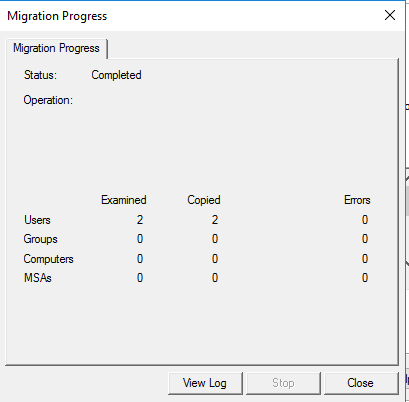 #### Migration of workstations or member servers If you want to migrate workstations or member servers, the process is fairly the same. The only change is choose “computer migration wizard” from the right-click menu instead of “group account migration wizard.” The wizard will be the same until you select the organizational unit for the migrating workstations or member states. 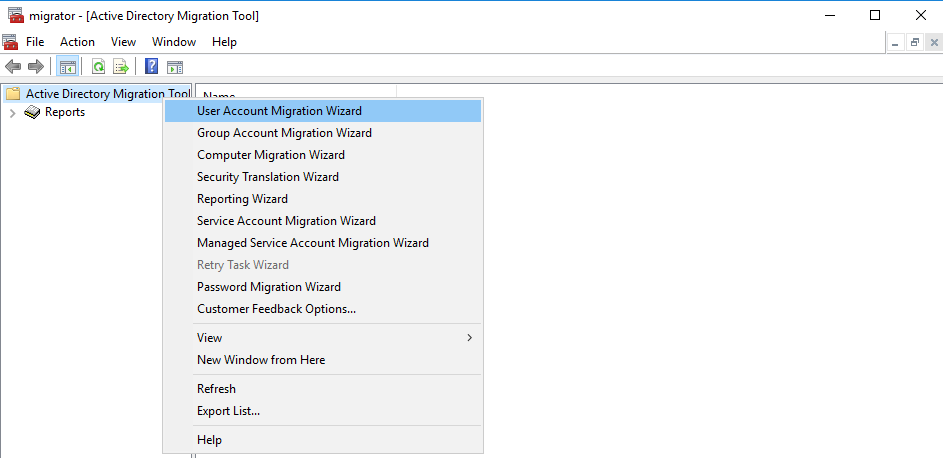 After that, follow these steps. - You’ll get a “translate objects” screen, and here check “local groups” and “user rights.” - In the next screen, choose “replace” radio button and click “next.”/li> - Accept the default value of five minutes and click “next.” - The next screen is “object property exclusion.” Make no changes here, and simply click “next.”/li> - In the “conflict management” screen, choose “do not migrate source object if a conflict is detected in the target domain.” - Finally, check your information, click “finish,” and wait for the wizard to complete the migration. You’ll get a summary of the migration process. That’s how you migrate different objects within the same forest. [Active Directory’s](https://techgenix.com/active-directory-migration-considerations-part1/) wizards take care of much of the work, so you can channel your time for the more difficult tasks. In the next article, we’ll talk about how you can migrate objects across forests. In most cases, you’ll do this migration when one company has taken over another and the resources have to be moved to the new company. Obviously, that’s a much longer process, so see you in the next part. About The Author Lavanya Rathnam Lavanya Rathnam is a professional writer of tech and financial blogs. Creative thinker, out of the boxer, content builder and tenacious researcher who specializes in explaining complex ideas to different audiences. [Original Article](https://techgenix.com/active-directory-migration-tool/)