Active Directory - Walkthroughs
- LAPS
- Rename Domain
- How to Rename an Active Directory Domain Name
- Step by Step How to Rename Domain Name in Windows Server 2016
- Troubleshooting
- Change IP Address on Domain Controller
- Changing default OU for new USERS and COMPUTERS
- How to Perform Authoritative Sync of SYSVOL Data Using Distributed File System Replication (DFS)
- How to Seize FSMO Roles in Active Directory
- proxyAddress Attribute doesn't copy when using Active Directory Migration Tool (ADMT)
- Using The Active Directory Migration Tool: A Comprehensive Guide
LAPS
An Overview of Windows LAPS
What is Windows LAPS?
Windows LAPS (Local Administrator Password Solution) automatically manages a local administrator account’s password: changing the password when it expires (using password length and complexity settings) and backing up the password to Active Directory so it is available for authorized users to retrieve.
Windows LAPS was made available with the April 2023 Cumulative Update for the following Operating Systems:
- Windows 11 22H2
- Windows 11 21H2
- Windows 10 (those editions still supported by Microsoft)
- Windows Server 2022
- Windows Server 2019
Windows LAPS is not available for Windows Server 2016, but you can continue to use legacy LAPS with it.
Windows LAPS is a whole new solution for managing the local administrator password and is not just an update of the legacy LAPS solution that was originally released in 2015. It includes much of the same functionality of legacy LAPS, and also includes a couple of new things:
- Supports encrypting passwords stored in AD
- Can store password history in AD (for encrypted passwords only)
- Supports saving the password to Azure AD instead of Windows Server (on-prem) AD
Comparing Windows LAPS and Legacy LAPS
| Comparing Windows LAPS and Legacy LAPS | ||
| Windows LAPS | Legacy LAPS | |
| Password-management bits | Included with the April 2023 Cumulative Update for Windows | The client-side extension must be installed on each computer. |
| Frequency of processing the LAPS policy cycle | This is hard-coded in Windows to 1 hour
The Invoke-LapsPolicyProcessing PowerShell cmdlet can be used to trigger processing in addition to gpupdate /force. |
Since this was a Group Policy Client-side extension, this was done at the same time as a group policy refresh.
gpupdate /force will force the processing of Group Policy |
| Configuration options | Group Policy
Configuration Service Provider (such as Intune) |
Group Policy |
| Group Policy settings location | Computer Configuration – Policies – Administrative Templates – System – LAPS | Computer Configuration – Policies – Administrative Templates – LAPS |
| Where is the password stored in AD | All Windows LAPS attributes are confidential attributes:
msLAPS-PasswordExpirationTime: This is a regular attribute that stores the date and time that the LAPS password will expire / when it will be reset, calculated by adding the value of the Password Age (Days) setting to the time the password was last set msLAPS-Password: A clear-text string that contains the name of the managed account, the timestamp of the password update, and the current password msLAPS-EncryptedPassword: The encrypted current password msLAPS-EncryptedPasswordHistory: Contains the encrypted previous passwords (it will store as many of the previous passwords as it is configured to, which allows for a maximum of 12) msLAPS-EncryptedDSRMPassword: This setting only pertains to Domain Controllers. msLAPS-EncryptedDSRMPasswordHistory: This setting only pertains to Domain Controllers. |
ms-mcs-AdmPwd: This is a confidential attribute where the password is stored
ms-mcs-AdmPwdExpirationTime: This is a regular attribute that stores the date and time that the LAPS password will expire / when it will be reset, calculated by adding the value of the Password Age (Days) setting to the time the password was last set |
| Where can the password be backed up to? | Active Directory or Entra ID. | Active Directory only. |
| Is the password encrypted when backed up to AD/Entra ID? | Active Directory: It depends on the LAPS policy in use when the password is saved in AD.
Entra ID: Yes, the password is always encrypted. |
No. |
| Who can access the password in AD |
|
You must have access to the confidential attribute in AD. |
Prerequisites for Using Windows LAPS
- The computer object must have permission to write its password to itself in Active Directory.
- The computer must be running an Operating System for which Windows LAPS is available.
- The computer must be updated with the April 2023 Cumulative Update for Windows or later.
- The computer must have a Windows LAPS policy assigned to it.
- The computer must be able to reach a Domain Controller in order to backup the password to AD.
- The domain functional level must be Windows Server 2016 or later in order to support encrypting the password backed up to AD.
Windows LAPS Policy Settings
The following settings are located in Computer Configuration – Policies – Administrative Templates – System – LAPS:
| Setting | Description |
| Password Settings | If enabled, you can configure the following aspects of the password that is generated:
Password Complexity: Determines what type of characters are used to generate the password. The available options are:
Password Length: Determines how many characters the password will be in length. This must be a number from 8 – 64. The default value is 14. Password Age (Days): This is the number of days that will be used to set the password expiration time. This must be a number from 1 – 365. The default value is 30. Passphrase Length (words): This is the number of words that will be used in the passphrase (when Password Complexity is set to a passphrase option). This must be a number from 3 – 10. The default value is 6. |
| Name of administrator account to manage | The name of the local administrator account whose password is managed.
Only set this if you want Windows LAPS to manage an account other than the built-in Administrator. The default, when not specified, is the built-in Administrator (by its well-known RID). Notes: If you specify a disabled account, the password will be managed by the account will not be enabled by LAPS. If you specify an account that does not exist, . If you specify an account that is not a member of the local Administrators group it will not be added to the local Administrators by LAPS. |
| Configure automatic account management |
This option is only applicable starting with 24H2 operating systems (Windows 11 24H2 and Server 2025). When enabled, this takes precedence over the Name of administrator account to manage setting. If enabled, you can configure the following aspects of the managed account: Specify the target account to manage: Two options are available:
Automatic account name (or name prefix): The name of the account that Windows LAPS will manage the password for (or the prefix on the name of the account if Randomize the name of the managed account is checked.) Enable the managed account (checkbox): If checked, the account will be enabled by LAPS. If unchecked, the account will be disabled by LAPS. Randomize the name of the managed account (checkbox): If checked, the Automatic account name (or name prefix) will be treated as a prefix; a suffix of eight random numbers will be added to it. The name will also be randomized every time the password is changed. If unchecked, the Automatic account name (or name prefix) will be treated as the account name. |
| Enable password encryption | If enabled, the password is encrypted before it is backed up to AD.
If disabled, the password is not encrypted before it is backed up to AD. If not configured, the default value is Enabled. This setting is only applicable when backing up the password to Active Directory. |
| Enable password backup for DSRM accounts | If enabled, the Domain Controller’s DSRM account password will be managed and backed up to AD.
If not configured, the default value is Disabled. This setting is only applicable to Domain Controllers. |
| Do not allow password expiration time longer than required by policy | If enabled, LAPS will adhere to the computer’s password settings policy and the password will be reset when the password has expired based on the computer’s password settings policy. The new expiration is then set so it adheres to the computer’s password settings policy.
If disabled, the expiration of the password set by LAPS could exceed the requirement of the computer’s password settings policy. If not configured, the default value is Enabled. |
| Configure size of encrypted password history | If enabled, you can specify how many older encrypted passwords to store in AD. This must be a number from 0 – 12.
This setting only applies when encrypted passwords are being backed up to AD. This setting may help out when reverting to a VM snapshot where an older password was in use at the time the snapshot was taken. The default value, if not configured, is 0. |
| Configure password backup directory | Determines where the password is backed up to.
Options:
The default value when not specified is 0 (the password will not be backed up). |
| Configure authorized password decryptors | When enabled, you will specify the user or group that is authorized to decrypt the encrypted password in AD.
You must provide one of the following as the decryptor
Warning: If the device cannot resolve the SID or name provided, the password will not be backed up. This setting only applies when encrypted passwords are being backed up to AD. The default value when not specified is the Domain Admins group. This setting is only applicable when backing up the password to Active Directory. |
| Post-authentication actions | Specify an action that will be triggered after the successful authentication of the account whose password is being managed.
The available actions are:
Set the grace period to the time you want it to wait after the authentication before the action is triggered. The grace period must be set greater than 0; if set to 0 the action will not be triggered. The default behaviour, when this setting is disabled or not configured, is to reset the password and logoff the managed account after 24 hours. |
Retrieving a LAPS Password from Active Directory
There are several methods to retrieve the LAPS password.
Using the Active Directory Users and Computers (ADUC) Console
- Open the Properties for the computer.
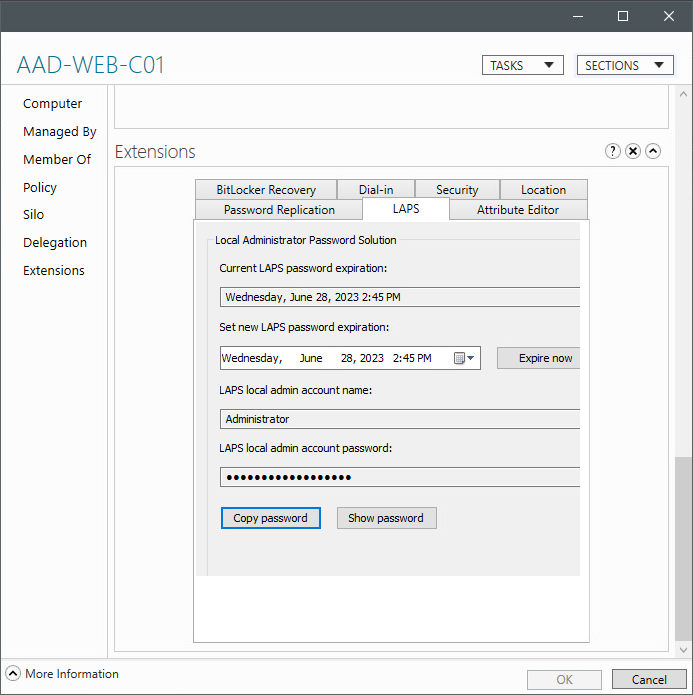
- Select the LAPS tab.

On the LAPS tab of the computer’s Properties page:- The Current LAPS password expiration is displayed.
- You can specify a new password expiration.
After specifying the new expiration click OK or Apply. - You can make the password expire now by clicking on the Expire now button and then clicking on OK or Apply.
This will set the expiration to the current date and time.
The password will not actually be changed immediately on the computer, but when it next processes LAPS policy. - The LAPS local admin account name is displayed.
- The LAPS local admin account password is masked by default
- Clicking Copy password will put the clear-text password on your clipboard without unmasking it here.
- Clicking Show password will display the password in clear text here.
Note: You cannot view the password history from here. You must use PowerShell to access the password history.
Using Active Directory Administration Center
- Open the properties for the computer.
- Scroll down to the Extensions.
- Select the LAPS tab.

The LAPS tab is available just as it would appear in ADUC. Refer to the ADUC section above for details.
Using PowerShell
You can retrieve the LAPS password using the Get-LapsADPassword cmdlet.
- Use the Get-LapsPassword cmdlet

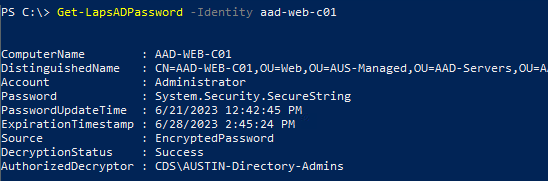
Get-LapsADPassword -Identity <computername>
will return the current password in a Secure String object.The Account property shows the managed account name.The Password property contains the password.The PasswordUpdateTime shows when the password was updated.The ExpirationTimestamp shows when the current password expires/when a new password will be required.The DecryptionStatus property will show Success if you are allowed to decrypt the password. It will show Unauthorized if you are not.The AuthorizedDecryptor property will show the user or group that can decrypt the password.Note: When using tab-completion it is easy to accidentally run the Get-LapsAADPassword instead. This is the cmdlet used to retrieve the password from Azure Active Directory. - Or to get the password in plain text
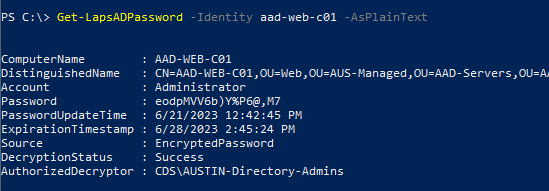
Get-LapsAdPassword -Identity <computername> -AsPlainText
will return the current password in plain text. - Or to get the password history in plain text

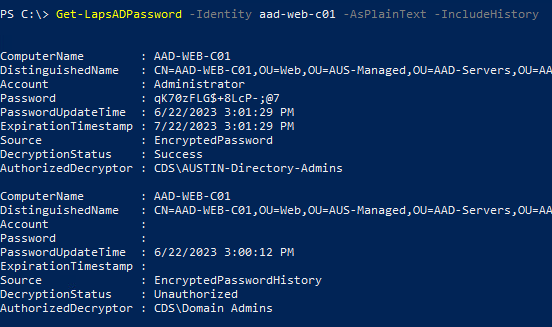
Get-LapsAdPassword -Identity <computername> -AsPlainText -IncludeHistory
will return the password history in plain text
The number of passwords in the password history depends on the LAPS policy applied and how many times the password has been changed by LAPS.
Each password in the password history can have a different Authorized Decryptor, depending on what was specified in the policy when the password was encrypted and stored in AD.The AuthorizedDecryptor shows who can decrypt the password.
The DecryptiomStatus shows whether the password was successfully decrypted for the user running the cmdlet.In this example, the user running the cmdlet can see the latest password as they are a member of the Authorized Dectryptors. They cannot see the previous password as the Authorized Dectryptors for it is a different group that the user is not a member of.
Windows Event Log
A new Windows Event Log channel has been created for Windows LAPS.
PowerShell Module
Below are some helpful cmdlets included in the LAPS PowerShell module.
| Cmdlet | Description |
| Get-LapsAdPassword | Gets the escrowed password(s) from Active Directory. Review the Retrieving a LAPS Password section above for details and examples. |
| Invoke-LapsPolicyProcessing | Initiates the processing of the current LAPS policy, independent of the hourly processing cycle). |
| Reset-LapsPassword | Attempts to immediately change the managed account’s password (whether or not it has expired). |
Frequently Asked Questions
Q1: Can I initiate a password change ahead of the expiration time?
A1: There are a couple of ways to have the managed password changed:
- Use the Reset-LapsPassword cmdlet, which will result in LAPS attempting to reset the password immediately.
- Edit the password expiration for the computer to the current time, which will result in the password being reset the next time LAPS policy is processed on the computer.
Q2: What happens if the computer cannot reach a Domain Controller when the password expires? Will the password be set without the new password being backed up in AD?
A2: As with legacy LAPS, Windows LAPS will first escrow the new password in Active Directory. Only if that is successful with the password actually be changed on the computer.
Q3: Who can decrypt an encrypted password in Active Directory?
A3: This is specified by the user or group set as the authorized password decryptors in the LAPS policy at the time the password was stored in AD.
Is this setting was not set, the decryptors default to the Domain Admins.
Q4: What happens to the password and password expiration stored in Active Directory when Windows LAPS manages the password?
A4: The attributes used by legacy LAPS are not modified by Windows LAPS. After Windows LAPS starts to manage the account’s password the legacy LAPS attributes will remain intact. Windows LAPS does not clear out the Legacy LAPS attributes.
This can be confusing, having two sets of password attributes, but you should avoid programmatically clearing out all of the legacy LAPS attributes on all of your computers without verifying they are no longer valid. You could be clearing out currently-set passwords making them unavailable (Windows LAPS is not available for Windows Server 2016 which will continue to use legacy LAPS if enabled. Windows LAPS may not have changed the password yet if there is no Windows LAPS policy assigned to the computer).
Q5: What will happen if a computer has both a legacy LAPS and Windows LAPS policy applied to it?
A5: Windows LAPS will manage the password.
Q6: Will Windows LAPS save both an unencrypted and encrypted password to AD?
A6: No, Windows LAPS will store only an encrypted password or unencrypted password based on the computer’s policy settings.
Q7: What will happen if the account I specify as the Name of administrator account to manage does not exist?
A7: Windows LAPS policy processing will fail. It can not manage an account that does not exist. This scenario can lead you to being locked out of the computer / not having a way to get admin access to it.
Q8: What will happen if the account I specify as the Name of administrator account to manage is disabled?
A8: Windows LAPS policy processing will succeed. It will manage the account’s password, but it will not enable the account. The account must be enabled before it can be used. This scenario can lead you to being locked out of the computer / not having a way to get admin access to it.
Q9: What will happen if the account I specify as the Name of administrator account to manage is not a member of the local Administrators group?
A9: Windows LAPS policy processing will succeed. It will manage the account’s password, but it will not add it to the Administrators group. This scenario can lead you to being locked out of the computer / not having a way to get admin access to it.
Q10: Can the password of more than one account be managed by Windows LAPS?
A10: No, only one account can be managed.
Q11: Should I remove (delete or unlink) my GPO(s) that configure Legacy LAPS?
A11: To “clean things up”, you can unlink or delete any GPOs that configure Legacy LAPS as long as you do not have any computers running an operating system that Windows LAPS is not available on. If you need to keep using Legacy LAPS for older operating systems, you can optionally use filtering (security filtering or WMI filtering) on the GPO to have it only apply to these computers – although you do not need to do anything as Windows LAPS will manage the password in the scenario where Windows LAPS and Legacy LAPS are both enabled.
Rename Domain
How to Rename an Active Directory Domain Name
In this short article, we will show you how to properly change an Active Directory domain name from test.com to resource.loc. In fact, it is not the best idea to rename an Active Directory domain. In large and complex AD infrastructure, it is better to migrate users, computers, and servers to a new domain. However, for simple and small AD environments (test, pre-prod, or DMZ ), you can easily rename your AD domain according to this guide
Before you start, make sure that:
- You have an up-to-date backup of your domain controllers;
- Replication works correctly in your domain and there are no critical errors of domain controllers or DNS (How to check Active Directory health);
- There is no Exchange in your domain. You cannot rename an AD domain if Exchange is deployed in it (except for Exchange Server 2003);
- To rename a domain, you need Windows Server 2003 or newer (in my example, the functional level of my AD domain and forest is Windows Server 2016).
First of all, create a DNS zone for your new domain on your current domain controllers. To do it, open the dnsmgmt.msc snap-in, create a new primary Forward Lookup Zone with the name resource.loc and replicate it on all DNS servers in your old test.com domain.
You can create a new DNS zone using PowerShell:
Add-DnsServerPrimaryZone -Name resource.loc -ReplicationScope "Domain" –PassThru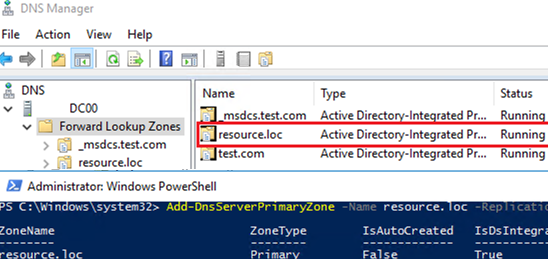
Wait till the new DNS zone is replicated on all DCs.
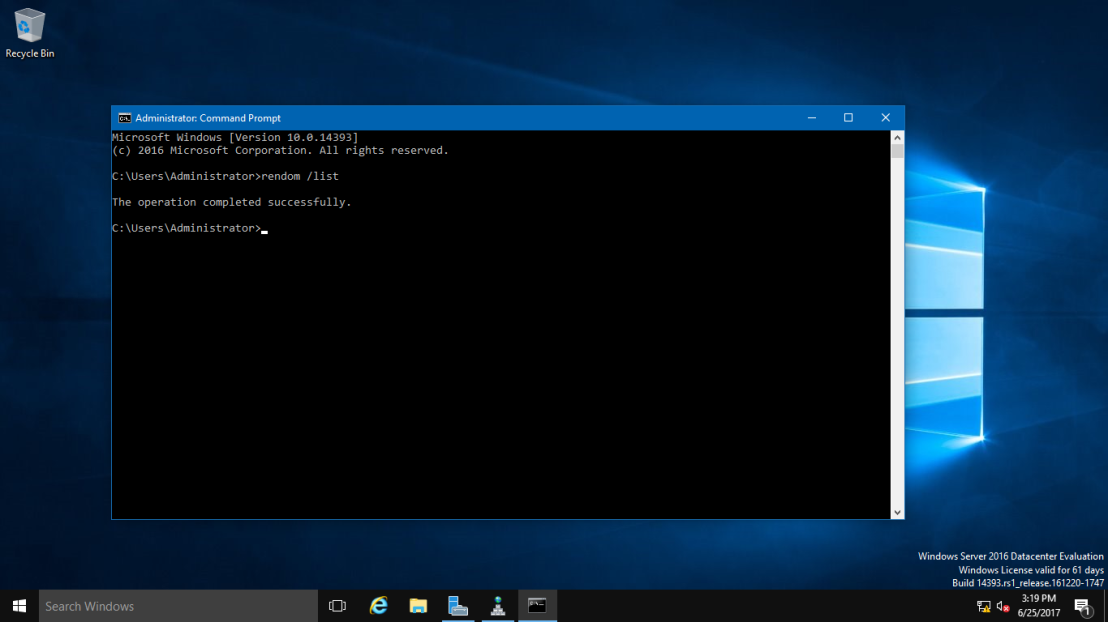
Run the rendom /list command to generate a Domainlist.xml file with the current AD forest configuration.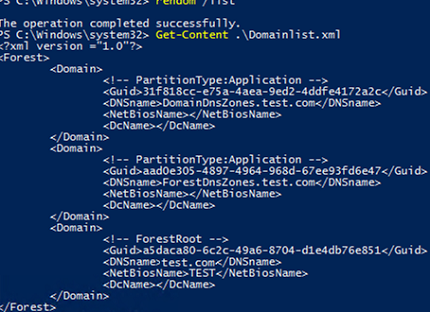
Get-Content .\Domainlist.xml<Forest>
<Domain>
<!-- PartitionType:Application -->
<Guid>6944a1cc-d79a-4bdb-9d1b-411fd417bbbc</Guid>
<DNSname>DomainDnsZones.test.com</DNSname>
<NetBiosName></NetBiosName>
<DcName></DcName>
</Domain>
<Domain>
<!-- PartitionType:Application -->
<Guid>bb10d409-4897-4974-9781-77dd94f17d47</Guid>
<DNSname>ForestDnsZones.test.com</DNSname>
<NetBiosName></NetBiosName>
<DcName></DcName>
</Domain>
<Domain>
<!-- ForestRoot -->
<Guid>b91bcb80-7cbc-49b7-8704-11d41b77d891</Guid>
<DNSname>test.com</DNSname>
<NetBiosName>TEST</NetBiosName>
<DcName></DcName>
</Domain>
</Forest>Open the Domainlist.xml and replace all old domain names with the new ones:
Notepad .\Domainlist.xml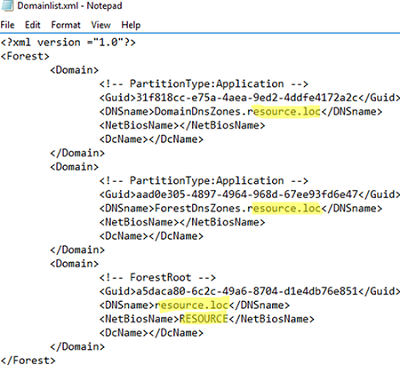
Save the file and run this command:
rendom /showforestThe command will show the changes to be made in the configuration.
The following command will upload Domainlist.xml with the new configuration of AD partitions to the domain controller with the Domain naming master FSMO role:
rendom /upload
The FSMO role owners can be displayed as follows:
netdom query fsmo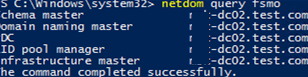
After that, you won’t be able to make changes to the AD forest configuration because it will be locked.
The rendom /prepare command will check the availability of all DCs in the forest and if they are ready to be renamed.
Make sure that the command has not returned any errors.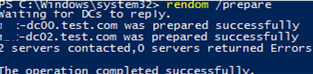
Waiting for DCs to reply.
mun-dc02.test.com was prepared successfully
mun-dc00.test.com was prepared successfully
The operation completed successfully.
The command below will rename the domain (domain controllers will be unavailable for some time and restarted automatically to apply new settings):
rendom /execute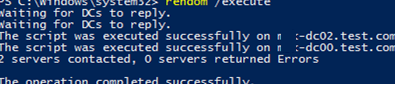
Waiting for DCs to reply.
The script was executed successfully on mun-dc02.test.com
The script was executed successfully on mun-dc00.test.com
2 servers contacted, 0 servers returned Errors
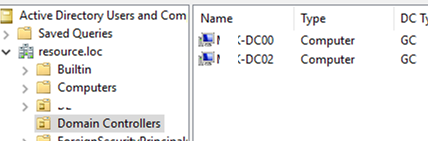
The operation completed successfully.Make sure that the new domain name is displayed in the domain properties. Note that the full computer name did not change.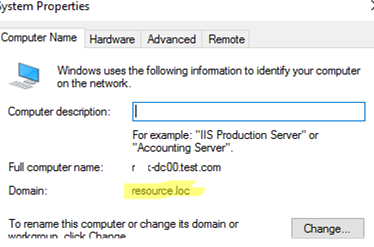
You must provide an account name in the format newdomain\username to login to the DC.
To get to the DC, specify the account from the domain. On Windows Core domain controllers you can specify a different username by pressing ESC several times.
Run the following command to update GPO bindings:
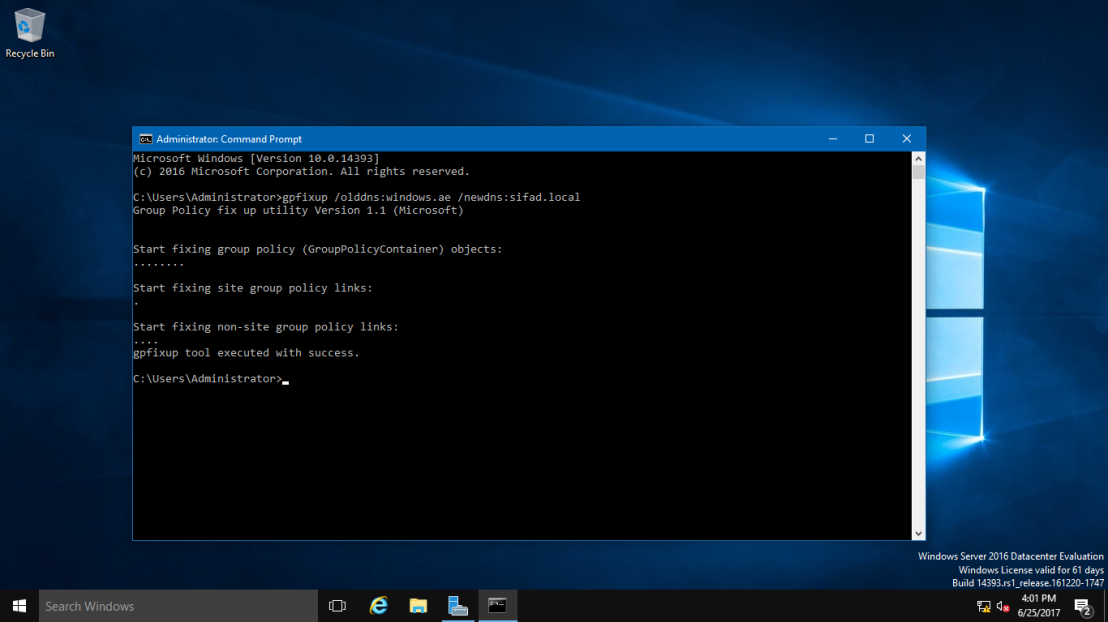
gpfixup /olddns:test.com /newdns:resource.loc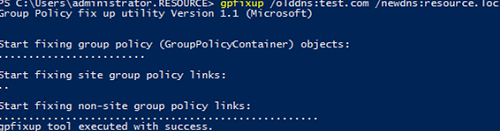
Group Policy fix up utility Version 1.1 (Microsoft)
Start fixing group policy (GroupPolicyContainer) objects:
Start fixing site group policy links:
Start fixing non-site group policy links:
gpfixup tool executed with success.
Then update the NetBIOS domain name:
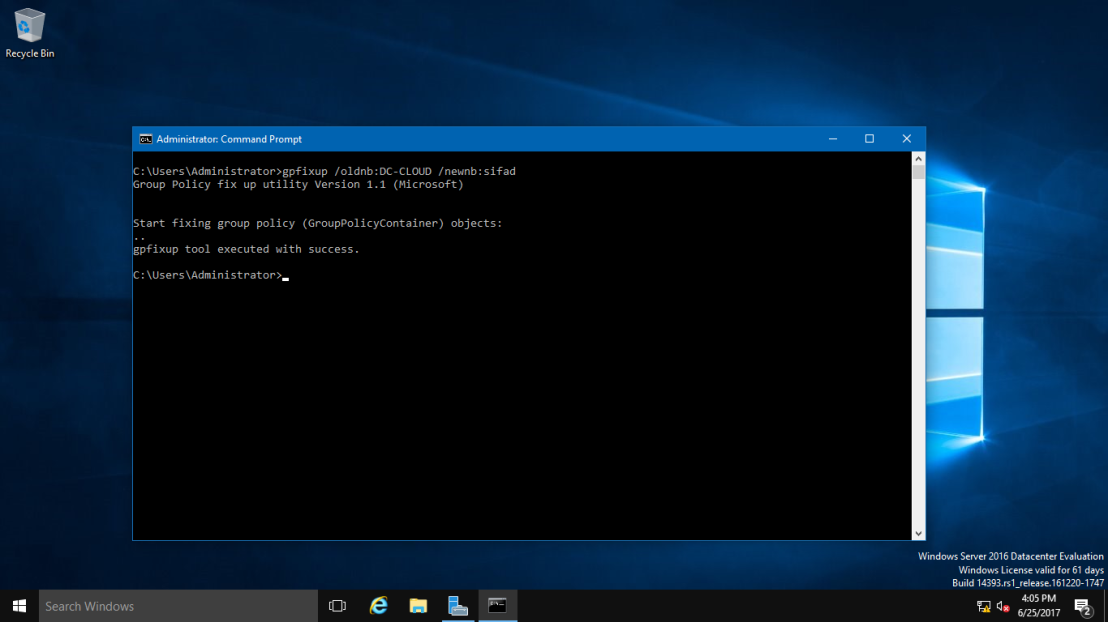
gpfixup /oldnb:TEST /newnb:RESOURCEThen add new names on each domain controller manually and make them primary ones:
netdom computername %COMPUTERNAME%.test.com /add:%COMPUTERNAME%.resource.loc
netdom computername %COMPUTERNAME%.test.com /makeprimary:%COMPUTERNAME%.resource.loc
Restart the DCs:
Shutdown –f –r –t 0Only domain controllers need to be manually renamed. The rest of the computers and servers can be rebooted twice and they will automatically switch to the new domain.
This must be done after /execute and BEFORE executing the rendom /clean command.
Or you can use the commands above to rejoin computers to the new domain.
The command below will remove links to your old domain from AD:
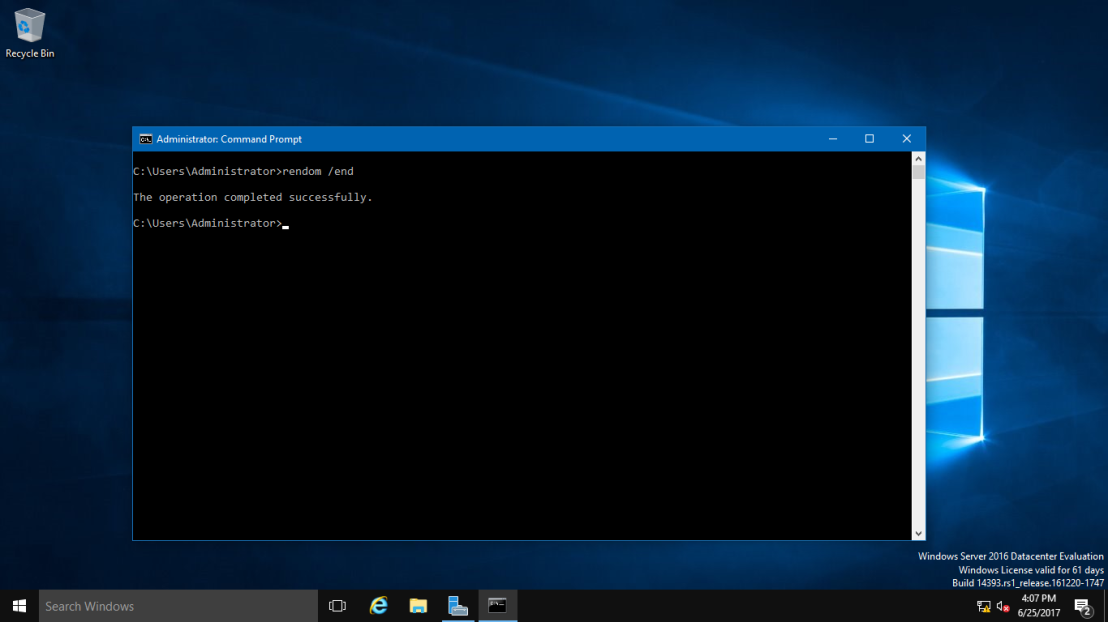
rendom /cleanUnlock the domain configuration:
rendom /endOpen the ADUC (dsa.msc) console and make sure that it has connected to the new domain name and all OU structure, users and computers remain in place.
Note that you will have to do some extra steps to re-configure some services (CA, Failover Clusters) to a new domain.
After renaming your domain, check the AD replication state and errors on the DCs (see the link above).
Original Article
Step by Step How to Rename Domain Name in Windows Server 2016
You can use the domain rename process to change the names of your domains, and you can also use it to change the structure of the domain trees in your forest. This process involves updating the Domain Name System (DNS) and trust infrastructures as well as Group Policy and service principal names (SPNs).
The ability to rename domains provides you with the flexibility to make important name changes and forest structural changes as the needs of your organization change. Using domain rename, you cannot only change the name of a domain, but you can change the structure of the domain hierarchy and change the parent of a domain or move a domain residing in one domain tree to another domain tree. The domain rename process can accommodate scenarios involving acquisitions, mergers, or name changes in your organization, but it is not designed to accommodate forest mergers or the movement of domains between forests.
Note:
Domain rename is intended to be a supported method for renaming domains when domain renames are necessary; it is not intended to make domain rename a routine operation.The domain rename process is complex, and it requires a great deal of care in planning and execution. In addition, the time that is required for a complete domain rename operation is directly proportional to the size of an Active Directory forest in terms of its number of domains, domain controllers, and member computers. Therefore, although domain rename is possible, it should not be undertaken lightly.The domain rename operation is not supported in Microsoft Exchange Server 2007 or Exchange Server 2010. DNS domain rename is supported in Exchange Server 2003. However, renaming of the NetBIOS domain name is not supported in any version of Exchange Server. Other non-Microsoft applications might also not support domain rename.
For this time easy Guide, I will show you all how to rename domain name in Windows Server 2016, the process is straightforward. but as usual. backup any necessary information and Server before you proceed & I always advice, please do this exercises in LAB Environment (Hyper-V). Don’t simply take any risk by doing this is production environment unless you have to. 😦
The existing domain is Windows.ae and I will rename it to Sifad.local
So, let get started.
1 – Open your System Properties and check your existing domain name, if you see from my Windows Server 2016 system properties, my existing domain name is Windows.ae. This will be change to Sifad.local in the short while.

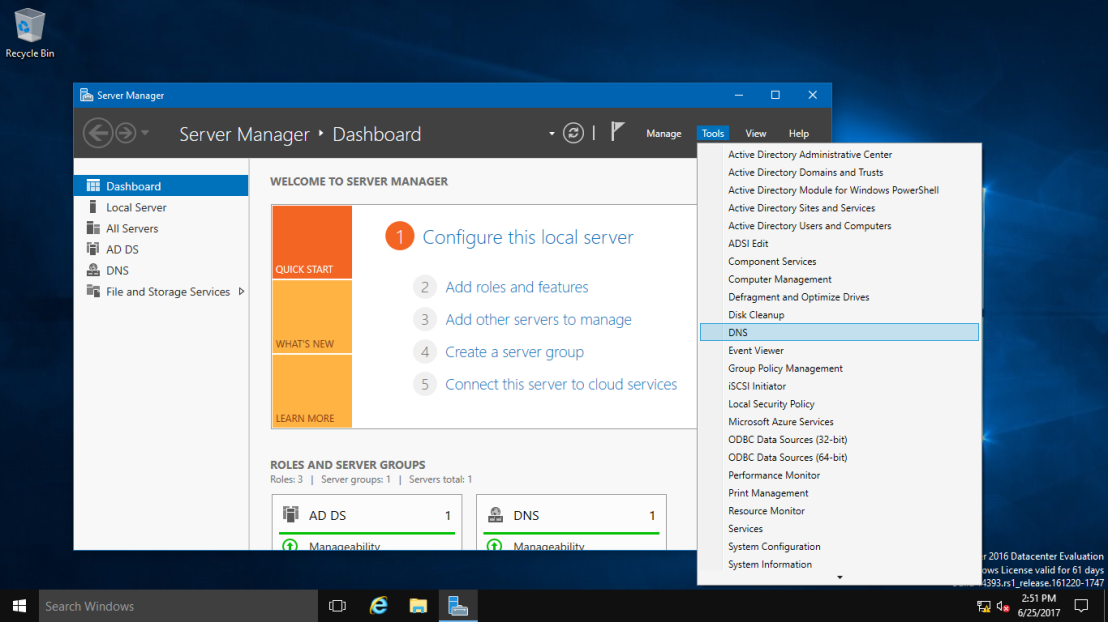
2 – Next, open your Server Dashboard, go to Tools & click DNS to open DNS Manager.
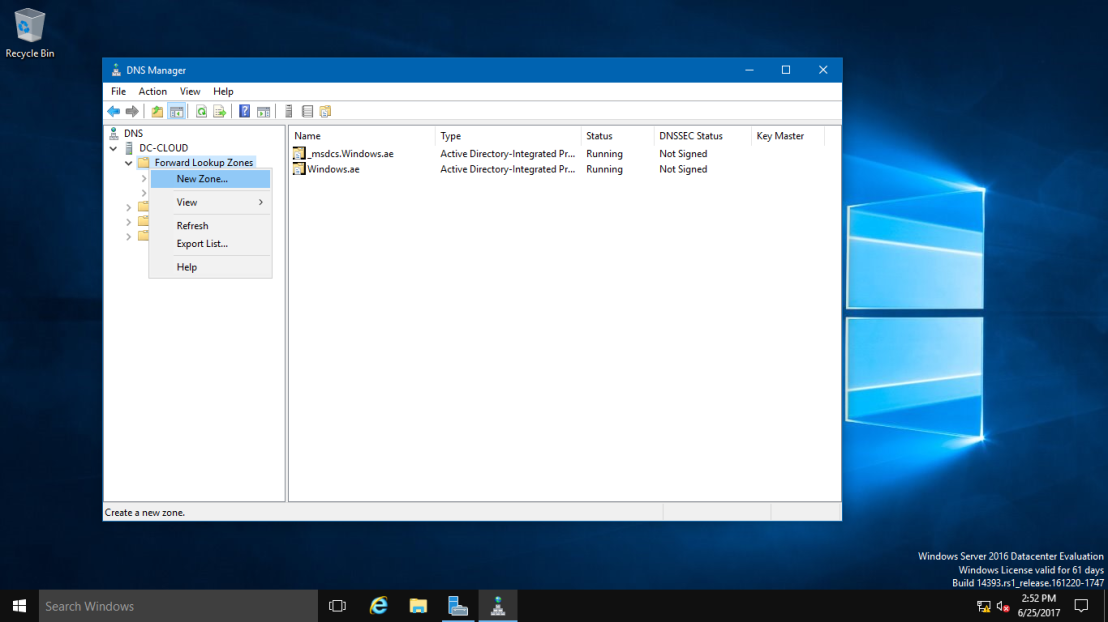
3 – on the DNS Manager, you must create the New DNS Zone (Sifad.local), this is to make sure that after whole process successfully, your member server and Windows clients can join to new Domain name.
To create new DNS Zone, Right Click Forward Lookup Zone, and click New Zone
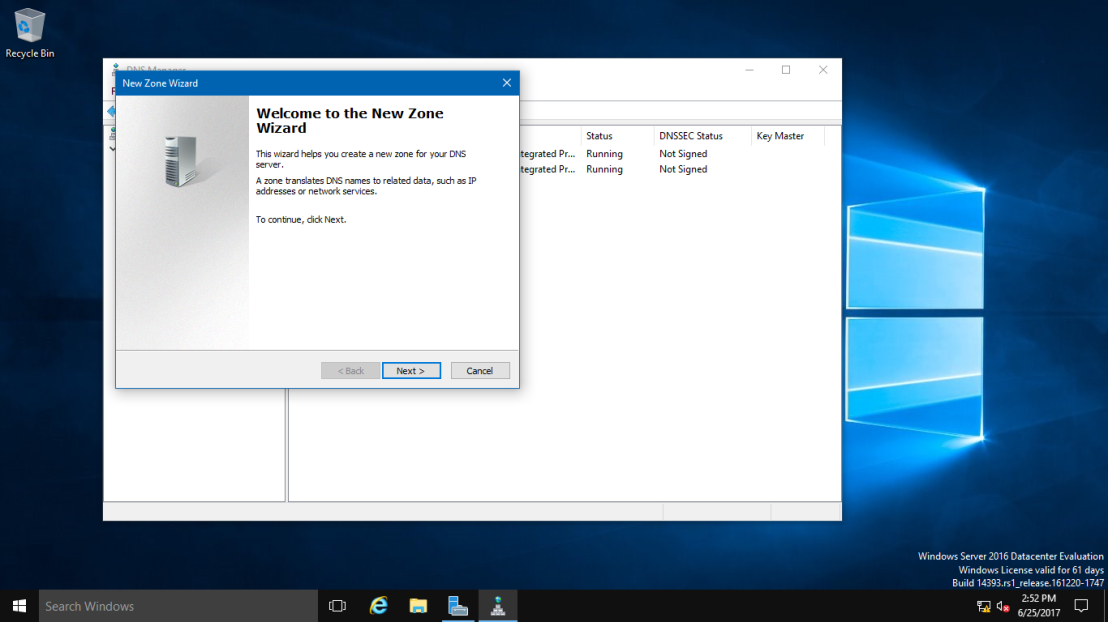
4 – On the Welcome to the New Zone Wizard, just click Next button.
5 – On the Zone Type, Click Primary Zone and click Next.

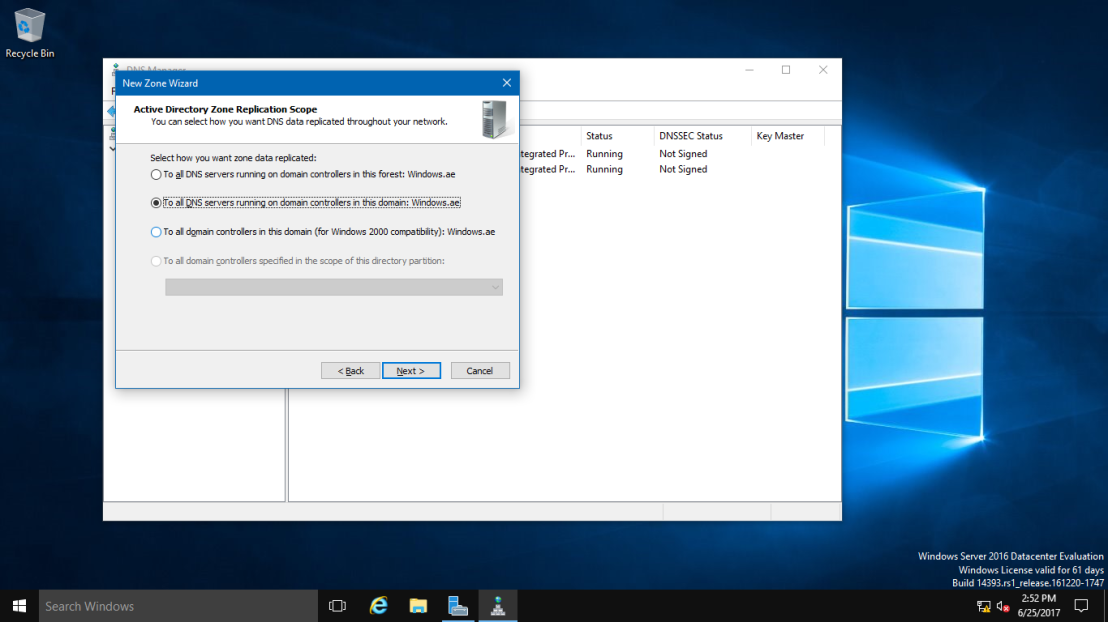
6 – On the Active Directory Zone Replication Scope, click button To all DNS servers running on domain controllers in this domain: Windows.ae and click Next.
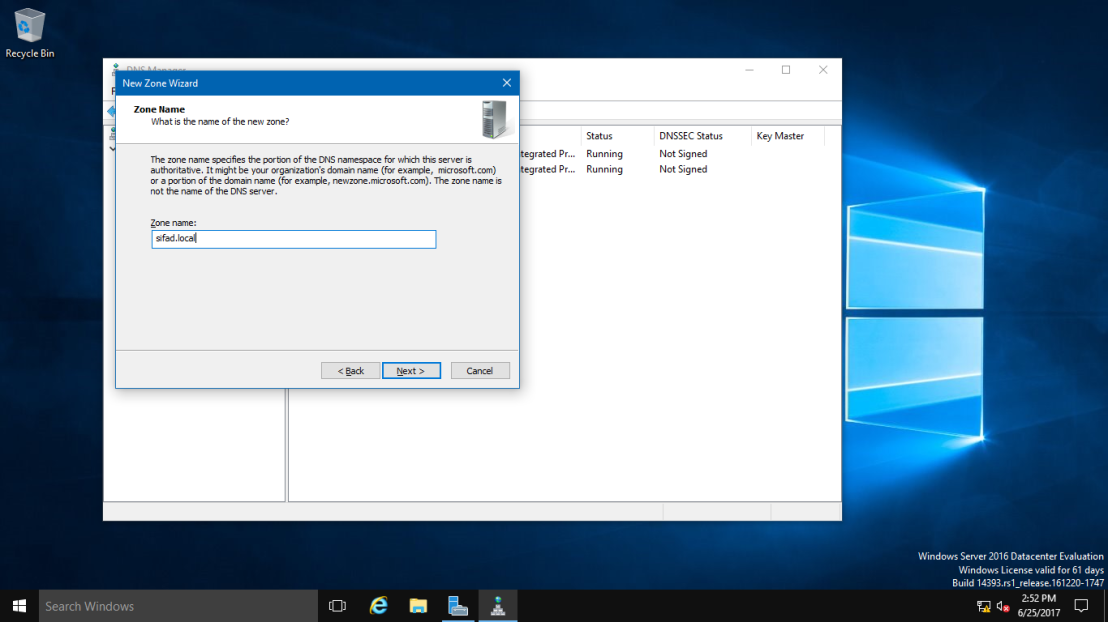
7 – In the Zone Name, key in your New Domain Name, my new Domain Name is Sifad.local.
8 – On the Dynamic Update, Click Allow only secure dynamic updates (recommended for Active Directory), and click Next.

9 – On the completing the New Zone Wizard, click Finish to complete the process.

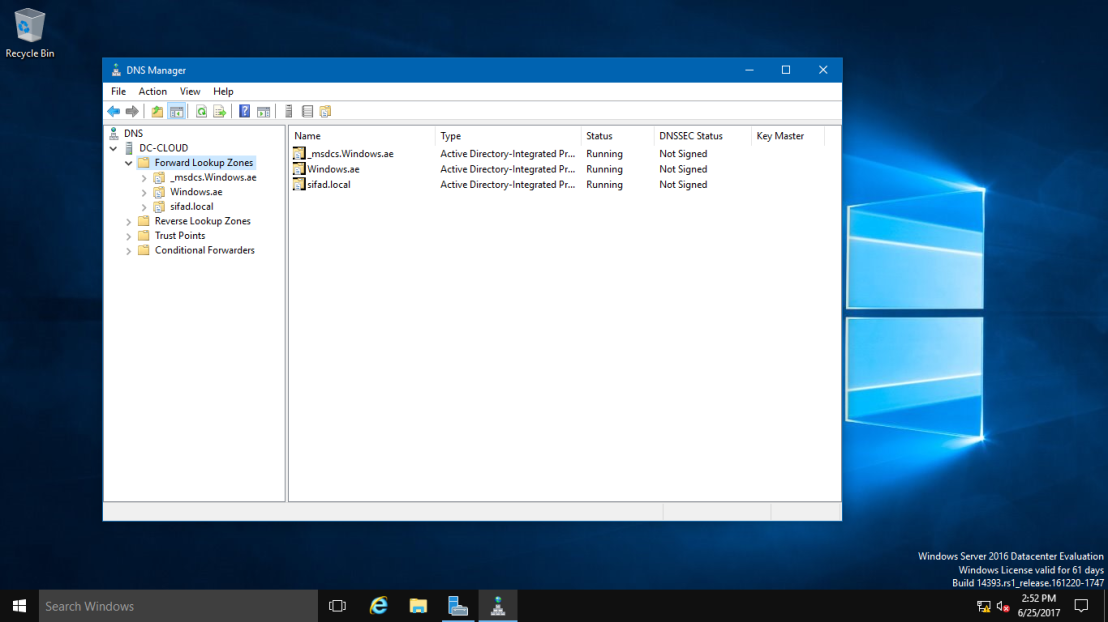
10 – On DNS Manager, you can see my new Domain Name is listed (sifad.local).
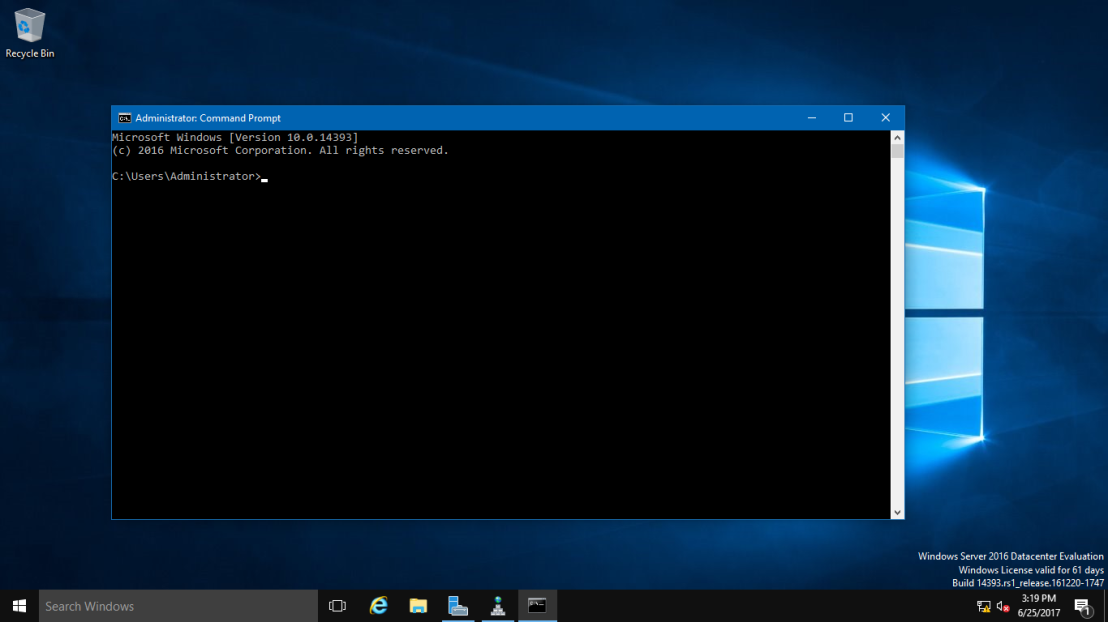
11 – Next, open Command Prompt, run as administrator.
12 – In CMD, type rendom /list and press enter – this command use to generate a state file named Domainlist.xml. This file contains the current forest configuration.
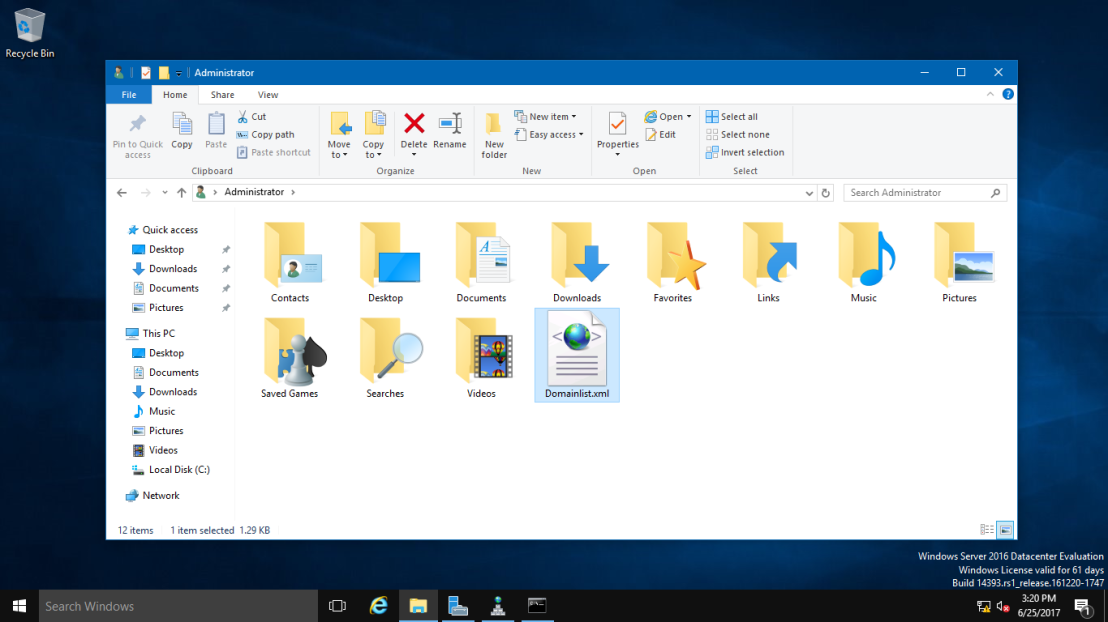
13 – Next, open computer and browse to C:\Users\Administrator folder to get your Domainlist.xml.
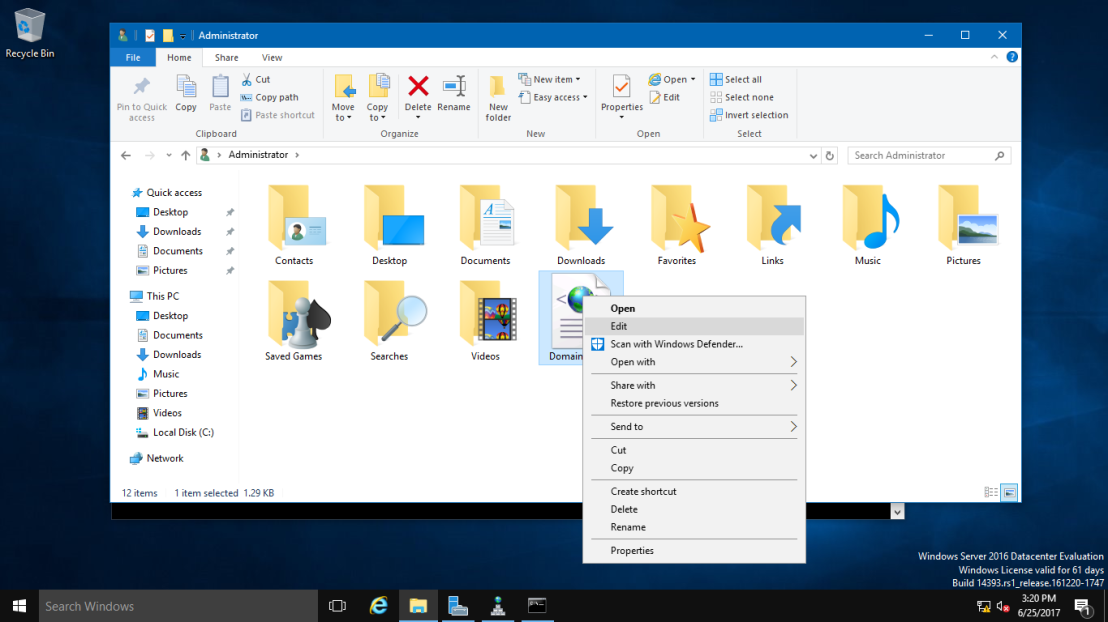
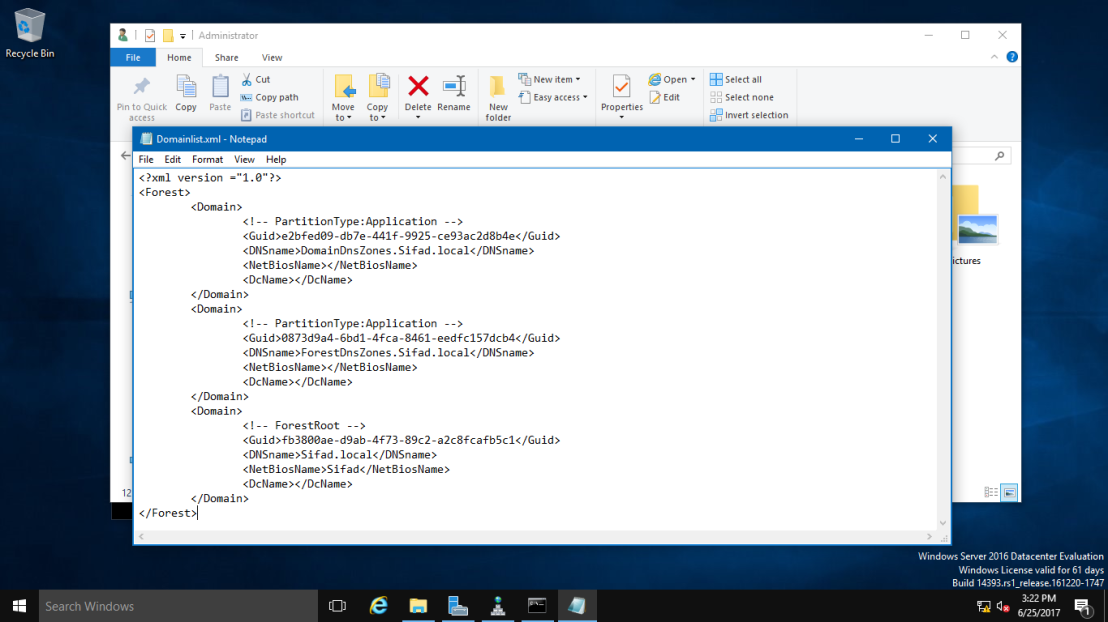
14 – Once you see the Domainlist.xml, right click the file name & choose Edit. I going to change the DNSname and NetBiosName in this Domainlist.xml file.
15 – Once the Domainlist.xml open, you can see there are few existing Domain name, change this existing domain name to new domain name. (Refer to picture)
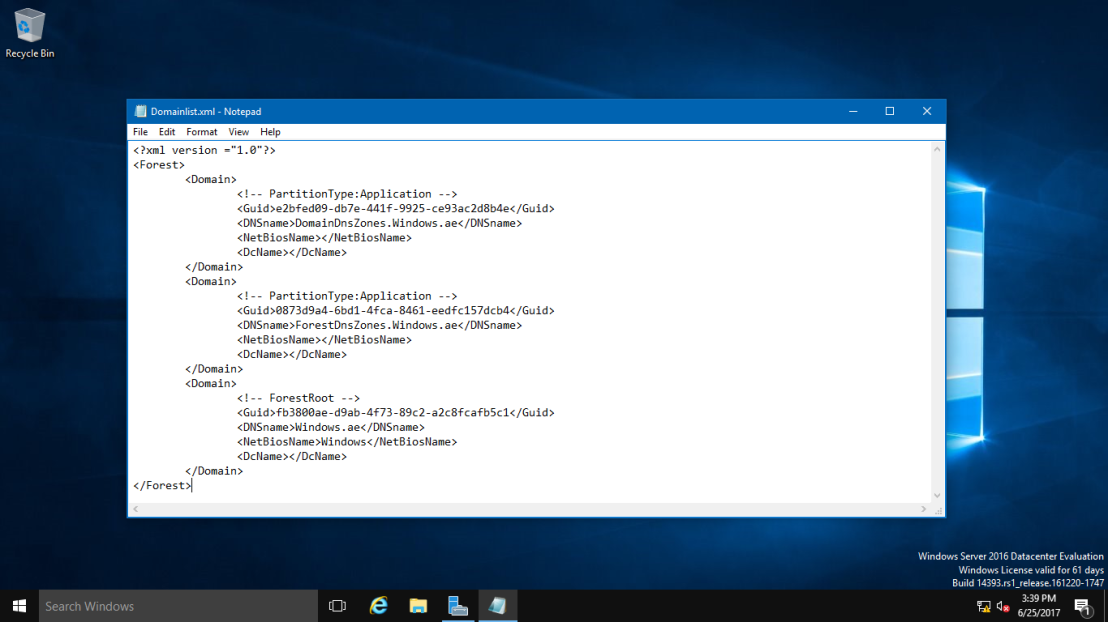
16 – once you change to new Domain name, make sure you save the Domainlist.xml file.
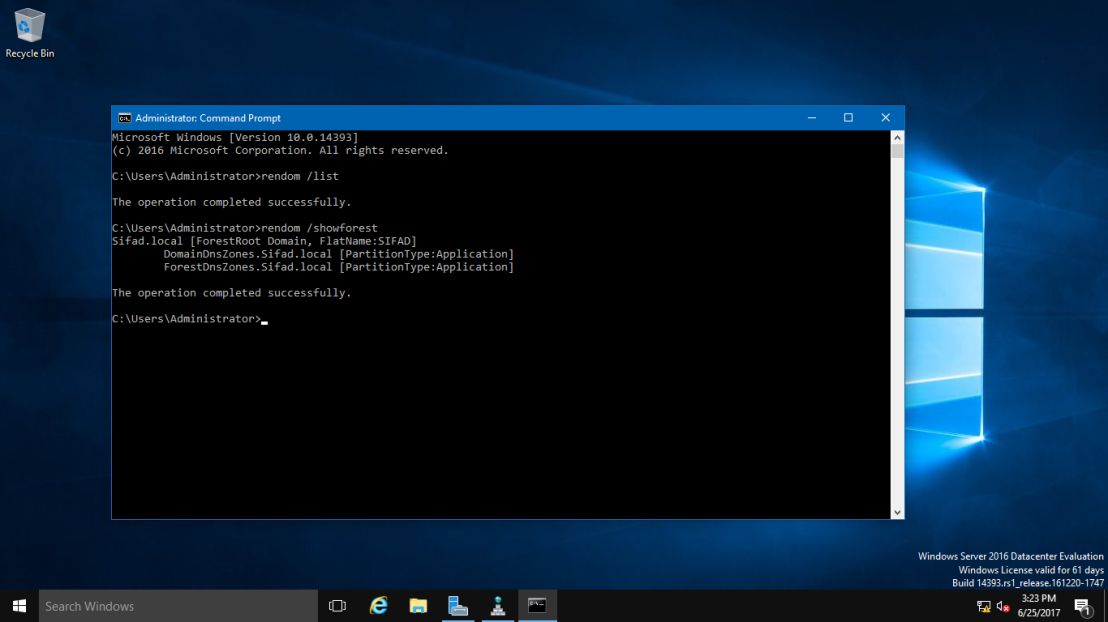
17 – After you save the Domainlist.xml file, On the CMD, type rendom /showforest. This is to show the potential changes; this step does not make any changes.
18 – Next, type rendom /upload. This is to upload the rename instructions (Domainlist.xml) to the configuration directory partition on the domain controller holding the domain naming operations master role.

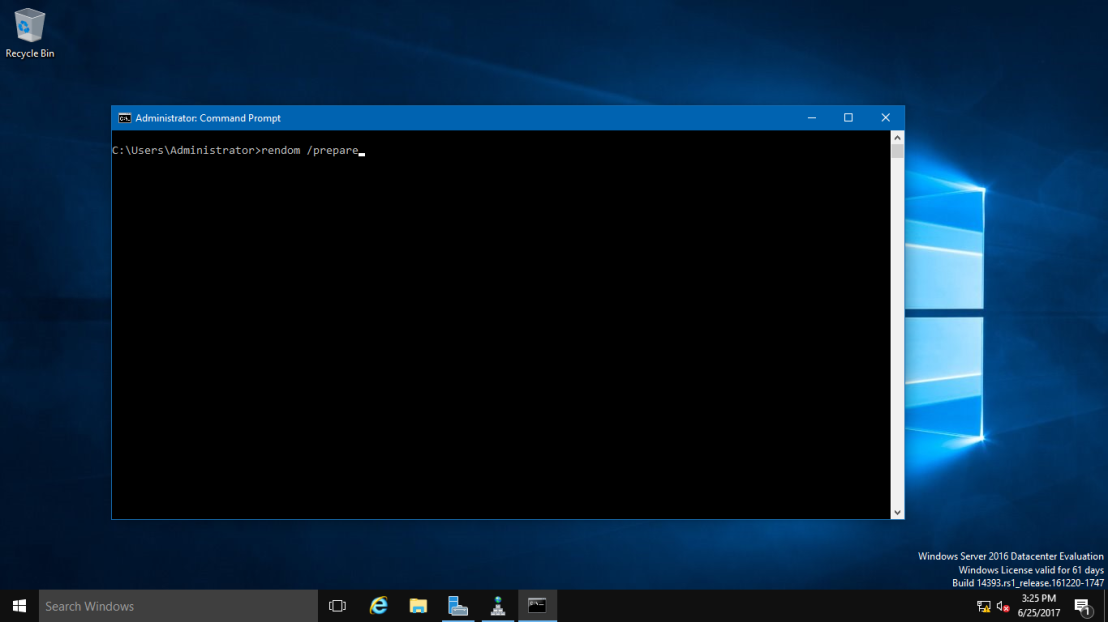
19 – Next, type rendom /prepare. This use to verify the readiness of each DC in the forest to carry out the rename instructions. This should contact all DC’s successfully and return no errors before proceed to next process.
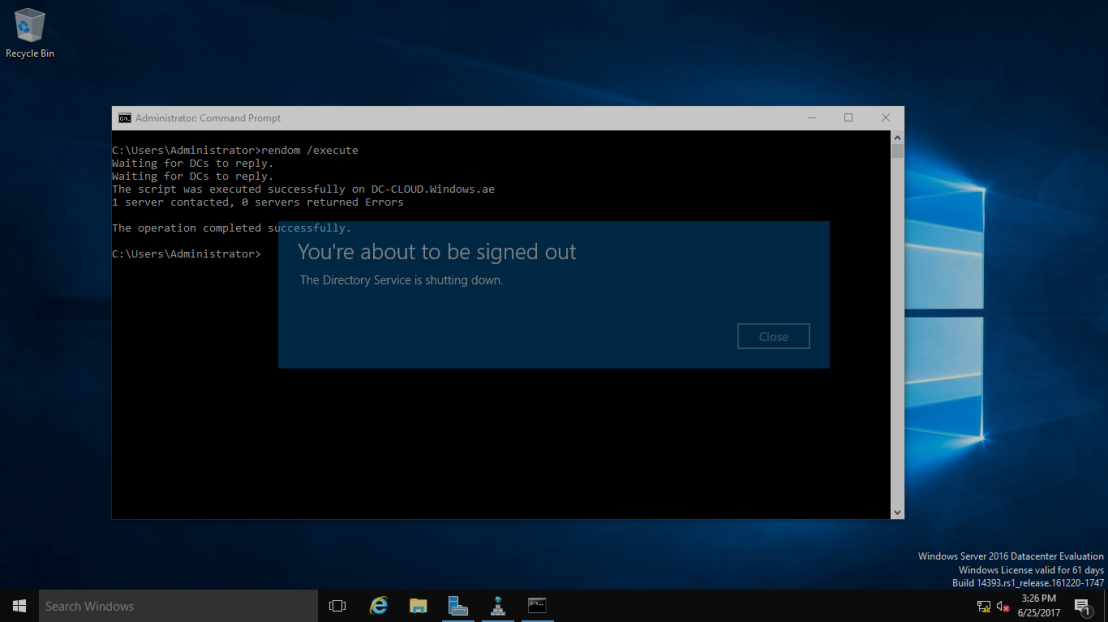
20 – Next, type rendom /execute. This is to verifies readiness of all DC’s and then preforms the rename action on each one.
“Remember also there will be a service interruption during this process. Once the process successful, your DC Server will be restarted.”
21 – Once your DC Server restarted, log in using the new Domain name as Administrator.
22 – Next, after you successfully log in, open System Properties and check your old Domain Name is now gone. Replace by new Domain name.

23 – Next, open CMD again, and type gpfixup /olddns:windows.ae /newdns:sifad.local This is to refresh all intra Domain references and links to group policy objects.
24 – Next, type gpfixup /oldnb:DC-CLOUD /newnb:sifad.
25 – Next, type rendom /clean. This is to remove references of the old domain name from AD.

26 – Next, type rendom /end. This is to unfreeze the forest configuration and allow further changes. This was frozen during the rendom /upload step.
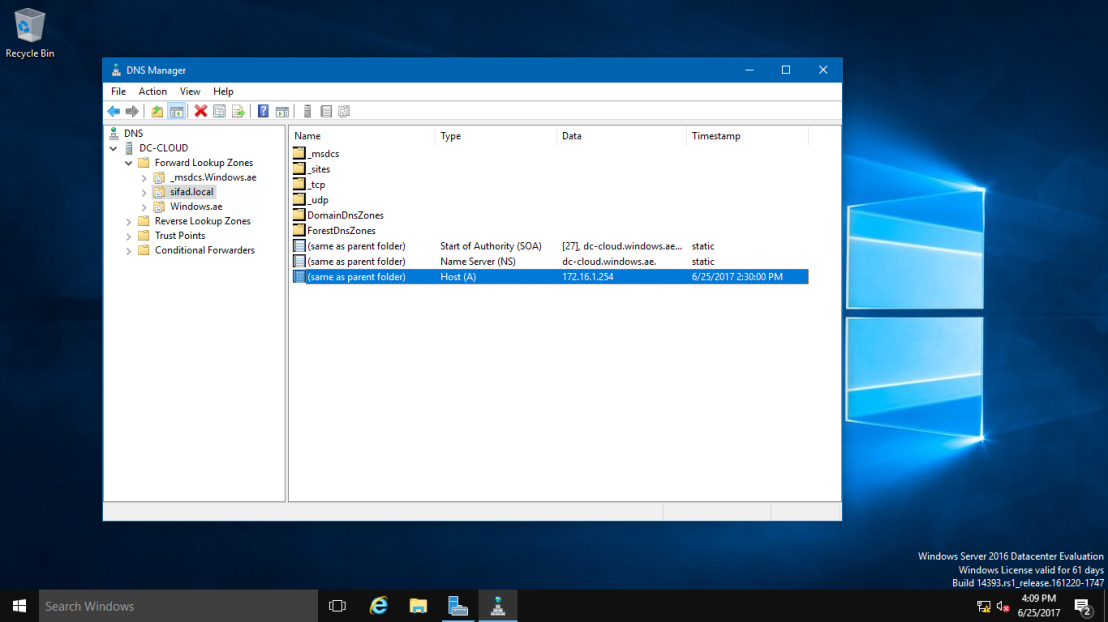
27 – Next, Open DNS Manager, click your new created domain (Sifad.local), here you can see your own IP listed but we still have long way to go to make sure this DNS Zone is working.
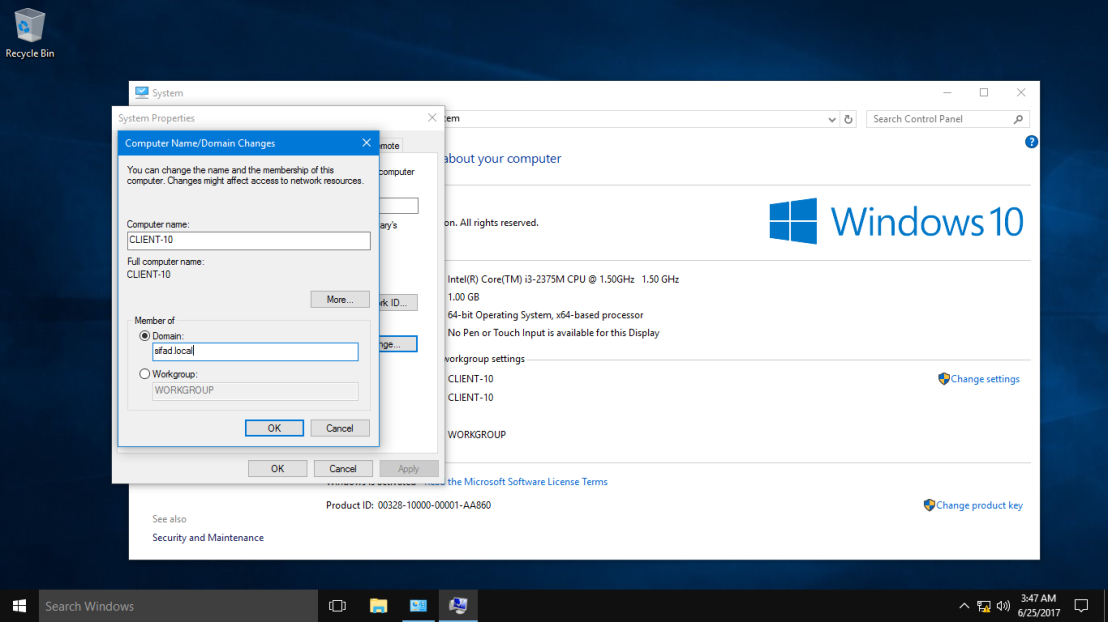
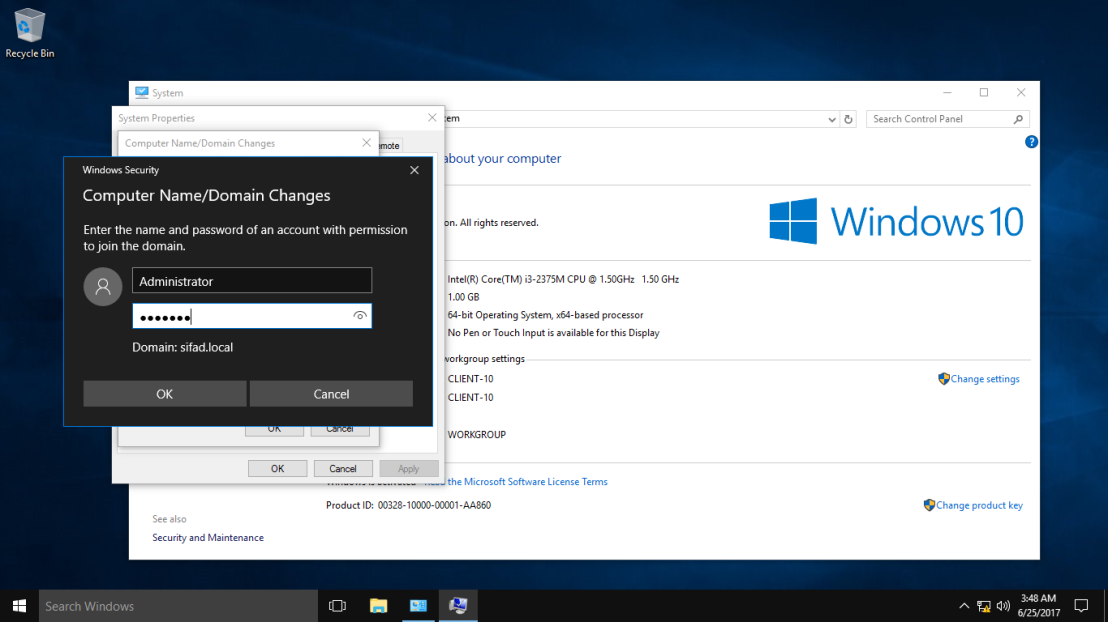
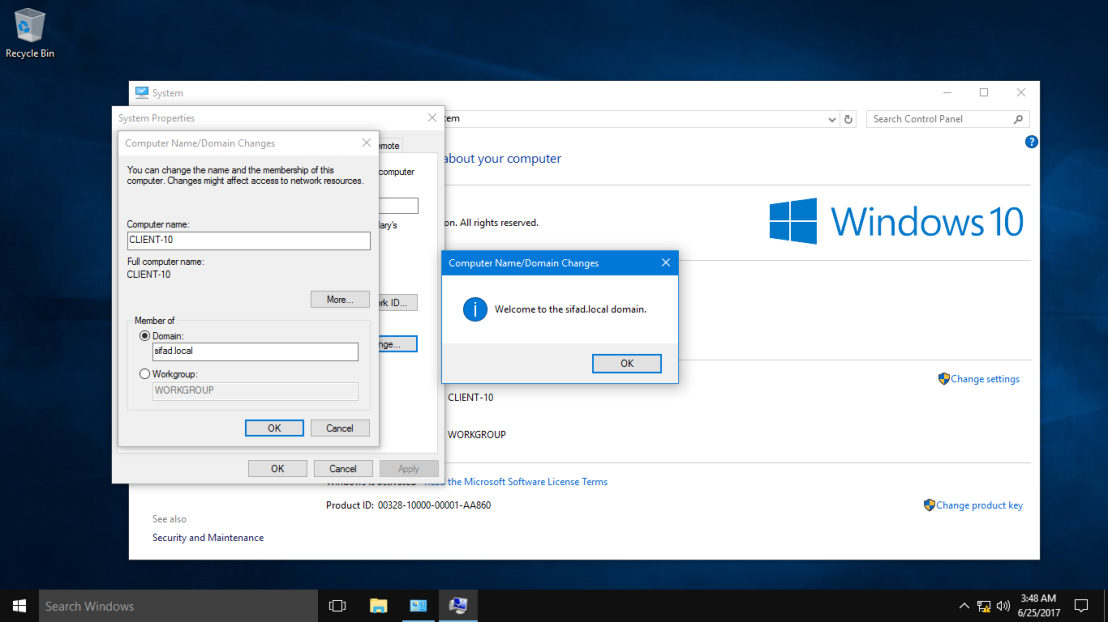
28 – Next, turn on your client PC, for this exercise I’m using Windows 10 as a client. Open System Properties and join to new Domain (sifad.local). Windows Security box will show up and now key in administrator and domain password and click OK (Welcome to the sifad.local domain). (Refer pictures)
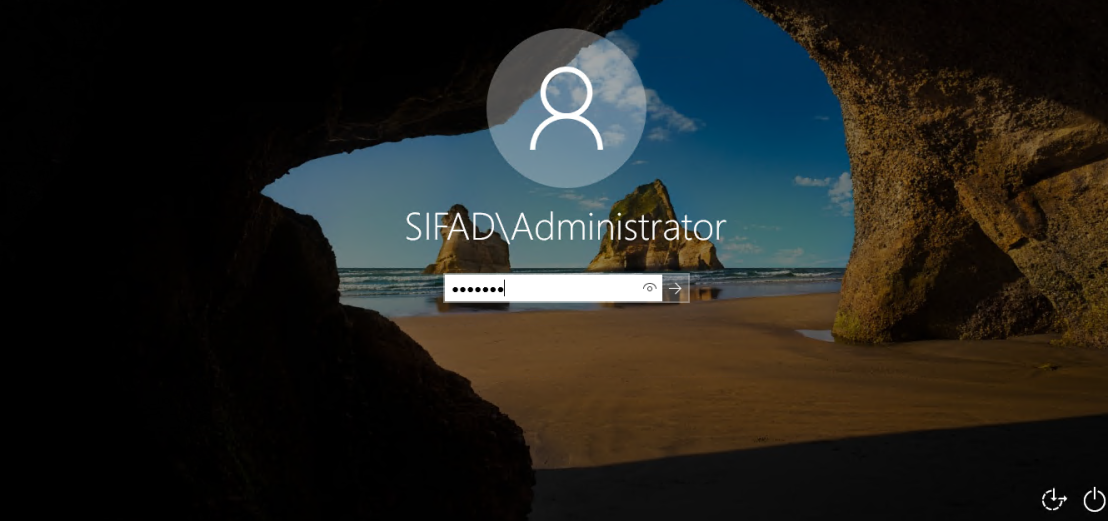
29 – After your Windows 10 restart, log in as a domain administrator.
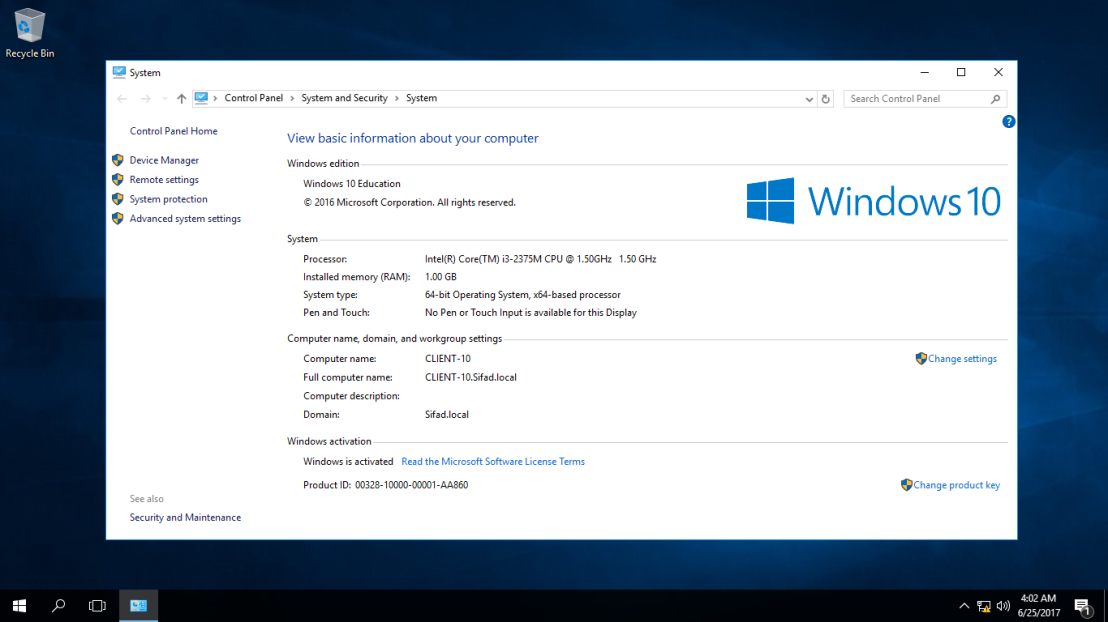
30 – Once you log in, double check Windows 10 System Properties. Now your Windows 10 successfully join in to new Domain (Sifad.local).
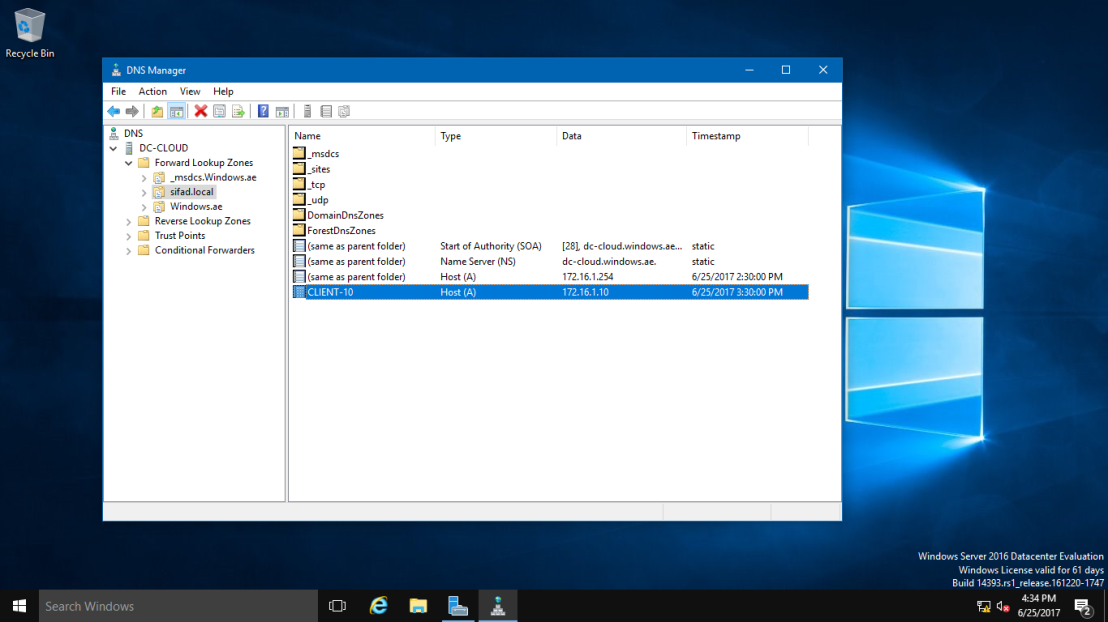
31 – Now, go to the Server 2016 and open DNS Manager, you can see now your Windows 10 Client is listed in DNS.
32 – You can also check in Active Directory Users & Computers that your Windows 10 Client now also listed.
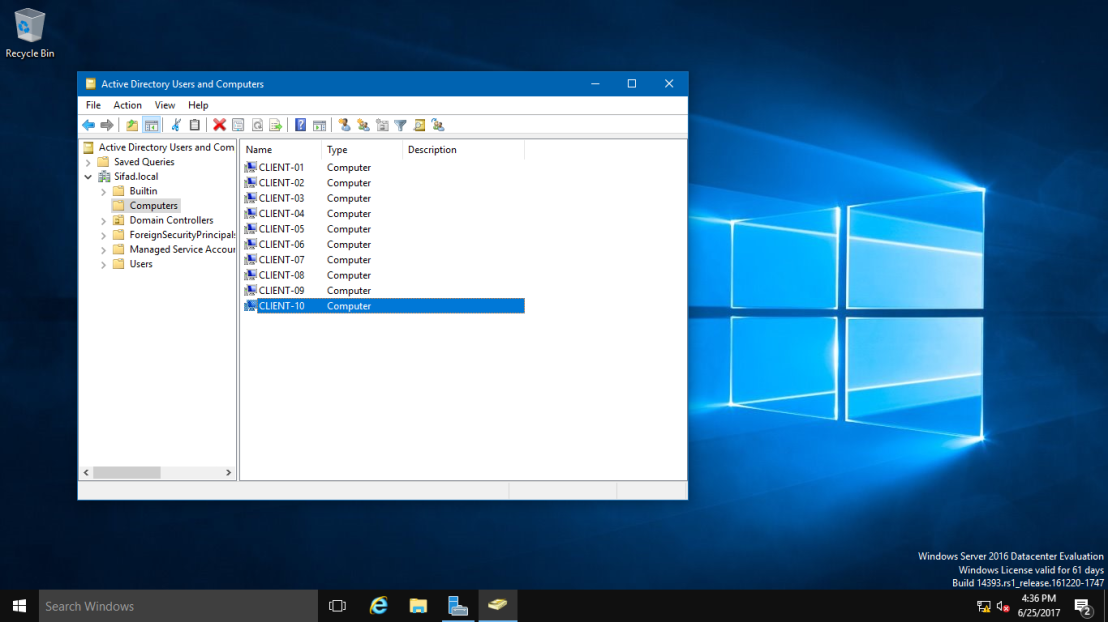
This ends the rename process and we have a dc now with a new domain name.
Troubleshooting
Domain Controller Could Not Be Contacted
Error Description
When I try to join a new Windows workstation or server to an Active Directory (AD) domain, I sometimes encounter the following error: “An Active Directory Domain Controller (AD DC) for the domain ‘domainname’ could not be contacted.”
This error can occur due to any of several reasons, from a simple incorrect DNS server IP address to a much more complex issue. In this blog, I will walk you through the steps you need to troubleshoot this problem, from the simplest to the most complex.
When the Error Arises
The error can be displayed when you attempt to join a workstation or server to a domain. Here are the steps that lead up to the error:
-
Right-click on the
Startbutton and selectSystem: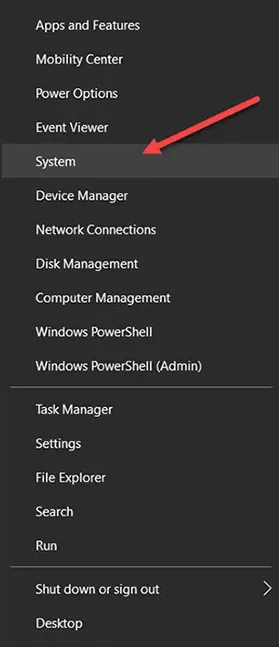
-
On the next screen, click
Change settings: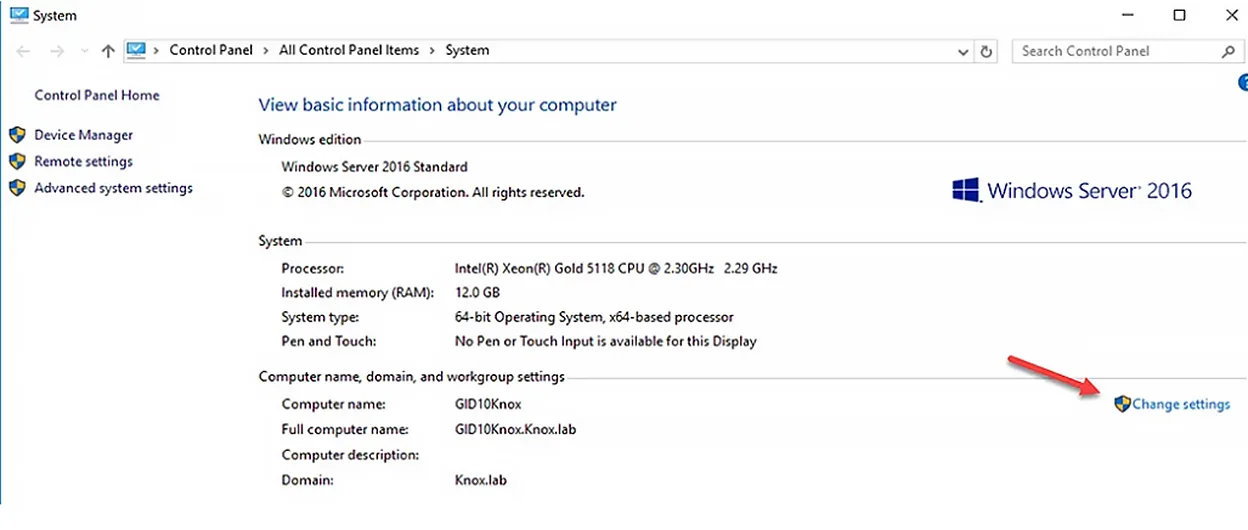
-
In the System Properties window, click the
Changebutton. Then enter the name of the new computer and specify which domain you want to join it to, being sure to enter the FQDN (fully qualified domain name) of the domain. ClickOK. This is when the error might be displayed: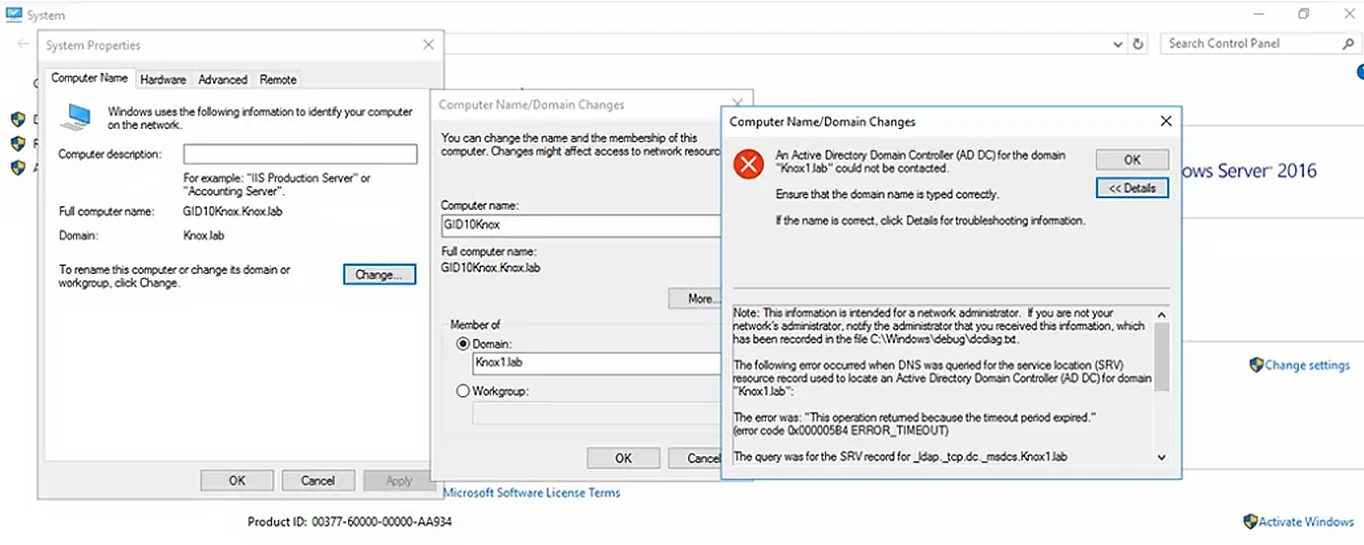
Initial Troubleshooting Steps
First, ensure that you typed the domain name correctly.
If that’s not the problem, click Details to get information about the error.
The following sections detail the steps to take to get to the root of the problem. In most cases, the issue is related to one of the following: incorrect DNS settings or a wrong IP address on your system, DNS misconfiguration on the domain controller (DC) side, or ports that are blocked on the firewall.
If you do not know the root of the problem, I suggest proceeding through these troubleshooting options in order. However, if you have additional information, feel free to proceed directly to the step that you think is likely to solve the problem.
Verify that the IP Settings are Correct
Make sure that the network interface of your computer has the right IP address. The IP address can be explicitly defined in the network adapter settings or can be obtained from a DHCP server. To get the computer’s current network settings, use this command:
ipconfig /all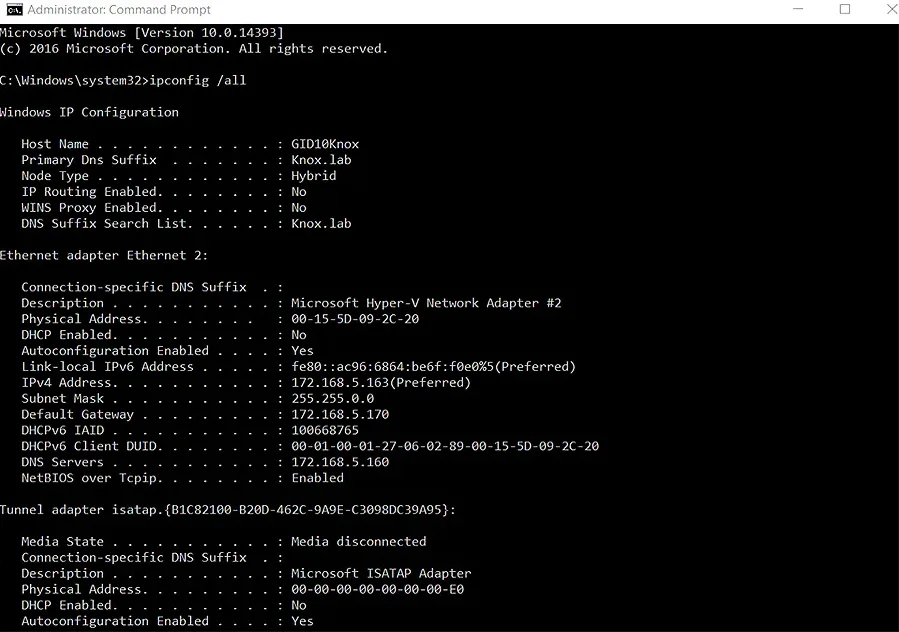
Make sure the DNS Client Service is Running
Next, check whether the DNS client service is up and running using this command:
Get-Service dnscache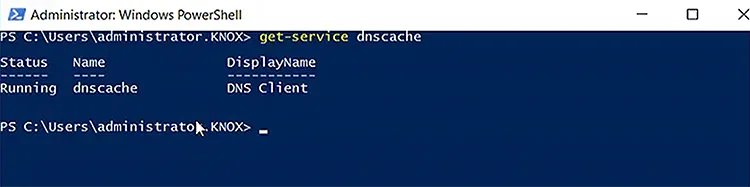
Check the Host File for Domain Entries
Make sure there are no entries for your domain or domain controller names in the hosts file located at C:\Windows\System32\Drivers\etc\hosts on the PC. Open the file with Notepad or any other text editor. If there are any entries for your domain or DC names, delete them.
To view the contents of the hosts file on the PC, use this command:
get-content C:\Windows\System32\Drivers\etc\hosts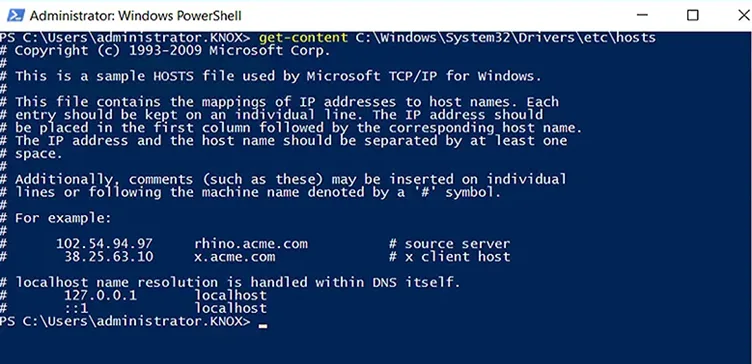
Restart the DNS Cache Service
Open an elevated command prompt and clear the DNS cache using this command:
ipconfig /flushdnsThen stop and restart the dnscache service using this command:
net stop dnscache && net start dnscache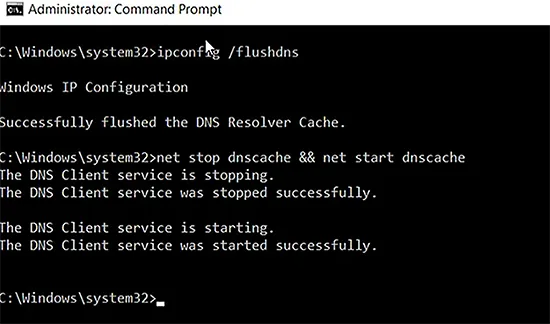
Alternatively, you can use the Service.msc console. Right-click on DNS Client to open its properties dialog:
Click use the Stop and Start buttons to stop and restart the service:
Check whether the DC is Reachable from the Client
To determine whether the domain controller is reachable from the client, first run the following commands from a command prompt:
ping your_domain_name.com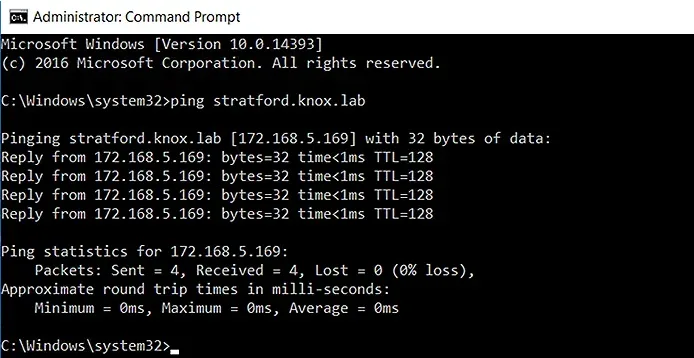
Then run this command:
tracert your_domain_name.com
You should also check the availability of the DC from another workstation on the same network. If your client cannot access the DC but other clients can, there could be a problem with your client’s cable or hardware, or with a device in the middle. To narrow down the problem, try a different network jack or go wireless.
Check the DC’s Accessibility using PowerShell
Alternatively, you can use the following PowerShell cmdlets to check the connectivity to the DC.
To display the IP address:
Get-NetIPConfiguration –All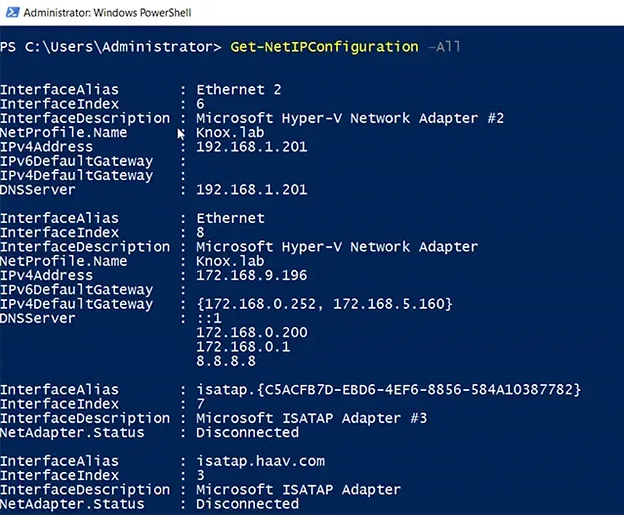
To ping the DC:
Test-NetConnection domainname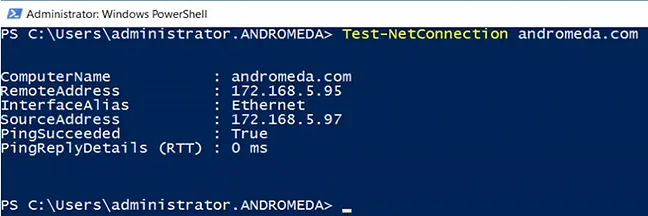
To trace the routes to the DC:
Test-NetConnection –TraceRoute domainname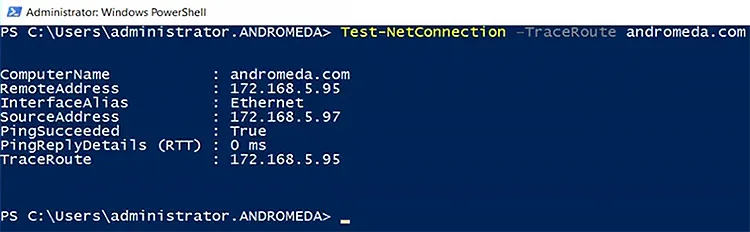
Add the DNS server to the TCP/IP settings of your Network Adapter
If the domain controller can be reached, try adding the IP address of your DNS server to your network adapter’s Advanced TCP/IP settings.
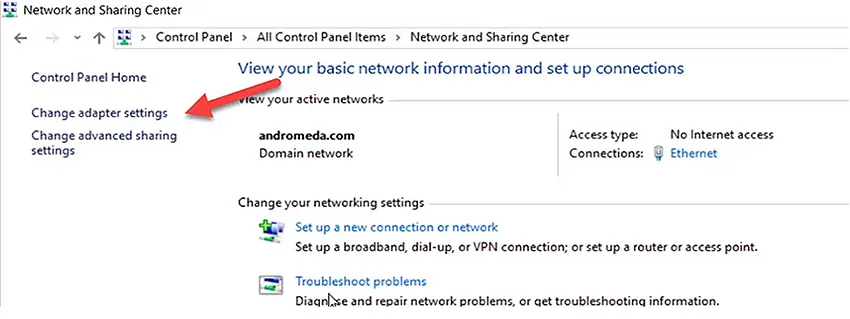
- Open
Control Panel, clickNetwork and Sharing Center, and then clickChange adapter settings: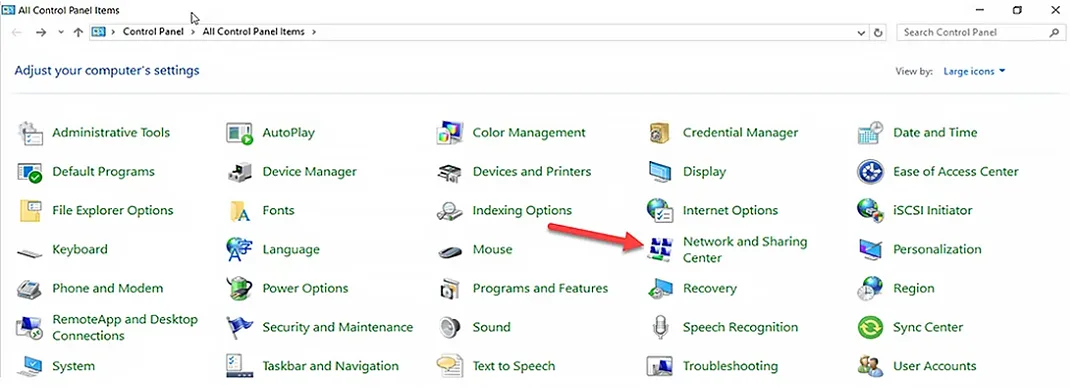
-
Right-click on the network adapter and select
Properties.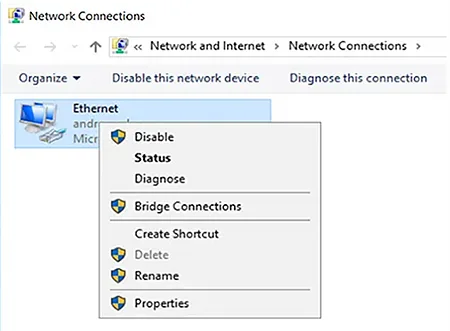
-
Right-click on
Internet Protocol Version 4 (TCP/IPv4)and chooseProperties. -
Click the
Advancedbutton and go to the DNS tab. -
On the
DNStab, click theAddbutton, provide the IP address of your DNS server and clickOK. (Note that the DNS server might be a DC, especially if it’s a small organization.)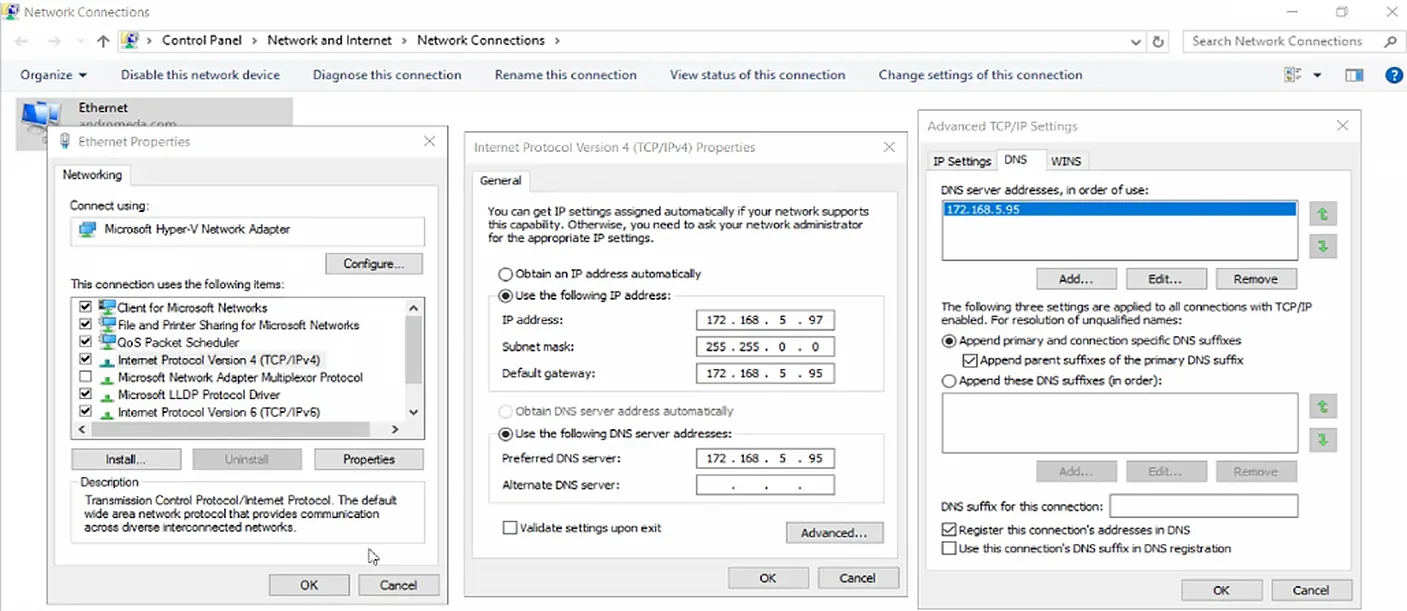
-
If multiple IP addresses are listed, use the arrow buttons to move your preferred one to the top of the list. Then click
OK.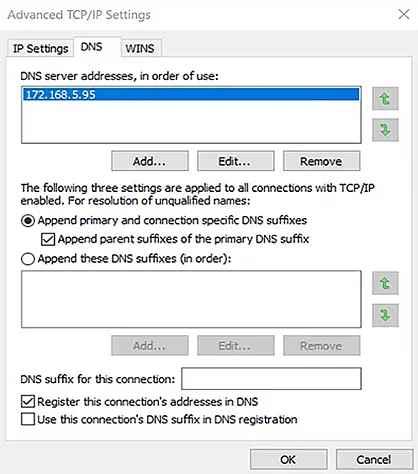
-
Click
OKagain to save your changes. -
Restart the workstation or server so the changes will take effect, and try again to join the workstation or server to the Active Directory domain.
Check whether you’re using the Right DNS servers
Before you go too deep down the rabbit hole, double-check that you are using the correct DNS servers. Specifically, the DNS servers that DCs are aware of are used to register records that help AD-connected devices locate resources like DCs; DNS servers that are not AD-integrated do not have these records.
According, make sure you are using one of the following:
- A DNS server with Active Directory integration
- A DNS server that replicates records from another DNS server that is aware of Active Directory
- A DNS server configured to query either an AD-integrated DNS server or a DNS server with duplicated records via forwarding
To check that your DNS server is one of these, use the PowerShell cmdlet shown below in a PowerShell session on a domain-joined PC. (If you don’t have another domain client to use, you will need to contact your network staff.)
Get-DnsClientServerAddress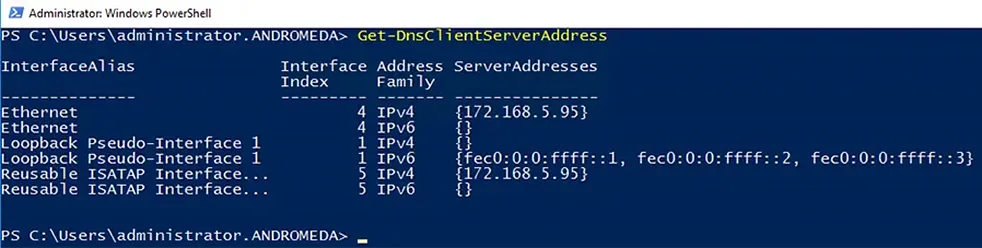
The DNS servers used by the computer running the cmdlet are listed in the ServerAddesses column.
Option 1: Update the Computer’s DNS Client Settings
If you need to update the computer’s DNS client settings, you can use the following cmdlet:
Set-DnsClientServerAddressAlternatively, you can use the IPv4 Properties dialog box for the computer’s network card: Go to Control Panel –> Network –> Internet –> Network Connections. Then right-click on the network card, select Properties and then Internet Protocol Version 4 (TCP/IPv4), and then Properties. Review the settings: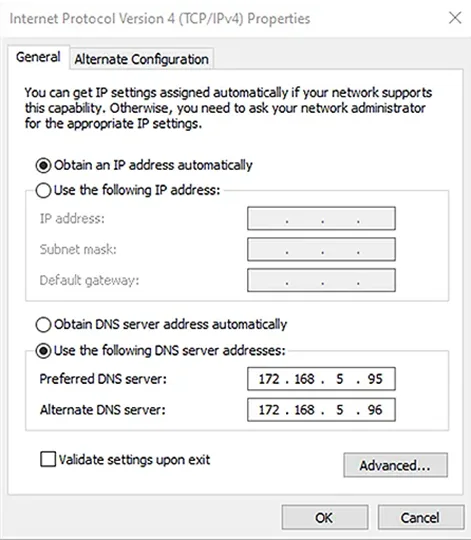
If the network supports Dynamic Host Configuration Protocol (DHCP), ensure that both the Obtain an IP address automatically and Obtain DNS server address automatically boxes are checked.
If your network does not use DHCP, change the values for Preferred DNS server and Alternative DNS server to the ones you found previously (when you ran the Set-DnsClientServerAddress cmdlet).
Option 2: Connect to the Domain through Windows Settings
Another option is to connect to the domain through Windows Settings:
-
Press the
WindowsandIkeys on your keyboard to open the Window Settings window. -
Click
Accounts.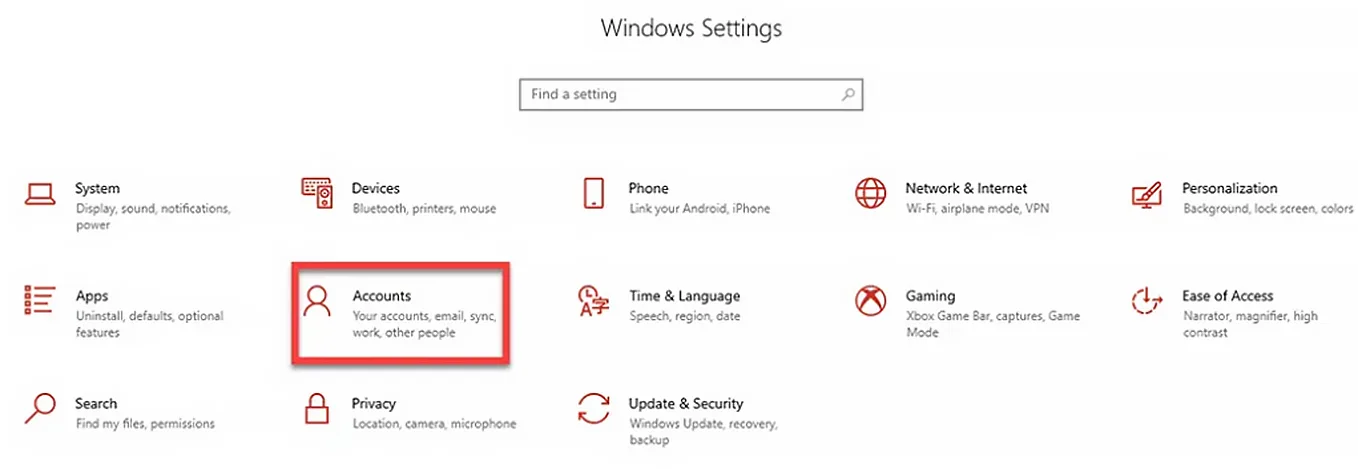
-
In the left menu, click
Access work or school. Then clickConnect.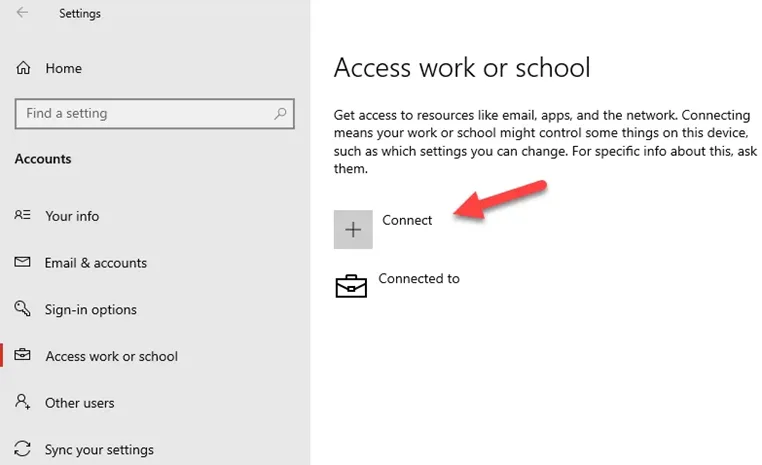
-
At the bottom of the Microsoft account window, click
Join this device to a local Active Directory domain.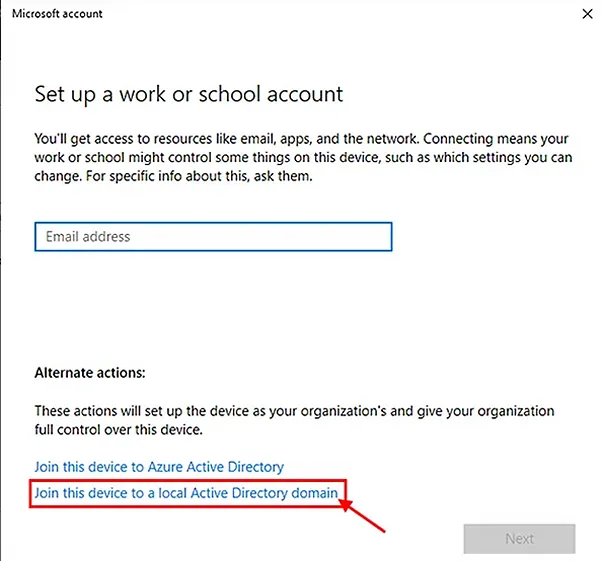
-
Provide a valid, contactable domain name and click
Next.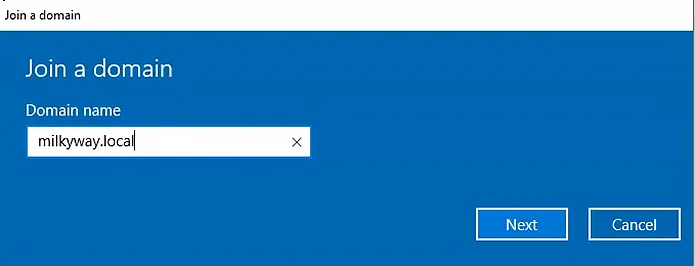
-
Next, provide a domain account to use for joining this workstation to a domain. This account must have the permissions to join a workstation to a domain. Click
OK.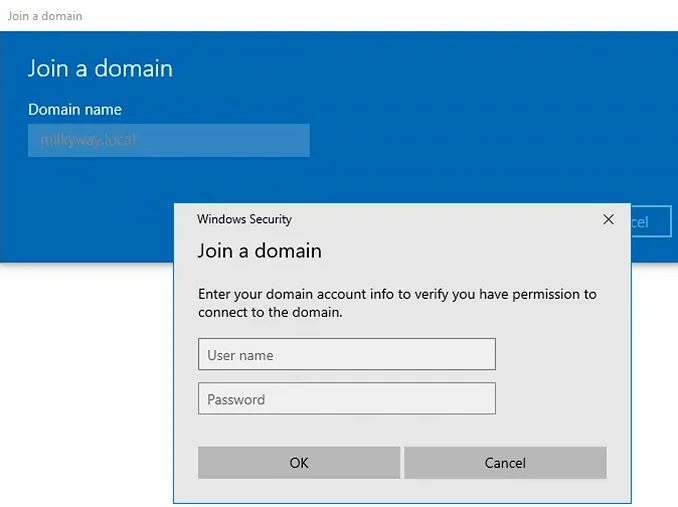
-
If you do not get an error, your workstation is now joined with the domain. On the next screen, provide a user account for this PC and then click
Next.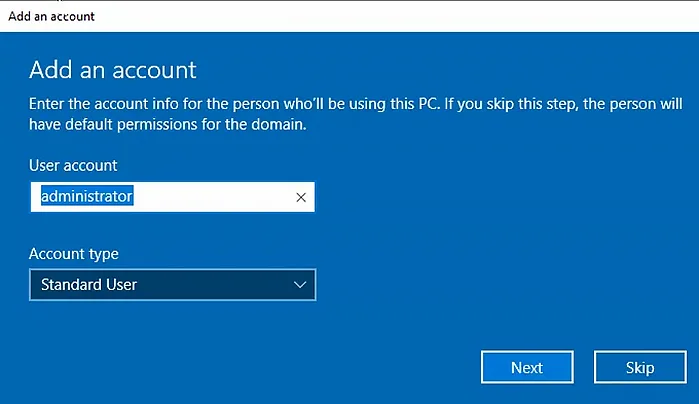
-
Click
Restartso your changes will take effect.
Check whether a Firewall is blocking port 53 on the DC
Check whether the DNS service on the DC is being blocked by a firewall. To see whether port 53 is available on the DC, use this cmdlet:
test-netconnection 172.168.5.160 -port 53Check the value of “TcpTestSucceeded”. A value of “True” as shown below indicates that the DNS service on the DC is operational.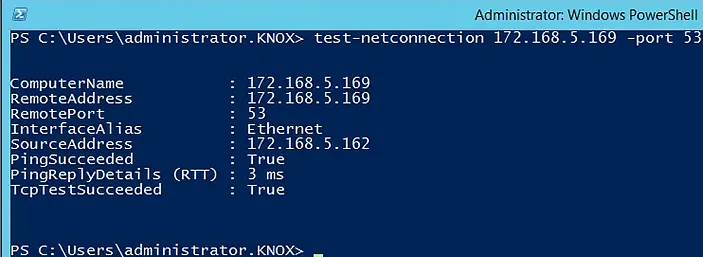
Check whether your Computer can resolve the Domain Name of the DC
Next, check whether the workstation can accurately resolve the domain name to the DC’s IP address. Use the fully qualified domain name of the domain to which you are trying to join your workstation with the Resolve-DNSName cmdlet, as shown here:
Resolve-DNSName fabrikam.local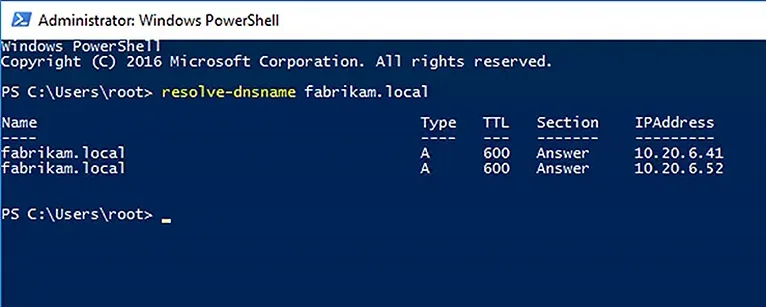
This command should return one or more DNS server records.
Check whether the Workstation can Contact the DNS server that hosts the DNS zone
Next, check whether:
- The computer can communicate with the DNS server that hosts the DNS zone or resolves DNS names for the domain.
- The DNS server for the client is configured correctly and that it is connected to it.
- You can find a domain and connect to the DC from your computer.
To get the domain and DC information, along with the IP address, use the following cmdlet:
nltest /dsgetdc:fabrikam.local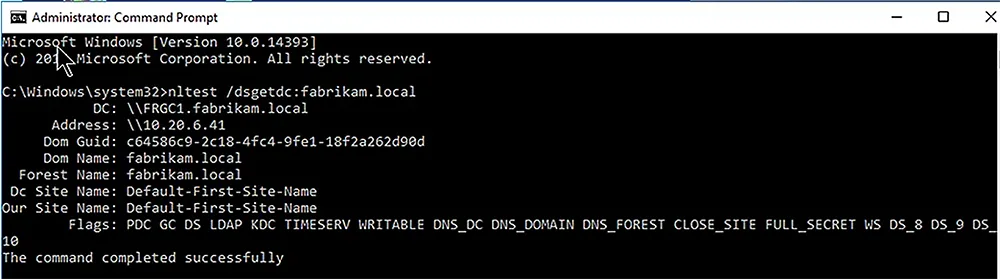
If the command completes successfully, it will return information like the following:
DC: \\FRGC1.fabrikam.local
Address: \\10.20.6.41
Dom Guid: c64586c9-2c18-4fc4-9fe1-18f2a262d90d
Dom Name: fabrikam.local
Forest Name: fabrikam.local
Dc Site Name: Default-First-Site-Name
Our Site Name: Default-First-Site-Name
Flags: PDC GC DS LDAP KDC TIMESERV WRITABLE DNS_DC DNS_DOMAIN DNS_FOREST CLOSE_SITE FULL_SECRET WS DS_8 DS_9 DS_10
The command completed successfully
Restart the Netlogon Service on the Domain Controller
Restart the Netlogon service on the DC using this command:
net stop netlogon && net start netlogon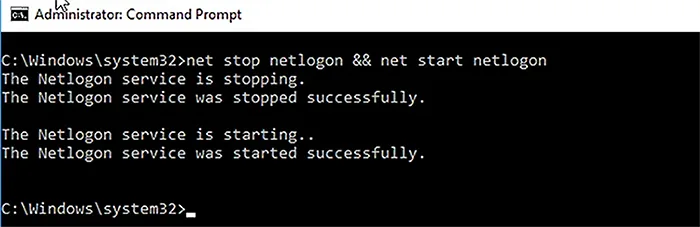
Alternatively, simply reboot the DC.
When the server restarts, it will try to register the necessary SRV records on the DNS server.
Re-register the DC’s DNS records
Re-register the DC’s DNS records by running this command:
ipconfig /registerdns
Wait for the records to arrive in DNS and for them to propagate across the domain.
Change IP Address on Domain Controller
In this post, I will demonstrate how to change the IP address on a domain controller.
Before you change the IP address it is very important to run through a checklist. Any changes to a domain controller can disrupt services and impact business operations. See my checklist below.
For this demonstration, I have the following settings.
- DC1, IP Address 192.168.100.10
- DC2, IP Address 192.168.100.11
- DC3, IP Address 192.168.100.12
I’m going to change the IP on DC2 to 192.168.100.15. If you are changing to a different subnet there are additional things to consider that I go over in the checklist.
Pre-Change Checklist
I recommend reviewing each item on this checklist before making changes. I’ve migrated many domain controllers from small to large networks and these steps have been a lifesaver. If you do this often you will probably come up with your own checklist.
Do You Have Multiple Domain Controllers?
It is best practice to have multiple domain controllers and backup Active Directory for disaster recovery reasons. I do not recommend making major changes to domain controllers if you have a single domain controller. If you have multiple DCs and the change breaks the server you can still operate from a secondary DC.
You can get a list of all domain controllers in your domain with this command:
Get-ADDomainController -filter * | select hostname, domain, forestCheck FSMO Roles
Does the DC hold any FSMO roles? Easily check with this command:
netdom query fsmoBelow you can see all my FSMO roles are on DC1.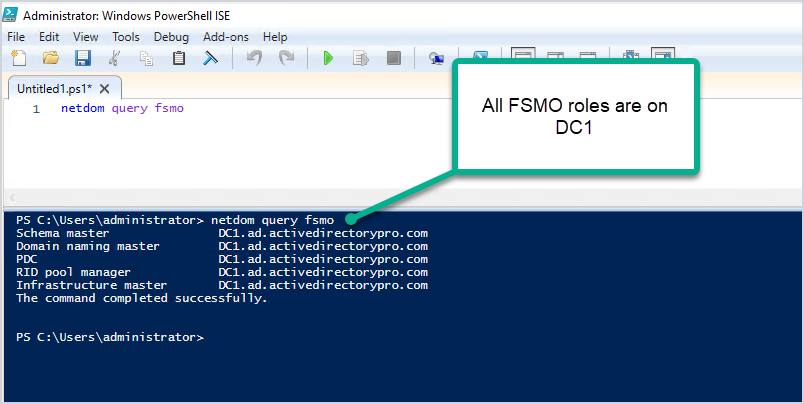
To help avoid disruption to authentication services you could move the FSMO roles to another domain controller that is on the same site. Keep in mind you would need to move any services that are manually configured to the server.
I’m making changes to DC2 which has no FSMO roles running on it.
Check Installed Roles and Features
I recommend checking what services are running on the server, you don’t want to change the IP and then have something break because you didn’t know it was a DHCP server or a web server.
- Check the control panel for installed software
- Check the installed roles and features
You can quickly check the installed roles and features with this command:
Get-WindowsFeature | Where-Object {$_. installstate -eq "installed"}Below you can see my DC2 server has some critical services running on it including DHCP and DNS. I’ll need to consider this when changing IP addresses.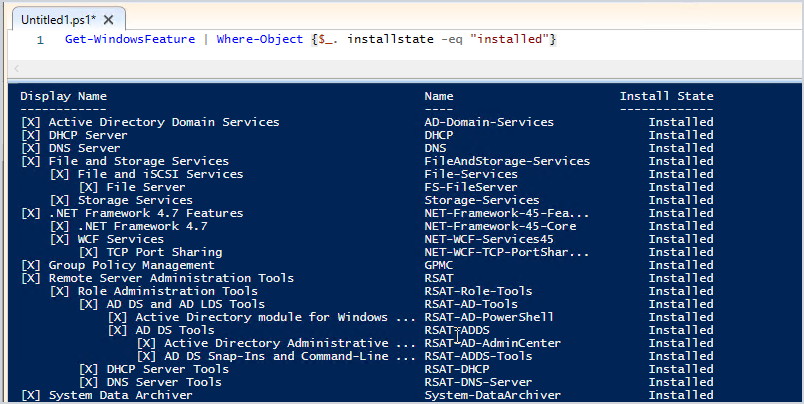
Find Devices Pointing to the Domain Controller with Wireshark
Wireshark can help you identify what systems are pointing to your domain controller for various services like DNS, DHCP, and so on. This might be the most important pre-change step.
Useful Wireshark filters:
- dns
- dhcp
- ldap
- DCERPC
Here is an example: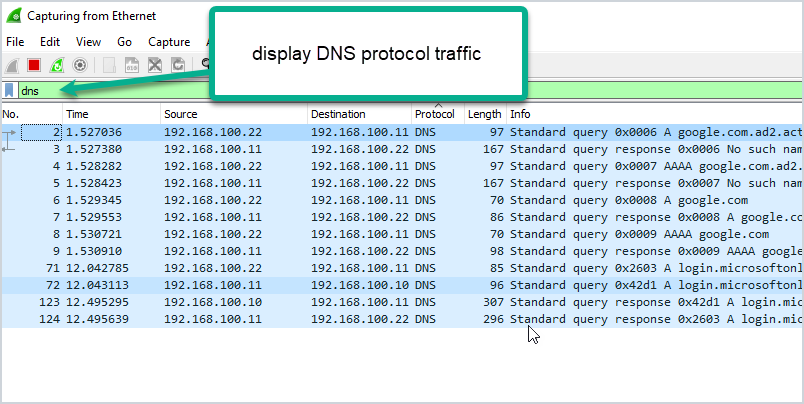
The packet capture shows that system 192.168.100.22 is using DC2 for DNS. I’ve done a large migration of domain controllers before and used Wireshark to help identify systems that are still pointing to old domain controllers. From experience, you will probably be surprised at how many systems are hardcoded to your DCS.
Check Domain Controller Health
You need to check that your domain controller is healthy before making the change. Any issues could result in replication issues, DNS issues, and so on. I’ve got a complete guide on how to use dcdiag its actually very easy to use. Just open the command prompt on your server and run the command.
dcdiagCheck The Health of DNS
By default, dcdiag does not test DNS. Use this command to run a complete test on DNS.
dcdiag /test:dns /vMake sure the server passes all tests and the name resolution SRV record is registered.
Run Best Practice Analyzer
The best practice analyzer can find configuration issues according to Microsoft best practices. The BPA tool is not always accurate so you need to double check its findings. Also, any errors or warnings do not mean your migration will fail. It can just help you find any major misconfigurations according to Microsoft best practices.
Here is a scan from my DC2.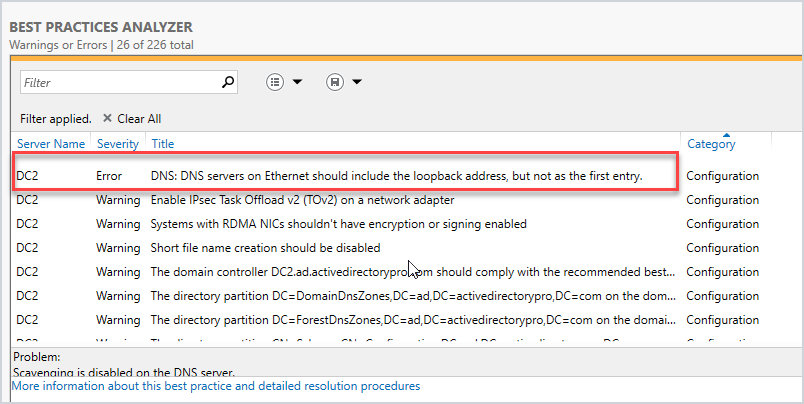
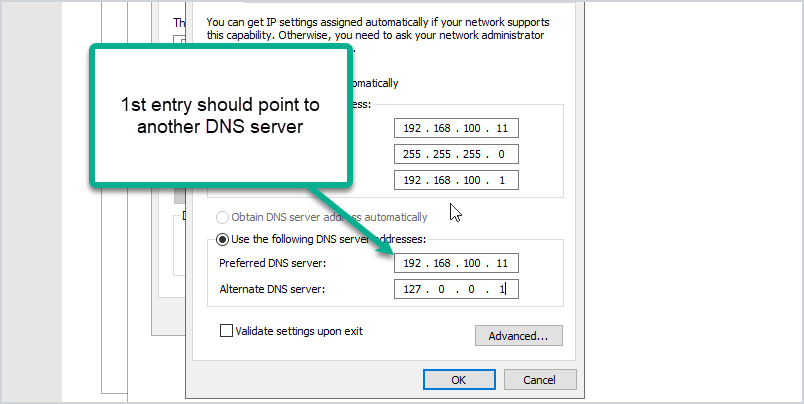
I’ve got a warning that the loopback address is not included on the ethernet adapter settings. The best practice is to point the preferred DNS server to another DNS server (not itself).
Here is an example of how it should be configured: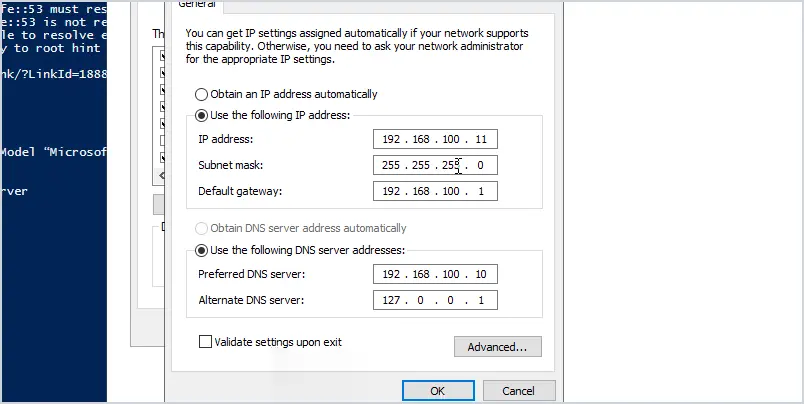
My DC2 IP address is 192.168.100.11. You can see I set the preferred DNS to another domain controller (DC1) and the alternate is set to the loopback address. This is Microsoft’s best practice.
Again any warnings or errors the best practice analyzer finds doesn’t mean your migration will fail. But to help avoid any potential migration issues I recommend running this tool and reviewing the scan results. It might even fix some issues you weren’t aware of.
Are You Changing Subnets?
If you will be changing to a new subnet then consider the following:
- If the server also runs DHCP you will need to update the helper address on your switch or firewall.
- Add the new subnet to Active Directory sites and services.
Check Firewall Rules
Are there any firewall rules that will need to be updated? This could be your network firewall and windows based firewalls. I typically have rules on the network firewall that limit network access for critical servers like domain controllers. I would need to update the firewall rules to permit traffic to the new DC IP.
Plan & Schedule the IP Change
I recommend making this type of change during your maintenance window. No matter how much you prepare for changes there is always a potential for something going wrong. You need to have a maintenance window to allow time to resolve any issues. Don’t forget to communicate these changes with your team ahead of time.
How to Change the IP Address of a Domain Controller:
Here are the steps to changing the IP Address on a domain controller.
- Log on locally to the server (console access, don’t RDP or use remote access).
- Change NIC TCP/IP settings
- Change IP Address
- Change subnet mask (if required)
- Change Default gateway (if required)
- Preferred DNS server (should point to another DC in the same site)
- Alternate DNS server (should be the loopback address 127.0.0.1)
- After changing the IP run
ipconfig /flushdnsto remove local cache - Run
ipconfig /registerdnsto ensure the new IP is registered by the DNS server - Run
dcdiag /fixto ensure service records are registered.
Video Tutorial

Done. Nice work!
Post Change Checklist:
- Update DHCP settings if DC server is also DNS server
- If subnet address changed then make sure AD Sites and services is updated
- Update clients that use static ip address
- Update other DCs nic settings (if needed)
- Run commands
dcdiaganddcdiag /test:dns /vto check for issues. - Verify DNS is working, you can do this with nslookup.
- Test authenticating to the DC. You can do this by manually settings a client IP DNS settings to the IP of the DC or using PowerShell and specify the authentication server.
- Continue to monitor old IP with wireshark – This can be done by a span port or assign the DCs old IP to a computer with wireshark installed. This is useful to help find systems that are still using the old IP of the DC.
- Update firewall rules if needed.
- If a client system is having issues try to flush the local dns cache with
ipconfig /flushdnscommand - Changing the IP address on the DC should not effect any shares on the server as long as DNS is updated.
Summary
In this post, I showed you how to change the IP address on a domain controller. I also showed you a checklist I go through before changing the IP address. Authentication, DNS, and DHCP services are critical so it’s very important to plan and review as much as you can before making changes to these critical services. Also, all organizations and networks are different so over time you may have a different checklist than mine.
Changing default OU for new USERS and COMPUTERS
By default, users are created in “Users”, and Computers in “Computers” OU, but these are the default folders, and one may want to defferentiate between them, in ex. when using Azure AD Hybrid and Autopilot or Intune, when new computers are domain joined, you want them to go to specific sync’ed OU’s instead:
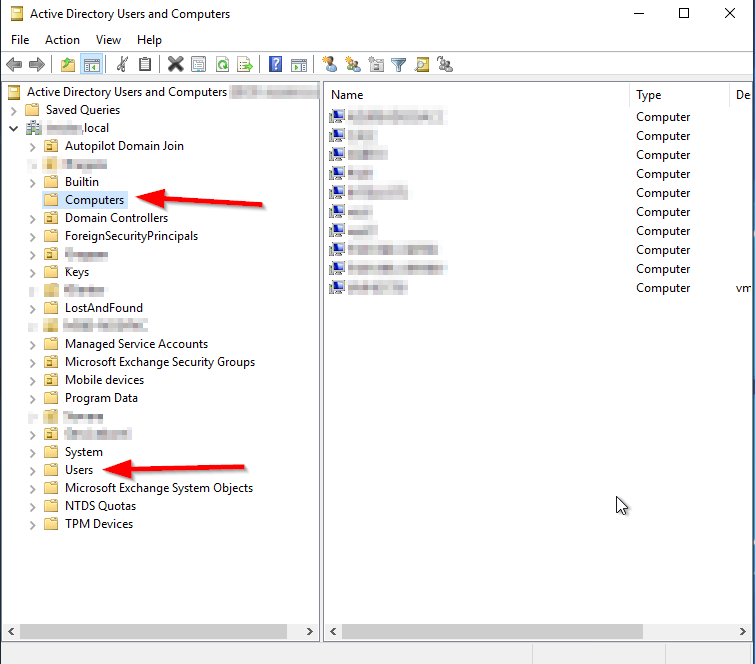
To see the default OU’s, that are in use today, type this into Powershell:
Computers:
Get-ADDomain | select computerscont*
Users:
Get-ADDomain | select userscont*
How to change:
Computers:
redircmp “OU=Autopilot Domain Join,DC=domain,DC=local”Users:
redirusr “OU=Users,OU=Microsoft365,DC=domain,DC=local”That’s it! – Effective immediately 🙂
How to Perform Authoritative Sync of SYSVOL Data Using Distributed File System Replication (DFS)
Instructions
Important: This article is only applicable if SYSVOL data is being replicated using Distributed File System Replication (DFSR). This has been the preferred method of replicating SYSVOL data since Windows Server 2008. It is possible, however, that the older method, File Replication Service (FRS), is still in use if the domain has existed for a long time. To determine whether DFSR is in use, run dfsrmig /getmigrationstate from an elevated command prompt on a domain controller (DC). If the migration state is "Eliminated," DFSR is in use.
The SYSVOL folder hierarchy, present on all Active Directory DCs, is used to store two important sets of data:
- Group Policy template files: These are stored in separate folders beneath
\\SYSVOL\<domain>\Policies. - Log on, log off, startup, and shutdown scripts used by machines in the domain: These are stored in
\\SYSVOL\<domain>\scripts. The scripts folder is itself shared as NETLOGON.
This data is replicated among DCs, but SYSVOL replication takes place separately from Active Directory replication. It is possible for one to fail while the other is fully functional. In some situations, SYSVOL replication may fail and be unable to resume without manual intervention. The following steps perform an authoritative sync of SYSVOL. In an authoritative sync, DFSR initializes SYSVOL using the DC's own copy of the SYSVOL data. This becomes the source copy of SYSVOL for the domain. An authoritative sync is necessary if the DC with the most up-to-date copy of the SYSVOL data is the DC on which DFSR has stopped working. This is implicitly true if there is only one DC in the domain.
Instructions for performing a non-authoritative sync of SYSVOL data using DFSR can be found in How to Perform a Non-Authoritative Sync of SYSVOL Data Using Distributed File System Replication (DFSR).
To perform an authoritative sync of SYSVOL data using DFSR, follow these steps:
- On the authoritative DC, launch the ADSI Edit console (
adsiedit.msc). - If the Default naming context is already listed in the left pane, go to the next step. Otherwise, perform the following steps to connect to the default naming context:
- Right-click the ADSI Edit header in the left pane and select Connect to….
- Select the radio button labeled Select a well known Naming Context and select Default naming context from the dropdown list.
- Click OK. The default naming context should now appear in the left pane of the console.
- Under the default naming context, browse to DC=domain > OU=Domain Controllers > CN=servername > CN=DFSR-LocalSettings > CN=Domain System Volume. In this step, servername represents the name of the DC that has been chosen as authoritative.
- Right-click CN=SYSVOL Subscription and select Properties.
- Double-click the msDFSR-Enabled attribute and set its value to FALSE.
- Double-click the msDFSR-Options attribute and set its value to 1.
- Click OK to close the properties window.
- Repeat steps 3-5, but not step 6, replacing servername with the name of every other DC in the domain. In other words, browse to the CN=SYSVOL Subscription object of each of the other DCs and set its msDFSR-Enabled attribute to FALSE. Do not change the value of the msDFSR-Options attribute.
- Force Active Directory replication throughout the domain. This may take some time, depending on the size and replication topology of the domain.
- On every DC in the domain, run
dfsrdiag polladfrom an elevated command prompt. - On the authoritative DC, launch Event Viewer and confirm that the DFS Replication event log contains event 4114. This event indicates that SYSVOL is no longer being replicated. (This event is present on all DCs, but checking all of them is not necessary.)
- In ADSI Edit, browse to the location in step 3 and set the msDFSR-Enabled attribute to TRUE.
- On the authoritative DC, run
dfsrdiag polladfrom an elevated command prompt. - Check the DFS Replication event log from the authoritative DC for event 4602. This event confirms that an authoritative sync of SYSVOL has occurred on this DC.
- Repeat step 8, but set each DC's msDFSR-Enabled attribute to TRUE this time. As before, do not change the value of the msDFSR-Options attribute.
- Force Active Directory replication throughout the domain.
- On every DC except the authoritative DC, run
dfsrdiag polladone last time. - On at least one of the non-authoritative DCs, confirm that events 4614 and 4604 appear in the DFS Replication event log. These events indicate that those DCs have performed a non-authoritative sync of SYSVOL.
The steps above ensure that a non-authoritative sync of SYSVOL is performed on all other DCs after the authoritative sync is performed on the authoritative DC. This avoids possible conflicts arising in the SYSVOL data.
Additional Information
If the dfsrdiag pollad command is not recognized, you have two options:
- Restart the DFS Replication service instead of running the command. If other (non-SYSVOL) data are replicated by DFSR, this may cause brief interruptions.
- Install the DFS Management tools by selecting Add Roles and Features from the Manage menu of Server Manager. The DFS Management tools are found at the location shown below.

How to Seize FSMO Roles in Active Directory
How can I forcibly seize FSMO Roles from one domain controller (DC) to another? Windows Server Active Directory domains utilize a Single Operation Master method called FSMO (Flexible Single Master Operation).
The five FSMO roles are:
- Schema master – Forest-wide and one per forest.
- Domain naming master – Forest-wide and one per forest.
- RID master – Domain-specific and one for each domain.
- PDC – PDC Emulator is domain-specific and one for each domain.
- Infrastructure master – Domain-specific and one for each domain.
Seize FSMO roles using PowerShell
You can seize FSMO roles using the PowerShell Move-ADDirectoryServerOperationMasterRole cmdlet. The syntax for the command is as follows:
Move-ADDirectoryServerOperationMasterRole -Identity -OperationMasterRole -Server -Force-Identity sets the domain controller (DC) you want to assign the role(s) to
-OperationMasterRole specifies the role(s) you want to seize. You can specify the roles by name or number
-Force seizes the roles rather than transfer them
Warning: Seizing a role should be done only as a last resort. In the event of a seizure, you cannot ever bring the DC that previously held the role back online.
Seize the PDC Emulator role
Move-ADDirectoryServerOperationMasterRole -Identity "DC3" -OperationMasterRole PDCEmulator -ForceSeize RID Master
Move-ADDirectoryServerOperationMasterRole -Identity "DC3" -OperationMasterRole RIDMaster - ForceSeize Infrastructure Master
Move-ADDirectoryServerOperationMasterRole -Identity "DC3" -OperationMasterRole InfrastructureMaster -ForceSeize Schema Master
Move-ADDirectoryServerOperationMasterRole -Identity "DC3" -OperationMasterRole SchemaMaster -ForceSeize Domain Naming Master
Move-ADDirectoryServerOperationMasterRole -Identity "DC3" -OperationMasterRole DomainNamingMaster -ForceYou can check FSMO roles, and which DCs hold each role, using the GUI and command line.
Seize FSMO roles using NTDSUtil
To seize the FSMO roles by using Ntdsutil, follow these steps:
Caution: Using the Ntdsutil utility incorrectly may result in partial or complete loss of Active Directory functionality.
- On any domain controller, click Start, click Run, type Ntdsutil in the Open box, and then click OK.
C:WINDOWS>ntdsutil
ntdsutil:- Type roles, and then press ENTER.
ntdsutil: roles
fsmo maintenance:Note: To see a list of available commands at any of the prompts in the Ntdsutil tool, type ?, and then press ENTER.
- Type connections, and then press ENTER.
fsmo maintenance: connections
server connections:- Type connect to server <servername>, where <servername> is the name of the server you want to use, and then press ENTER.
server connections: connect to server server100
Binding to server100 …
Connected to server100 using credentials of locally logged on user.
server connections:- At the server connections: prompt, type q, and then press ENTER again.
server connections: q
fsmo maintenance:- Type seize <role>, where <role> is the role you want to seize. For example, to seize the RID Master role, you would type seize rid master:
Options are:
Seize naming master
Seize infrastructure master
Seize PDC
Seize RID master
Seize schema master- You will receive a warning window asking if you want to perform the seize. Click on Yes.
fsmo maintenance: Seize infrastructure master
Attempting safe transfer of infrastructure FSMO before seizure.
ldap_modify_sW error 0x34(52 (Unavailable).
Ldap extended error message is 000020AF: SvcErr: DSID-03210300, problem 5002 (UNAVAILABLE)
, data 1722
Win32 error returned is 0x20af(The requested FSMO operation failed. The current FSMO holde
r could not be contacted.)
)
Depending on the error code this may indicate a connection,
ldap, or role transfer error.
Transfer of infrastructure FSMO failed, proceeding with seizure …
Server "server100" knows about 5 roles
Schema - CN=NTDS Settings,CN=SERVER200,CN=Servers,CN=Default-First-Site-Name,CN=Sites,CN=Configuration,DC=dpetri,DC=net
Domain - CN=NTDS Settings,CN=SERVER100,CN=Servers,CN=Default-First-Site-Name,CN=Sites,CN=Configuration,DC=dpetri,DC=net
PDC - CN=NTDS Settings,CN=SERVER100,CN=Servers,CN=Default-First-Site-Name,CN=Sites,CN=Configuration,DC=dpetri,DC=net
RID - CN=NTDS Settings,CN=SERVER200,CN=Servers,CN=Default-First-Site-Name,CN=Sites,CN=Configuration,DC=dpetri,DC=net
Infrastructure - CN=NTDS Settings,CN=SERVER100,CN=Servers,CN=Default-First-Site-Name,CN=Sites,CN=Configuration,DC=dpetri,DC=net
fsmo maintenance:
Note: All five roles need to be in the forest. If the first domain controller is out of the forest then seize all roles. Determine which roles are to be on which remaining domain controllers so that all five roles are not on only one server.
- Repeat steps 6 and 7 until youve seized all the required FSMO roles.
- After you seize or transfer the roles, type q, and then press ENTER until you quit the Ntdsutil tool.
Note: Do not put the Infrastructure Master (IM) role on the same domain controller as the Global Catalog server. If the Infrastructure Master runs on a GC server it will stop updating object information because it does not contain any references to objects that it does not hold. This is because a GC server holds a partial replica of every object in the forest.
Where should I put the seized FSMO roles?
In most cases, an administrator can keep the FSMO role holders (all 5 of them) in the same spot (or actually, on the same DC) as has been configured by the Active Directory installation process. However, there are scenarios where an administrator would want to move one or more of the FSMO roles from the default holder DC to a different DC.
Moving the FSMO roles while both the original FSMO role holder and the future FSMO role holder are online and operational is called Transferring, and is described in the Transferring FSMO Roles article.
However, when the original FSMO role holder went offline or became non operational for a long period of time, the administrator might consider moving the FSMO role from the original, non-operational holder, to a different DC. The process of moving the FSMO role from a non-operational role holder to a different DC is called Seizing, and is described in this article.
If a DC holding a FSMO role fails, the best thing to do is to try and get the server online again. Since none of the FSMO roles are immediately critical (well, almost none, the loss of the PDC Emulator FSMO role might become a problem unless you fix it in a reasonable amount of time), so it is not a problem to them to be unavailable for hours or even days.
If a DC becomes unreliable, try to get it back on line, and transfer the FSMO roles to a reliable computer. Administrators should use extreme caution in seizing FSMO roles. This operation, in most cases, should be performed only if the original FSMO role owner will not be brought back into the environment. Only seize a FSMO role if absolutely necessary when the original role holder is not connected to the network.
What will happen if you do not perform the seize in time? This table has the info:
| FSMO Role | Loss implications |
| Schema | The schema cannot be extended. However, in the short term no one will notice a missing Schema Master unless you plan a schema upgrade during that time. |
| Domain Naming | Unless you are going to run DCPROMO, then you will not miss this FSMO role. |
| RID | Chances are good that the existing DCs will have enough unused RIDs to last some time, unless youre building hundreds of users or computer object per week. |
| PDC Emulator | Will be missed soon. NT 4.0 BDCs will not be able to replicate, there will be no time synchronization in the domain, you will probably not be able to change or troubleshoot group policies and password changes will become a problem. |
| Infrastructure | Group memberships may be incomplete. If you only have one domain, then there will be no impact. |
Important: If the RID, Schema, or Domain Naming FSMOs are seized, then the original domain controller must not be activated in the forest again. It is necessary to reinstall Windows if these servers are to be used again.
The following table summarizes the FSMO seizing restrictions:
| FSMO Role | Restrictions |
| Schema | Original must be reinstalled |
| Domain Naming | |
| RID | |
| PDC Emulator | Can transfer back to original |
| Infrastructure |
Another consideration before performing the seize operation is the administrators group membership, as this table lists:
| FSMO Role | Administrator must be a member of |
| Schema | Schema Admins |
| Domain Naming | Enterprise Admins |
| RID | Domain Admins |
| PDC Emulator | |
| Infrastructure |
proxyAddress Attribute doesn't copy when using Active Directory Migration Tool (ADMT)
By default, ADMT excludes these attributes from the migration, meaning you're going to be left with users that don't have this information. This will cause lots of issues if you're needing to use O365.
- Create a new VBS script by coping the following info a Notepad document, then saving as
DisplayExclusionList.vbs. Ensure this is saved inC:\Temp
Set o = CreateObject("ADMT.Migration")
WScript.Echo o.SystemPropertiesToExclude- Open an Administrative Command Prompt, navigate to
C:\Windows\SysWow64, then run the the following command and the results should look similar to below the command.
cscript.exe C:\Temp\DisplayExclusionList.vbs
- Once you have done this, you will see the list of all the items that are in the exclusions list. From here you can create a similar script which will amend that list and remove mail and proxyAddress
Set o = CreateObject("ADMT.Migration")

o.SystemPropertiesToExclude = "msDS-PSOApplied,msDS-HostServiceAccount,attributeCertificateAttribute,audio,carLicense,departmentNumber,employeeNumber,employeeType,gecos,gidNumber,homePostalAddress,houseIdentifier,ipHostNumber,jpegPhoto,labeledURI,loginShell,memberUid,msDFSR-ComputerReferenceBL,msDFSR-MemberReferenceBL,msDS-ObjectReferenceBL,msDS-SourceObjectDN,msExchAssistantName,msExchHouseIdentifier,msExchLabeledURI,msRADIUS-FramedIpv6Route,msRADIUS-SavedFramedIpv6Route,msSFU30Aliases,msSFU30Name,msSFU30NisDomain,msSFU30PosixMember,msSFU30PosixMemberOf,networkAddress,nisMapName,otherMailbox,photo,preferredLanguage,registeredAddress,roomNumber,secretary,shadowExpire,shadowFlag,shadowInactive,shadowLastChange,shadowMax,shadowMin,shadowWarning,textEncodedORAddress,uid,uidNumber,unixHomeDirectory,unixUserPassword,userPKCS12,userSMIMECertificate,x500uniqueIdentifier"
Whilst this might look like a really long command, all I did was copy the output from the DisplayExclusionsList.vbs file, then input it at the end of the script, and removed the proxyAddress and mail entries. After running the migration again, the attributes moved through very nicely and saved me a lot of time!!
Using The Active Directory Migration Tool: A Comprehensive Guide
By Lavanya Rathnam / April 27, 2018
Migration has become an integral part of IT operations today. As an admin, you may have to move resources from one project to another, migrate objects as a part of a corporate strategy, and more. All this means you’re constantly doing migrations in one form or another. The good news though is migration is easy when you use Microsoft’s Active Directory because of a tool called Active Directory Migration Tool, or ADMT in short. This tool comes with a ton of options and wizards to help you migrate across domains and forests within just a few minutes.
What is the Active Directory Migration Tool?
The Active Directory Migration Tool helps to migrate objects and restructure tasks in an Active Directory environment. It is used for migrating between domains in the same forest (intraforest) or across different forests (interforest).
Prerequisites for installing Active Directory Migration Tool
To install the Active Directory Migration Tool, you need the following system requirements:
- Windows Server 2008, Windows Server 2008 R2, Windows Server 2012, Windows Server 2012 R2, and Windows 2016
- Active Directory Migration Tool doesn’t work when computers are a read-only domain controller or when they are a part of a server core configuration.
- The source and the target domain should run only on one of the supported operating systems.
- You need a SQL server database instance for ADMT to store data. You can either install it on your own machine or create an instance from an existing database in your network.
How to install Active Directory Migration Tool
Installing ADMT is a fairly easy process. Here is a step-by-step guide to installing it.
- Remove all previous versions of ADMT.
- Download the Active Directory migration tool from Microsoft’s site. Navigate to the downloaded folder and double-click on admtsetup32.exe.
- Read through the instructions and click “next” when you’re done.
- Accept the license terms and conditions.
- In the next step, you have the option to be a part of Microsoft’s “customer experience improvement program.” Select the “join” radio button if you want to send your hardware configuration information to improve ADMT. Else, select the “I do not want to join” radio button and click “next.”
- In the following screen, provide the database instance. If you’re using a local server, specify it in the format “..”. For example, you can input “..SQLSERVER”. On the other hand, if you’re using an instance of your network database, use the format “.”
- When you click “next,” the wizard will take a few minutes to configure your components and install them.
- Once the installation is done, note the log path and installation directories. Finally, click “finish.”
With this, your ADMT installation is complete and you’re all set to use it.
How to use Active Directory Migration Tool
You can migrate users, groups, computers, managed server accounts, and all other objects on AD FS using the ADMT console, command line, or VBScript.
Let’s see some of the basic migration examples using the ADMT console.
Intraforest migration using Active Directory Migration Tool
Create a checklist
Before starting the migration process, here’s a list of things to do.
- As a first step, understand the structure of your forest. Check out your root domain, child domain, and tree domain, and see how they’re structured. Since they’re all part of the same forest, they’ll most likely have a two-way trust by default.
- Determine which objects you want to move, the source of these objects, and the destination where you want to move them.
- Consider creating a table to document the domain objects you plan to move. Include the source, destination, and even a status column for your reference.
- ADMT doesn’t come with any built-in test options. So develop a test plan and make sure you test each object during and after the migration process.
- Check the membership and credentials of each object before you migrate
- ADMT migration is not reversible. The only way to move objects from the destination back to the source is to do another migration process. This can be cumbersome and long, so have a rollback plan in place.
- Inform all users who will be affected by this migration. Follow your organization’s protocol and send clear communication ahead of time.
Once you’ve taken care of these premigration tasks, start the migration process.
Migration for limited objects
If you want to migrate only a small number of objects, use the ADMT console to manually select the objects, and migrate them.
To do that…
-
Log in with your ADMT credentials on the target or parent domain, where ADMT is already installed.
-
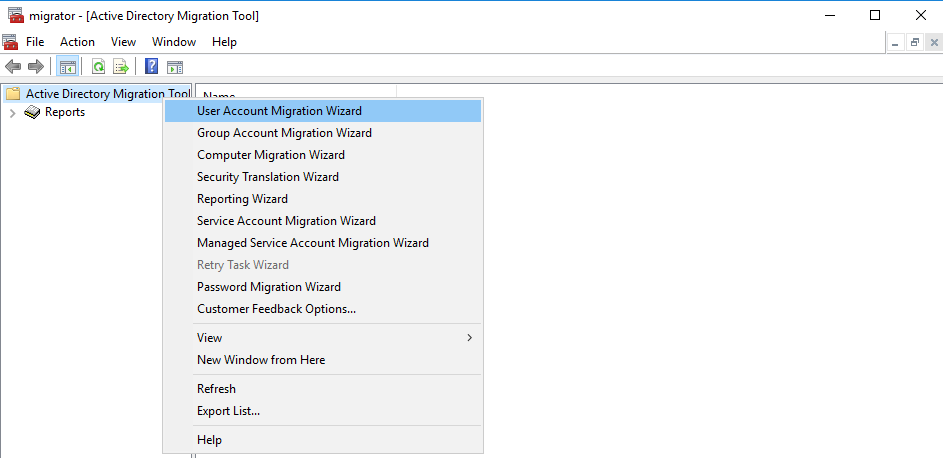
Navigate to the “Active Directory Migration Tool” folder, right-click on it, and select “user account migration wizard.”
-
When the wizard opens, click the “next” button.
-
In the next screen, give the NetBIOS or DNS name of the source and target domains, and click “next.”
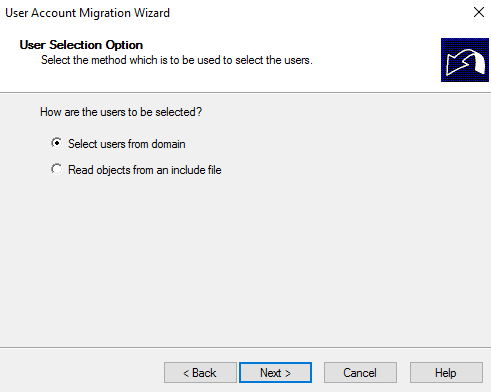
-
Then, choose the “select users from domain” radio button
-
In the next screen, click the “add” button. This will open a dialog box where you can browse through user accounts and select the users you want to migrate.
-
Once you’re done, click the “OK” button and the dialog box will close. Check if the main window has all the user accounts you selected. Click “next.”
-
Select the target organizational unit for the selected users and click “next.”
-
In this screen, check “translate roaming profiles” and “update user rights” checkboxes. You may get warnings here. Simply ignore them and click “next.”
-
The next screen is conflict management settings. It’s best to select “do not migrate source object if a conflict is detected in the domain” as it makes conflict resolution easy for you. Click “next.”
-
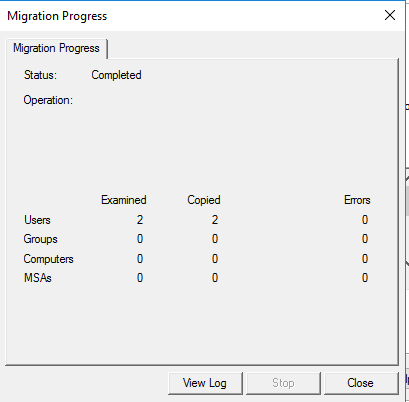
This is the last screen, so check the details and click “finish.” Wait for the wizard to complete the migration. You’ll get a prompt in case of errors; otherwise you’ll see a summary of the migration process.
Open the target domain and verify if the users are migrated.
Migration for a large number of objects
While it was easy to migrate a few objects manually, it can get cumbersome to select hundreds of objects. So, to migrate more than a handful of objects, it’s best to include them in a file and upload the same to the wizard.
The first few steps are similar to the above-mentioned migration process. However, instead of choosing the “select users from domain” radio button, choose “read objects from an include file.” Browse, add the include file, and continue with the wizard. The process is similar to migrating individual user accounts. Once you’re done with the wizard, click “finish.”
Migration of groups
To migrate entire groups from source to destination, start with the “Active Directory Migration Tool” directory. Right-click and select “group account migration wizard.”
- In this wizard, give the NetBIOS or DNS name of the source and target domains.
- Next, choose “select groups from domain” option if you want to migrate only a few groups. In case of large groups, select “read objects from an include file.”
- For the first option, manually choose from the list of groups. In the case of the second option, upload the include file with the names of all the groups you want to migrate.
- Select the target organizational unit for the migrating groups.
- Do not make any selection in the “group options” screen. Simply click “next.”
- In the “conflict management” screen, choose “do not migrate source object if a conflict is detected in the target domain.”
- Finally, check your information, click “finish” and wait for the wizard to complete the migration. You’ll get a summary of the migration process.
Migration of workstations or member servers
If you want to migrate workstations or member servers, the process is fairly the same. The only change is choose “computer migration wizard” from the right-click menu instead of “group account migration wizard.” The wizard will be the same until you select the organizational unit for the migrating workstations or member states.
After that, follow these steps.
- You’ll get a “translate objects” screen, and here check “local groups” and “user rights.”
- In the next screen, choose “replace” radio button and click “next.”/li>
- Accept the default value of five minutes and click “next.”
- The next screen is “object property exclusion.” Make no changes here, and simply click “next.”/li>
- In the “conflict management” screen, choose “do not migrate source object if a conflict is detected in the target domain.”
- Finally, check your information, click “finish,” and wait for the wizard to complete the migration. You’ll get a summary of the migration process.
That’s how you migrate different objects within the same forest. Active Directory’s wizards take care of much of the work, so you can channel your time for the more difficult tasks.
In the next article, we’ll talk about how you can migrate objects across forests. In most cases, you’ll do this migration when one company has taken over another and the resources have to be moved to the new company. Obviously, that’s a much longer process, so see you in the next part.